As part of the process of exploring the Newspeak language here I'm going to focus on the Hopscotch UI framework. It will be used to present information from the Twitter REST API which is very easy to use.
The Hopscotch framework and IDE is described in the "Hopscotch: Towards User Interface Composition" paper by Vassili Bykov.
Code for this program was created using the Newspeak prototype from 2009-02-27.
The program
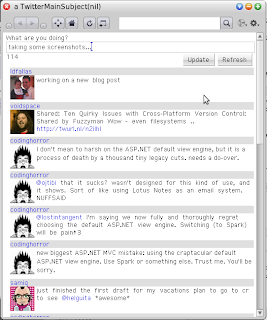
Here's a screenshot of the program:

The program is not a complete client, it just allows to post a new twit and to read the current time line of a the user.
The code from the previous post "Parsing JSON with Newspeak" is used to access the data provided by the Twitter services.
The code
The following screenshot shows the definition of the TwitterGUI class

The following nested classes provide the functionality for the client:
TwitterClient: A class for using the Twitter REST APITwitPresenter,TwitSubject: The UI piece and information for a single twitTwitterMainPresenter,TwitterMainSubject: The UI piece and information for a the complete client
As described in the Hopscotch paper a pair of elements is required to create a UI piece. A subject which contains the information being presented and the presenter which defines the UI that shows it.
In the case of a single twit the data is transmitted from the service as a JSON document.
The following code shows an example of the JSON response of a single twit from the Twitter REST API:
[{"in_reply_to_screen_name":null,
  "user":{
     "description":"Father, husband, friend, developer and late night programming language enthusiast.",
     "statuses_count":318,
     "utc_offset":-21600,
     "profile_background_tile":false,
     "profile_background_color":"6E8182",
     "following":null,
     "profile_text_color":"000000",
     "url":"http:\/\/langexplr.blogspot.com",
     "name":"Luis Diego Fallas",
     "protected":false,
     "profile_image_url":"http:\/\/s3.amazonaws.com\/twitter_production\/profile_images\/133285952\/ldnach_normal.png",
     "notifications":null,
     "profile_link_color":"0000ff",
     "profile_background_image_url":"http:\/\/static.twitter.com\/images\/themes\/theme1\/bg.gif",
     "created_at":"Mon Jul 28 13:51:55 +0000 2008",
     "screen_name":"ldfallas",
     "profile_sidebar_fill_color":"e0ff92",
     "followers_count":45,
     "time_zone":"Central America",
     "location":"Costa Rica",
     "id":15631932,
     "favourites_count":9,
     "friends_count":43,
     "profile_sidebar_border_color":"87bc44"},
  "text":"Experimenting with Hopscotch in Newspeak",
  "truncated":false,
  "in_reply_to_status_id":null,
  "created_at":"Tue Apr 07 14:21:57 +0000 2009",
  "in_reply_to_user_id":null,
  "id":1469769323,
  "favorited":false,
  "source":"web"}
...]
A
TwitSubject represents one of these pieces of information.
class TwitSubject withTwit: twit images: images= Subject (
"Describe the class in this comment."
|
   theTwit = twit.
   theImages = images.
|
)
(
createPresenter  = (
    ^TwitPresenter new subject: self.
)
)
The definition of the TwitPresenter looks like this:
class TwitPresenter = Presenter (
"Presenter for a single twit."
|
|
)
(
definition = (
   ^(padded:( column: {

        (row: { link: (subject theTwit user screen_name) action: [] . }) color: ( Color veryVeryLightGray).
         row: { image: (subject theImages at: (subject theTwit user profile_image_url)) .
         blank: 4.
         elastic: twitBody}.

   }) with: {3. 3. 2. 2.}) .
)
...
)
The following screenshot shows an example of the previous definition.

A special treatment need to be applied to the message since we want to be able to click on links or twitter user id's (not supported right now). The definition of
twitBody shows this.
twitBody = (
   |  text result |
   text: subject theTwit text.
   ((string: text contains: '@') or: [string: text contains: 'http'] )
   ifTrue: [ result:: flow: ((text subStrings: {Character space}) collect: [:t | componentFor: t])]
   ifFalse: [ result:: textDisplay: text ].
   ^result
)

componentFor: s = (
   |result|
   (s includesSubString: '@')
   ifTrue: [ result:: link: s action: [] ]
      ifFalse: [
        (string: s contains: 'http')
      ifTrue: [ result:: link: s action: [openLink: s] ]
      ifFalse:[ result:: label: s]
   ].
   ^result.
)

openLink:url  = (
   OSProcess command:  (browser , ' ' , url).
)
What these methods do is to break the string of the message into words separated by spaces. If a word is an URL or and '@' character a link is created if not a 'label' is created . For the future this code needs to be improved with a better technique to identify urls.
The following code shows the definition of TwitterMainSubject:
class TwitterMainSubject user: userName password: pswd  = Subject (
"Main subject."
|

   user = userName.
   password = pswd.
   data
   images = Dictionary new.
   twitterClient = TwitterClient user: userName password:pswd.

|
)
createPresenter ^  = (
   data:: twitterClient getFriendsTimeline.
   ^TwitterMainPresenter new subject: self
)

twits = (
   data:: twitterClient getFriendsTimeline.
   ^data collect: [:t | TwitSubject withTwit: t images: imagesDictionary].
)

updateStatus: statusText = (
   twitterClient updateStatus: statusText.
)
...
This class receives the used and password of the Twitter account. The TwitterClient class provides the access to the Twitter services.
Here's the definition of the TwitterMainPresenter class.
class TwitterMainPresenter = Presenter (
"Presenter for the main section of the GUI client."
|
   editor
   twitsHolder
   charCountHolder

|
)
(

definition ^ <Fragment> = (
   ^column: {
        row: { label: 'What are you doing?'.} .
        row: { elastic:twitEditor.} .
        row: { getCharCountHolder.
               filler.
               button: 'Update' action:[updateStatus: (editor editedText asString)].
               blank: 5.
               button: 'Refresh' action:[twitsHolder refresh].
               blank: 5.
             }.
        row: {
               blank: 5.
               elastic:: getTwitsHolder
             }}
))
The
getTwitsHolder method create an instance of an HolderComposer object that allows the content to be recalculated using the refresh method. Here's the definition:
getTwitsHolder = (
   twitsHolder:: holder: [ list:: subject twits collect: [ :i | i presenter  ] ].
   ^twitsHolder.
)
Notice also that here we are requesting the list of twits to the subject, which calls the web service again getting new content.
Final words
The experience of using the Newspeak and the Hopscotch framework to create this program was very nice.
One thing that I need to find out is how to prevent the application from blocking when requesting the data from the services.
Code for this post can be found here.