Thursday, March 31, 2011

A quick look at APL

In this post I'm going to show an implementation of polynomial multiplication written in APL and the steps to create it.

APL


APL is an array oriented programming language which means it's good for manipulating vectors, matrices and other kinds of arrays.

APL has many interesting characteristics among them is its syntax which uses non ASCII characters .

Here's a very nice video showing how to implement the Conway's Game Of Life in APL:


A very nice APL resource is the APL Wiki it has lots of information. Another very nice resource is The FinnAPL Idiom Library which contains lots little examples of code. Another nice resource is Vector the journal of the British APL Association which has information on the community around APL related languages.

The examples presented in this post were written using NARS2000 a nice open source implementation of APL.

Polynomial multiplication


As with a previous post on J I'm going to show the implementation of polynomial multiplication .

The following example shows the process of multiplying two polynomials:

(4x3 - 23x2 + x + 1) * (2x2 - x - 3)

= ((4x3 - 23x2 + x + 1) * 2x2) +
((4x3 - 23x2 + x + 1) * -x) +
((4x3 - 23x2 + x + 1) * -3)

= (8x5 - 46x4 + 2x3 + 2x2) +
(-4x4 + 23x3 - x2 - x) +
(-12x3 + 69x2 - 3x - 3)

= (8x5 - 50x4 + 13x3 + 70x2 - 4x - 3)

This example will be used to illustrate the parts of the code in the following sections.

The program


The final program to calculate polynomial multiplication looks like this:


Where a and b are the polynomials.

As with the previous post on J I'm sure there's a shorter way to write this program
(the number of parenthesis seems to indicate this!).

One key aspect to understand APL code is to remember that it evaluates expressions from right to left. See the Order of execution section of the APL Wiki for more information.

A description of each part of this program is presented in the following sections.

Polynomial representation


To represent polynomials we're going to use vectors the following way:

For:

(4x3 + 23x2 + x + 1)

the array will be:

1 1 23 4

In APL arrays are written as sequences of numbers separated by spaces (as above). You can manipulate this values easily, for example here we create two variables with two polynomials and add them:


In order to multiply each element of the array by a value we can simply write:


Outer product


The outer product operator lets you apply an operation to all the combinations of the elements of the operands. For example if we want to multiply each value of the two arrays representing the polynomials we want to multiply we can write:


Creating a matrix of intermediate polynomials


We need to obtain a matrix with the intermediate polynomials given the result of the outer product. But first I'm going to introduce the rho function. This function can be used to with one argument (monadic) to obtain the dimensions of the given array for example:


Or it can be used with two arguments (dyadic) to create an array of the given shape.


We can use this function combined with comma function to expand the matrix of polynomials:


The iota function lets you, among other things, create arrays of sequences of values. We're going to use it to create the values used to rotate each polynomial in our matrix:


The rotation of each matrix element is performed using the rotate function as follows:


The final step is to sum every vector in this matrix. We can do that by using the reduce operator (/) . This operator lets you apply a dyad operation to every element of an array accumulating the result. For example:


The nice thing about it is that if you apply it to a matrix, it will do the right thing by summing up every 1d vector. In our case we need to sum the rows so we change the axis of the operation.


Index origin


Before defining the final function we need to take an additional consideration. There is a system variable which modifies the origin of the iota function among other things. For example:


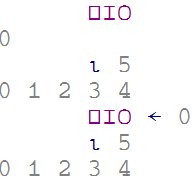
In other to make our code independent of the value of IO by using it instead of references to '1' as above.

Defining a function


The final function definition looks like this:


We can use this function as follows:


Wednesday, February 2, 2011

IronPython & WPF: Data binding with TreeView's selected element

In this post I'm going to show a small example of using data binding with the selected element of a WPF TreeView with an IronPython class.

A couple of days ago I had the necessity of using data binding to keep track of the selected value of a WPF TreeView . At first it seemed to be an easy task so I wrote:

<TreeView SelectedValue="{Binding selected, Mode=TwoWay}" ... />


Running this code results on the following error:

SystemError: 'Provide value on 'System.Windows.Data.Binding' threw an exception.' Line number '12' and line position '7'.


The problem is that the SelectedValue (and SelectedItem) property is read-only.

There are several ways to deal with this problem. One alternative is to use a technique similar to the one described in the "Forwarding the Result of WPF Validation in MVVM" post. We're going to define an attached property which works as an "output only" property that could be used with data binding.

Attached property definition


I couldn't find a way to wrote the definition of the attached property in IronPython because it needed to be instanciated by XamlReader. So the definition was written using C#:

using System.Windows.Markup;
using System.Windows;
using System.Windows.Controls;
using System.IO;
using System.Collections.ObjectModel;


namespace Langexplr
{
public static class TreeViewSelectedBehavior
{
public static readonly DependencyProperty MySelectedProperty =
System.Windows.DependencyProperty.RegisterAttached(
"MySelected",
typeof(object),
typeof(TreeViewSelectedBehavior)
);
public static object GetMySelected(TreeView t)
{
return t.GetValue(MySelectedProperty);
}

public static void SetMySelected(TreeView t, object theValue)
{
t.SetValue(MySelectedProperty, theValue);
}


public static readonly DependencyProperty SelectedHelperProperty =
System.Windows.DependencyProperty.RegisterAttached(
"SelectedHelper",
typeof(TreeViewSelectedHelper),
typeof(TreeViewSelectedBehavior),
new UIPropertyMetadata(null,OnSelectedHelperChanged)
);

public static TreeViewSelectedHelper GetSelectedHelper(TreeView t)
{
return (TreeViewSelectedHelper)t.GetValue(SelectedHelperProperty);
}

public static void SetSelectedHelper(TreeView t,
TreeViewSelectedHelper theValue)
{
t.SetValue(SelectedHelperProperty, theValue);
}
static void OnSelectedHelperChanged(
DependencyObject depObj,
DependencyPropertyChangedEventArgs e)
{
((TreeViewSelectedHelper)e.NewValue).Register((TreeView)depObj);
}

}


This class define two properties:
  • MySelected: the output property that is used to set the selected element in the view model
  • SelectedHelper: which is used to as an object that modifies the value of MySelected when the selected item changes(see below).


The following helper class is used to subscribe the SelectedItemChanged event and change "MySelected" .

public class TreeViewSelectedHelper 
{
public TreeViewSelectedHelper() { }
void SelectedItemChanged(object sender,
RoutedPropertyChangedEventArgs<object> args)
{
(sender as TreeView).SetValue(
TreeViewSelectedBehavior.MySelectedProperty,
((sender as TreeView)).SelectedItem);
}
public void Register(TreeView t)
{
t.SelectedItemChanged += SelectedItemChanged;
}
}

}


We can now compile this class:


set NETFX4=c:\WINDOWS\Microsoft.NET\Framework\v4.0.30319\
set WPFPATH=%NETFX4%\WPF
csc /debug /r:%NETFX4%System.Xaml.dll /r:%WPFPATH%\WindowsBase.dll /r:%WPFPATH%\PresentationCore.dll /r:%WPFPATH%\PresentationFramework.dll /target:library utils.cs


The example


Having defined this attached property and helper class we can now write the following example.

<Window xmlns="http://schemas.microsoft.com/winfx/2006/xaml/presentation"
xmlns:x="http://schemas.microsoft.com/winfx/2006/xaml"
xmlns:utils="clr-namespace:Langexplr;assembly=utils"
Title="TreeView selection test" Width="300" Height="300">
<Window.Resources>
<utils:TreeViewSelectedHelper x:Key="selHelper" />
</Window.Resources>

<StackPanel>

<TextBlock Text="{Binding selected.label}"/>
<TreeView ItemsSource="{Binding roots}"
utils:TreeViewSelectedBehavior.SelectedHelper="{StaticResource selHelper}">
<utils:TreeViewSelectedBehavior.MySelected>
<Binding Path="selected" Mode="OneWayToSource"/>
</utils:TreeViewSelectedBehavior.MySelected>

<TreeView.ItemTemplate>
<HierarchicalDataTemplate ItemsSource="{Binding children}">
<TextBlock Text="{Binding label}"/>
</HierarchicalDataTemplate>
</TreeView.ItemTemplate>
</TreeView>
</StackPanel>
</Window>


With this XAML definition we can write the following IronPython code:

import clr
clr.AddReference("PresentationCore")
clr.AddReference("PresentationFramework")
clr.AddReference("WindowsBase")
clr.AddReference('GalaSoft.MvvmLight.WPF4.dll')


from System.Windows.Markup import XamlReader
from System.Windows import Application
from System.IO import File
from System.Windows.Controls import TreeView
import System
import clrtype
from GalaSoft.MvvmLight import ViewModelBase
from System.Collections.ObjectModel import ObservableCollection


class TestModel(ViewModelBase):
__metaclass__ = clrtype.ClrClass
def __init__(self):
self.name = 'algo'
self.root = NodeModel('x1',[NodeModel('y2',[NodeModel('z2',[])]),
NodeModel('y3',[])])

self.sselected = NodeModel('',[])

@property
@clrtype.accepts()
@clrtype.returns(System.Object)
def selected(self):
result = self.sselected
return result

@selected.setter
@clrtype.accepts(System.Object)
@clrtype.returns()
def selected(self, value):
self.sselected = value
self.RaisePropertyChanged('selected')

@property
@clrtype.accepts()
@clrtype.returns(System.Object)
def roots(self):
return [self.root]

@property
@clrtype.accepts()
@clrtype.returns(System.String)
def label(self):
return self.name

@label.setter
@clrtype.accepts(System.String)
@clrtype.returns()
def label(self, value):
self.name = value
self.RaisePropertyChanged('label')


class NodeModel:
__metaclass__ = clrtype.ClrClass

def __init__(self,label, initchildren):
self.children_collection = ObservableCollection[System.Object](initchildren)
self.name = label


@property
@clrtype.accepts()
@clrtype.returns(System.Object)
def label(self):
return self.name

@property
@clrtype.accepts()
@clrtype.returns(System.Object)
def children(self):
return self.children_collection


xamlFile = File.OpenRead('test.xaml')
window = XamlReader.Load(xamlFile)
window.DataContext = TestModel()
xamlFile.Close()

Application().Run(window)


By running this example we can see how the label of the selected element of the TreeView is reflected in the TextBlock defined above.

Monday, January 31, 2011

IronPython & Silverlight Part VI: Using the TreeView control

In this post I'm going to show a small example of using the Silverlight 4 TreeView control with IronPython.

Referencing System.Windows.Controls.dll


Before we start using the TreeView control we need to add a reference to System.Windows.Controls.dll . This assembly can be found in the "Microsoft Silverlight 4 Tools for Visual Studio 2010" package.

You need to copy this assembly to the location of chiron.exe (ex. IronPython2.7\Silverlight\bin) and add a reference to it in the AppManifest.xaml file.

<Deployment xmlns="http://schemas.microsoft.com/client/2007/deployment" 
xmlns:x="http://schemas.microsoft.com/winfx/2006/xaml"
RuntimeVersion="4.0.50917.0"
EntryPointAssembly="Microsoft.Scripting.Silverlight"
EntryPointType="Microsoft.Scripting.Silverlight.DynamicApplication"
ExternalCallersFromCrossDomain="ScriptableOnly">
<!-- Add assembly references here -->
<Deployment.Parts>
...
<AssemblyPart Source="System.Windows.Controls.dll" />
</Deployment.Parts>
...
</Deployment>


Since we're using Silverlight 4 we need to change the runtime version to "4.0.50917.0" (see this post for more details).

Using the TreeView in XAML


Now that we have access to the assembly we can use it in app.xaml.

<UserControl x:Class="System.Windows.Controls.UserControl"
xmlns="http://schemas.microsoft.com/client/2007"
xmlns:x="http://schemas.microsoft.com/winfx/2006/xaml"
xmlns:sdk="clr-namespace:System.Windows.Controls;assembly=System.Windows.Controls"
xmlns:wsdk="clr-namespace:System.Windows;assembly=System.Windows.Controls">
<StackPanel x:Name="layout_root" Background="White">
<TextBlock x:Name="Message" FontSize="30" Text="TreeView experiment" />
<sdk:TreeView x:Name="tree">
<sdk:TreeView.ItemTemplate>
<wsdk:HierarchicalDataTemplate ItemsSource="{Binding nodes}">
<TextBlock Foreground="Red" Text="{Binding label}" />
</wsdk:HierarchicalDataTemplate>
</sdk:TreeView.ItemTemplate>
</sdk:TreeView>
</StackPanel>
</UserControl>


TreeView data binding


The XAML file above shows that we're binding the content of the tree view to the nodes property of the data source object. Here's the definition of the Python class used for this example:

from System.Windows import Application
from System.Windows.Controls import UserControl
from System import Object
from System.Collections.ObjectModel import ObservableCollection
import clrtype
import clr

clr.AddReferenceToFile('GalaSoft.MvvmLight.SL4.dll')

from GalaSoft.MvvmLight.Command import RelayCommand


class Node:
__metaclass__ = clrtype.ClrClass
__clrnamespace = "LangexplrExperiments"


def __init__(self,label,children):
self.text = label
self.children = children

@property
@clrtype.accepts()
@clrtype.returns(str)
def label(self):
return self.text

@property
@clrtype.accepts()
@clrtype.returns(Object)
def nodes(self):
return self.children


class App:
def __init__(self):
root = Application.Current.LoadRootVisual(UserControl(), "app.xaml")
root.tree.ItemsSource = [Node('level1',
[Node('level11',[]),
Node('level12',[Node('level121',[])])
])]


App()


With this changes we can run chiron.exe /b and we get:

Saturday, January 29, 2011

IronPython & Silverlight Part V: Using the MVVM Light Toolkit

In this post I'm going to show a small example of using the MVVM Light Toolkit in Silverlight with IronPython.

MVVM Light


According to its website, MVVM Light Toolkit is a:

...set of components helping people to get started in the Model - View - ViewModel pattern in Silverlight and WPF...

It provides useful elements such an implementation of "Relay Command" and a feature to expose events as commands (EventToCommand).

In the context of IronPython it will save us a lot of code.

Adding a reference to MVVM Light


There are several ways to add a reference to the MVVM Light Toolkit assembly. However the first step is to set the Silverlight version to 4 (see this post for more information).

Adding the reference using the manifest


One way to add the reference is to use the manifest AppManifest.xaml. Once we generated this file(using chiron.exe /m and copying it to app/) and changed the Silverlight version to 4 (see here) we can add an entry referencing the GalaSoft.MvvmLight.SL4.dll assembly.

<Deployment xmlns="http://schemas.microsoft.com/client/2007/deployment" 
xmlns:x="http://schemas.microsoft.com/winfx/2006/xaml"
RuntimeVersion="4.0.50401.0"
EntryPointAssembly="Microsoft.Scripting.Silverlight"
EntryPointType="Microsoft.Scripting.Silverlight.DynamicApplication"
ExternalCallersFromCrossDomain="ScriptableOnly">
<!-- Add assembly references here -->
<Deployment.Parts>
...
<AssemblyPart Source="GalaSoft.MvvmLight.SL4.dll"/>
...
</Deployment.Parts>
...
</Deployment>

Also we need to copy of the GalaSoft.MvvmLight.SL4.dll file to the chiron.exe folder (ex. IronPython\Silvelright\bin).


Using it in Python


Once we referenced this file using the manifest we need to reference it from code.
import clr
clr.AddReferenceToFile('GalaSoft.MvvmLight.SL4.dll')


Example


The following example shows the use of RelayCommand and ViewModelBase from IronPython.

app.xaml:

<UserControl x:Class="System.Windows.Controls.UserControl"
xmlns="http://schemas.microsoft.com/client/2007"
xmlns:x="http://schemas.microsoft.com/winfx/2006/xaml"
xmlns:wbc="clr-namespace:System.Windows.Controls">
<StackPanel Width="300" x:Name="layout_root" Background="White">
<TextBox x:Name="my_text_box"
Text="{Binding text_to_display, Mode=TwoWay}" />

<TextBlock Text="{Binding text_to_display}" />
<Button Content="Reset" Command="{Binding reset_command}"/>
</StackPanel>
</UserControl>


app.py:

import clr
clr.AddReferenceToFile('GalaSoft.MvvmLight.SL4.dll')
from System.Windows import Application
from System.Windows.Controls import UserControl
import System
import clrtype
from System.Windows import MessageBox
from GalaSoft.MvvmLight.Command import RelayCommand
from GalaSoft.MvvmLight import ViewModelBase

class MyBasicModel(ViewModelBase):
__metaclass__ = clrtype.ClrClass

def __init__(self):
self.text = 'Initial text'

@property
@clrtype.accepts()
@clrtype.returns(System.String)
def text_to_display(self): return self.text


@text_to_display.setter
@clrtype.accepts(System.String)
@clrtype.returns()
def text_to_display(self, value):
self.text = value
self.RaisePropertyChanged('text_to_display')

@property
@clrtype.accepts()
@clrtype.returns(System.Object)
def reset_command(self):
return RelayCommand(lambda: self.perform_reset_text() )

def perform_reset_text(self):
self.text_to_display = ''


class App:

def __init__(self):

self.model = MyBasicModel()
self.root = Application.Current.LoadRootVisual(UserControl(), "app.xaml")
self.root.DataContext = self.model


theApp = App()


Using this library from IronPython saves us from many thins such as having to declare events to comply with the INotifyPropertyChanged interface.

Tuesday, January 25, 2011

IronPython & Silverlight Part IV: Using Silverlight 4

The default Silverlight runtime version of programs created with IronPython 2.7 Beta 1 is "2.0.31005.0". If you want to take advantage of Silverlight 4 features you have to make a small change to AppManifest.xaml.


For example, say that you want to add a RichTextBox control(available on Silverlight 4).

<UserControl x:Class="System.Windows.Controls.UserControl"
xmlns="http://schemas.microsoft.com/client/2007"
xmlns:x="http://schemas.microsoft.com/winfx/2006/xaml"
xmlns:wbc="clr-namespace:System.Windows.Controls">
<StackPanel Width="300" x:Name="layout_root" Background="White">
<wbc:RichTextBox x:Name="rtb" />
<Button x:Name="my_button" Content="Ok"/>
</StackPanel>
</UserControl>


And

from System.Windows import Application
from System.Windows.Controls import UserControl
import System


class App:

def __init__(self):
self.theText = """
this
is
some
text"""


self.root = Application.Current.LoadRootVisual(UserControl(), "app.xaml")
self.root.rtb.Selection.Select(self.root.rtb.ContentStart, self.root.rtb.ContentEnd)
self.root.rtb.Selection.Text = self.theText

theApp = App()


In order to make this program work you have to add the AppManifest.xaml to the app/ folder of your application. You can get a copy of this file using chiron.exe /m :

By default this file looks like this:

<Deployment xmlns="http://schemas.microsoft.com/client/2007/deployment" 
xmlns:x="http://schemas.microsoft.com/winfx/2006/xaml"
RuntimeVersion="2.0.31005.0"
EntryPointAssembly="Microsoft.Scripting.Silverlight"
EntryPointType="Microsoft.Scripting.Silverlight.DynamicApplication"
ExternalCallersFromCrossDomain="ScriptableOnly">
<!-- Add assembly references here -->
<Deployment.Parts>
<!-- In the XAP -->
<!-- <AssemblyPart Source="Foo.dll" /> -->
<!-- Outside the XAP, same domain -->
<!-- <AssemblyPart Source="/Foo.dll" /> -->
<!-- Outside the XAP, different domain -->
<!-- <AssemblyPart Source="http://bar.com/Foo.dll" /> -->
<AssemblyPart Source="Microsoft.Scripting.Silverlight.dll" />
<AssemblyPart Source="System.Numerics.dll" />
<AssemblyPart Source="Microsoft.Scripting.dll" />
<AssemblyPart Source="Microsoft.Dynamic.dll" />
<AssemblyPart Source="IronPython.dll" />
<AssemblyPart Source="IronPython.Modules.dll" />
</Deployment.Parts>
<!-- Add transparent platform extensions (.slvx) references here -->
<Deployment.ExternalParts>
<!-- Example -->
<!-- <ExtensionPart Source="http://bar.com/v1/Foo.slvx" /> -->
</Deployment.ExternalParts>
...
</Deployment>


After copying this file to the app/ folder you have to change the RuntimeVersion attribute value to "4.0.50401.0".

Now to can run the application and have access to Silverlight 4 features.