Wednesday, August 20, 2008

Creating a RELAX NG schema from classes using XAML rules with IronRuby

In this post I'm going to show a little IronRuby program that generates a RELAX NG Schema Definition for XAML documents using some of the rules to map XML to classes.

This program is was created by modifiying the code of the
previous post to also generate RELAX NG Compact Syntax.

My goal with this post is to use the generated schema with a tool that supports RELAX NG to assist the creation of XAML document.

As with the previous post mentions, not all XAML rules can be expressed in XSD or in this case in RELAX NG. However I hope that the generated schema at least provides some help for editing XAML files.

Changes to RootClassNode and ClassNode classes

The RootClassNode and ClassNode contains information for classes that need an schema definition.

Here's the method to create the definition for one element:


def write_schema_definition_rlx(file)
ctype_name = @the_type.Name.to_s+"Atts"
file.print("#{ctype_name} = ")

write_properties_definition_rlx(file)

file.puts("")

if (!is_abstract)
file.print("#{@the_type.Name} = element #{@the_type.Name} { #{ctype_name} ,")
write_inner_elements_definition_rlx(file) unless is_abstract
file.puts("}")
end


@children.values.each {|c| c.write_schema_definition_rlx(file)}
end


What this code dos is to create a grammar definition for the attributes of the current class. This definition will be used in the definition of the current element (if not abstract) and in the definition of the descendants of the current element.

The write_properties_definition_rlx method writes the definition of the attributes using the defined properties.


def write_properties_definition_rlx(file)
atts = get_type_properties

file.print "("
file.print atts.map {|p| "attribute #{p.Name} { text } ?"}.join(" , ")
file.print ")*"
end


The write_inner_elements_definition_rlx method adds the definition of the content property if it exists. The add_group_base_type creates a group with all the descendants of the of the type of the content property.


def write_inner_elements_definition_rlx(file)
write_element_properties_definition_rlx(file)
if is_container
file.puts(",")
property_type = get_content_property_type
element_type = get_collection_element_type

if (element_type != nil)

group = @registry.add_group_base_type(element_type.FullName)
file.puts "(#{group} *)"
elsif (@registry.descends_from_base_type(property_type))

group = @registry.add_group_base_type(property_type.FullName)
file.puts(group)
else

file.puts(" text ")
end

end
end


The write_schema_definition_rlx creates the definition of a ClassNode which represents a class that inherits from another class.


def write_schema_definition_rlx(file)
if @the_type.contains_generic_parameters
ctype_name = @the_type.Name.to_s.gsub(/`/,'')+"Atts"
else
ctype_name = @the_type.Name.to_s + "Atts"
end

file.print("#{ctype_name} = #{@the_type.BaseType.Name}Atts")
if get_type_properties.length > 0
file.print(" , ")
write_properties_definition_rlx(file)
end

file.puts("")

if (!is_abstract)
file.puts(" #{@the_type.Name} = element #{@the_type.Name} {")
file.print("#{ctype_name},")
write_inner_elements_definition_rlx(file)
file.puts("}")

end

@children.values.each {|c| c.write_schema_definition_rlx(file)}
end


The generated schema

An example of the generated schema is the following:


TextBlockAtts = FrameworkElementAtts | (attribute FontSize { text } ? , attribute FontFamily { text } ? , attribute FontWeight { text } ? , attribute FontStyle { text } ? , attribute TextAlignment { text } ? , attribute Text { text } ?
... )*
TextBlock = element TextBlock {
TextBlockAtts,(element TextBlock.FontSize {AnyGenElement} | element TextBlock.FontFamily {AnyGenElement} | element TextBlock.FontWeight {AnyGenElement} | element TextBlock.FontStyle {AnyGenElement} | element TextBlock.TextAlignment {AnyGenElement} | element TextBlock.Text {AnyGenElement}
...)*,
(InlineElementGroup *)
}
...
InlineElementGroup = Run | LineBreak


Code for this post and the generated schema can be found here.

Monday, August 11, 2008

Creating an XSD schema from classes using XAML rules with IronRuby

This post presents a little unfinished experiment for creating an XSD Xml Schema definition from classes based on some of the rules to map XAML documents to objects. The program is written in IronRuby and it uses reflection to inspect classes and generate the schema definition.

The goal is to have an XML Schema that could be used in conjunction with an XML editor to create XAML documents (which is useful for those of us who don't have a full Visual Studio version). Although as the XAML Overview document says, there are elements that could not be completely mapped to an schema definition, some of them are mentioned below.

The Silverlight Visual Studio integration already includes a very nice XAML editing capabilities.

I think this experiment is a great way to learn more about IronRuby and how to use it to call .NET Libraries.

The strategy

What the program will do is to navigate all the classes inheriting from System.Windows.DependencyObject and generate and XML element and a complex type definition with all the properties included in the definition. For this experiment only two mappings are implemented: properties and content properties.

Properties

As the XAML Overview document describes two ways for specifying properties:


  1. By using XML attributes

  2. By using a class.property-name element


This means that:

This


<Button Background="Blue" >
...
</Button>


and


<Button>
<Button.Background>
<SolidColorBrush Color="Blue">
</Button.Background>
...
</Button>


are equivalent.

So the alternative is to create both the attribute and the property element definitions in the schema.

Content properties

For elements that contain the ContentPropertyAttribute a special child element will be created with a reference to a sequence of all identified concrete elements that in inherit from the property type. As discussed below, this definition is not complete for content properties that accept basic types such as a string.


The program

Some constant and variable definitions


require 'mscorlib'
require 'System.Xml, Version=2.0.0.0, Culture=neutral, PublicKeyToken=b77a5c561934e089, processorArchitecture=MSIL'
include System::Xml
include System::Reflection

SILVERLIGHT_FOLDER = "c:\\Program files\\Microsoft Silverlight\\2.0.30523.8\\"
BASE_TYPE_NAME = "System.Windows.DependencyObject"
CONTENT_PROPERTY_ATTRIBUTE = "System.Windows.Markup.ContentPropertyAttribute"

SILVERLIGHT_NAMESPACE = "http://schemas.microsoft.com/client/2007"
EXTRA_ATTRIBUTES_NAMESPACE = "http://schemas.microsoft.com/winfx/2006/xaml"
XSD_NAMESPACE = "http://www.w3.org/2001/XMLSchema"
CONCRETE_ELEMENTS_GROUP_NAME = "UIElementsGroup"

PRESENTATION_FRAMEWORK_COLLECTION_BASE_TYPE = "PresentationFrameworkCollection`1"


The main program

The main program looks like this:


begin

silveright_system_assembly = Assembly.reflection_only_load_from(SILVERLIGHT_FOLDER + "system.dll")
silveright_windows_assembly = Assembly.reflection_only_load_from(SILVERLIGHT_FOLDER + "System.Windows.dll")
silveright_core_assembly = Assembly.reflection_only_load_from(SILVERLIGHT_FOLDER + "System.Core.dll")
silveright_net_assembly = Assembly.reflection_only_load_from(SILVERLIGHT_FOLDER + "System.Net.dll")
silveright_xml_assembly = Assembly.reflection_only_load_from(SILVERLIGHT_FOLDER + "System.Xml.dll")


registry = Registry.new(silveright_windows_assembly)

registry.collect_data

registry.generate_xsd_schema
puts 'Done!'

rescue System::Reflection::ReflectionTypeLoadException => tl
puts tl
puts tl.LoaderExceptions
rescue System::IO::FileLoadException => e
puts e
puts "-----"
puts e.FusionLog
end


As presented here, the program first collects data about the classes stored in the System.Windows.dll Silverlight library and then generate the XSD schema definition.

The Registry class

The Registry class stores information on the identified classes and keeps track of element groups to be generated.

The collect_data method of the Registry class looks like this:


class Registry

def initialize(types_assembly)
@groups = {}
@types_assembly = types_assembly
@additional_types = {}
@classes = {}
end

...

def get_or_create(name,registry)
if @classes.has_key? name
return @classes[name]
else
return (@classes[name] = ClassNode.new(name,nil,registry))
end
end


...

def collect_data
base_type = @types_assembly.GetType(BASE_TYPE_NAME)
@classes[base_type.FullName] = RootClassNode.new(BASE_TYPE_NAME,base_type,self)

@types_assembly.get_types.each do |a_type|
if (base_type.is_assignable_from a_type and base_type.FullName != a_type.FullName )
node = get_or_create(a_type.full_name,self)
node.the_type = a_type
parent = get_or_create(a_type.BaseType.full_name,self)
parent.add_child(node)

puts "Adding #{a_type.FullName}"
end
end
end

end


As shown here the collect_data method iterates all the classes in the assembly, asking for elements that descend from System.Windows.DependencyObject. For each of these classes an instance of the ClassNode class is created.
If you are familiar with the .NET Reflection API you will recognize some of the names presented here such as is_assignable_from which is a call to the IsAssignableFrom method. As described here, IronRuby allows you to call existing .NET method names using Ruby naming convention .

Generating the Schema

The XSD schema is generated in the generate_xsd_schema Registry method which looks like this:


def generate_xsd_schema
base_type = @types_assembly.GetType(BASE_TYPE_NAME)
swriter = System::IO::StreamWriter.new("silveright.xsd")
writer_settings = XmlWriterSettings.new()
writer_settings.Indent = true
w = XmlWriter.Create(swriter,writer_settings)
w.write_start_document
w.write_start_element("schema",XSD_NAMESPACE)
w.write_attribute_string("targetNamespace",SILVERLIGHT_NAMESPACE)
w.write_attribute_string("elementFormDefault","qualified")
w.write_attribute_string("xmlns","sl",nil,SILVERLIGHT_NAMESPACE)
w.write_attribute_string("xmlns","x",nil,EXTRA_ATTRIBUTES_NAMESPACE)

w.write_start_element("import",XSD_NAMESPACE)
w.write_attribute_string("namespace",EXTRA_ATTRIBUTES_NAMESPACE)
w.write_attribute_string("schemaLocation","extraxamldefs.xsd")
w.write_end_element()

@classes[base_type.FullName].write_schema_definition(w)


create_additional_type_definitions(w)
create_concrete_elements_group(w)

w.write_end_element
w.write_end_document

w.Close
swriter.Close
end


As shown here a .NET XmlWriter class is used to generate the schema.

The write_schema_definition of the RootClassNode and ClassNode classes generates all the appropriate definitions for each class.


For the RootClassNode which represents classes that don't inherit from the DependencyObject the code looks like this:


class RootClassNode
attr_accessor :name,:the_type,:children

def initialize(name,the_type,registry)
@the_type = the_type
@name = name
@children = {}
@registry = registry
end

...

def write_schema_definition(writer)
ctype_name = @the_type.Name.to_s+"Type"
writer.write_start_element("complexType",XSD_NAMESPACE)
writer.write_attribute_string("name",ctype_name )

write_inner_elements_definition(writer) unless is_abstract

write_properties_definition(writer)
if (@the_type.FullName.to_s == BASE_TYPE_NAME)
writer.write_start_element("attributeGroup",XSD_NAMESPACE)
writer.write_attribute_string("ref","x:extraAttributes")
writer.write_end_element
end

writer.write_end_element

write_element_definition(writer,ctype_name) unless is_abstract

@children.values.each {|c| c.write_schema_definition(writer)}
end

end


A complex type is generated with the content of the current class. The write_inner_elements_definition method writes all the description of the child nodes for this complexType, for example it writes the property/element definitions and child node references. The write_properties_definition
method writes the attribute definitions for all the properties.

Also for all base types, a reference to an attribute group of "extraAttributes" is generated. This attribute group contains reference to definitions for some of the XAML attributes such as x:Name. More information about these attributes can be found in XAML Namespace (x:) Language Features.

Finally an element definition is created if the class is not abstract.

For classes inheriting from DependencyObject, a ClassNode instance is created.


class ClassNode < RootClassNode

def write_schema_definition(writer)

if @the_type.contains_generic_parameters
ctype_name = @the_type.Name.to_s.gsub(/`/,'')+"Type"
else
ctype_name = @the_type.Name.to_s + "Type"
end

writer.write_start_element("complexType",XSD_NAMESPACE)
writer.write_attribute_string("name",ctype_name )

writer.write_start_element("complexContent",XSD_NAMESPACE)
writer.write_start_element("extension",XSD_NAMESPACE)
writer.write_attribute_string("base","sl:#{@the_type.BaseType.Name}Type")
write_inner_elements_definition(writer) unless is_abstract
write_properties_definition(writer)
writer.write_end_element


write_element_definition(writer,ctype_name) unless is_abstract

@children.values.each {|c| c.write_schema_definition(writer)}
end
end


The main difference with BaseClassNode is that a complex type extension to the base type is generated. This will reduce the number of attribute definitions of each complex type.

Writing child node references

In order to allow sequences of heterogeneous elements as child nodes of XAML elements, a group definition is created with a choice that references every concrete type.

For example for elements that have a content property of type UIElement the following group is generated:


<group name="UIElementGroup">
<choice>
<element ref="sl:Path" />
<element ref="sl:Ellipse" />
<element ref="sl:Line" />
<element ref="sl:Polygon" />
<element ref="sl:Polyline" />
<element ref="sl:Rectangle" />
...
</choice>
</group>


Combining Enum values

The only way, that I could find, for combining .NET Enum values was to use a combination of Convert.ToInt32 and Enum.ToObject. The following function was used to do that.


def combine(enum_type,enum_values)
System::Enum.ToObject(
enum_type.to_clr_type,
((enum_values.map {|e_value|
System::Convert.ToInt32(e_value)}).inject {|i,j| (j | i)}))
end


A use of this function for combining BindingFlags looks like this:


p = @the_type.get_property(
c.to_string,
combine(BindingFlags,
[BindingFlags.Instance,
BindingFlags.Public,
BindingFlags.NonPublic]))

result_type = p.PropertyType


Elements not mapped

As mentioned at the beginning of the document, not all XAML document features can be accurately represented using XSD. Some of the things that I noticed:


  • Couldn't find a way to define attached properties. A possible workaround is to generate all possible attached property definitions

  • Content properties that allow strings are not represented. This is difficult since it has conflicts with the property/element definitions. Mixed content could be a possible workaround.

  • Extensibility: no easy way to represent things outside of System.Windows. This is a very difficult problem, maybe things like substitution groups could help to represent future child nodes.


Using the generated schema

With the schema generated, an XML editor with XSD Schema aware completion can be used. For example here it is used in Eclipse with XML editor tools included in WTP.


I tried to use the schema with the Netbeans 6.1 IDE (which was used as the Ruby editor for this code) however for schema completion it requires you to specify the schemaLocation attribute. Using this attribute or declaring the xsi namespace generates an error when the XAML is loaded at runtime!.


Code and generated schema for this post can be found here.

Tuesday, July 29, 2008

A quick look at Silverlight with IronRuby

This post presents a little Silverlight program written using IronRuby that exercises features such as graphics, dynamic language interaction and style separation.

This is the second of series of posts that explore features across different platforms such as JavaFX Script or Flex. The first post can be found here.

Code is this post is based on Silverlight 2 Beta 2.

The example

As described in the previous post:


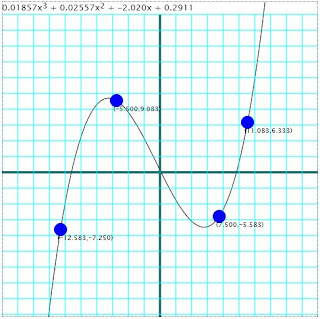
A little program that calculates and plots a polynomial that touches four points selected by the user. The user can move any of the given points in the screen and the polynomial will be recalculated and replotted while moving it.


The Neville's algorithm is used in order to find the polynomial that touches all the given points.

Dynamic languages and Silverlight

The Silverlight web site provides documentation and examples to get you started using dynamic languages with Silverlight also the Silverlight Dynamic Languages SDK provides examples and useful code templates.

However, most of the documentation that talks about specific features of Silverlight focused in working with C#.

One of the thing that I wanted to explore was to use the data binding feature, however I didn't find a way to use it in conjunction with IronRuby classes.

John Lam's blog is a good place to find specific samples for working with IronRuby and Silverlight.

One of the benefits of working with dynamic languages and Silveright is that it's very easy to just start trying examples and experiment with it. You only need the Silverlight 2 SDK beta 2 and any text editor (no Visual Studio is required). The Chiron local web server is a very useful tool that let's you execute the Silverlight program and let's you see the changes just by just refreshing the page.


The program

The final program looks like this:


The running version of this program can be found here.

Polynomial class

The following program shows the implementation of the Polynomial class.

class Polynomial
def initialize(coefficients)
@coefficients = coefficients
end
def evaluate(x)
i = @coefficients.length - 1
result = 0.0
while (i >= 0)
result += (x**i)*@coefficients[i]
i = i - 1
end
return result
end

def coefficients
@coefficients
end


def add(p)

if @coefficients.length > p.coefficients.length
c1 = @coefficients
c2 = p.coefficients
else
c1 = p.coefficients
c2 = @coefficients
end
length1 = c1.length
length2 = c2.length

result = (0..length1-1).map do |i|
if i < length2
c1[i]+c2[i]
else
c1[i]
end
end

return Polynomial.new(result)
end

def add_destructive(p)

if @coefficients.length > p.coefficients.length
c1 = @coefficients
c2 = p.coefficients
else
c1 = p.coefficients
c2 = @coefficients
end

length2 = c2.length

(0..length2-1).each do |i|
c1[i] = c1[i]+c2[i]
end

return Polynomial.new(c1)
end


def multiply(p)
results = Array.new(p.coefficients.length+@coefficients.length - 1,0.0)
current_exponent = 0
p.coefficients.each do |coefficient|
if coefficient.abs > 0.000001
current_self_exponent = 0
@coefficients.each do |self_coefficient|
results[current_self_exponent+current_exponent] = (self_coefficient*coefficient) + results[current_self_exponent+current_exponent]
current_self_exponent = current_self_exponent + 1
end
end
current_exponent = current_exponent + 1
end

Polynomial.new(results)
end
end


This class contains a couple of methods for polynomial evaluation, addition and multiplication. These operations are required to implement the algorithm.

Algorithm

The following code shows the implementation of Neville's algorithm.


class NevilleCalculator
def initialize(converter)
@converter = converter
end
def create_polynomial(points)
number_of_points = points.length
matrix = (0..number_of_points-1).map {|i|(0..i).map{|j| Polynomial.new([])}}
(0..number_of_points-1).each do |i|
matrix[i][0] = Polynomial.new([@converter.convert_to_plane_y(points[i].y)])
end
xs = points.map {|point| @converter.convert_to_plane_x(point.x) }

(1..number_of_points-1).each do |i|
(1..i).each do |j|
q = xs[i]-xs[i-j]
p1 = Polynomial.new [-1.0*xs[i-j]/q,1.0/q]
p2 = Polynomial.new [xs[i]/q,-1.0/q]
matrix[i][j] = p1.multiply(matrix[i][j-1]).add_destructive(p2.multiply(matrix[i-1][j-1]))
end
end

return matrix[number_of_points-1][number_of_points-1]
end
end


The create_polynomial method receives an array of user selected points in the screen. The converter object (described below) converts coordinates from the screen to the Cartesian coordinate system.

Screen to plane coordinate conversion

In order to convert the coordinates the Converter class was used.


class PlaneToScreenConverter
def initialize(screen_max_x,screen_min_x,screen_max_y,screen_min_y,
plane_max_x,plane_min_x,plane_max_y,plane_min_y)
...
@m_to_plane_x = ((@plane_max_x - @plane_min_x)/(@screen_max_x - @screen_min_x))
@b_to_plane_x = @plane_min_x- @screen_min_x*@m_to_plane_x

@m_to_plane_y = ((@plane_max_y - @plane_min_y)/(@screen_max_y - @screen_min_y))
@b_to_plane_y = @plane_min_y - @screen_min_y *@m_to_plane_y

end

...

def convert_to_screen_x(x)
m = ((@screen_max_x - @screen_min_x)/(@plane_max_x - @plane_min_x))
b = @screen_min_x - @plane_min_x*m
return (m*x + b)
end
def convert_to_screen_y(y)
m = ((@screen_max_y - @screen_min_y)/(@plane_max_y - @plane_min_y))
b = @screen_min_y - @plane_min_y*m
return (m*y + b)
end
def convert_to_plane_x(x)
return (@m_to_plane_x*x + @b_to_plane_x)

end
def convert_to_plane_y(y)
return (@m_to_plane_y*y + @b_to_plane_y)
end
end


Also a class to represent a user selected point was created:


class ScreenPoint
def x
@x
end

def x=(v)
@x = v
end

def y
@y
end

def y=(v)
@y = v
end
def initialize(x,y)
@x = x
@y = y
end
end


For some reason I couldn't use attr_accessor with the version of IronRuby shipped with the Silverlight SDK 2 Beta 2.

Plotting the polynomial

In order to plot the polynomial a Polyline object will be used. The FunctionPlotter class is used to create the list of points to create the list of Polyline points.


class FunctionPlotter
def initialize(converter,steps,polynomial)
@converter = converter
@steps = steps
@polynomial = polynomial
@points = []
end

def points
@points
end
def polynomial
@polynomial
end
def recalculate_points

increment = ((@converter.plane_max_x - @converter.plane_min_x)/@steps).abs
current_x = [@converter.plane_max_x,@converter.plane_min_x].min
@points = (0..@steps - 1).map do
x = current_x
y = @polynomial.evaluate(x)
current_x = current_x+increment
[x,y]
end
end
end


Dragging elements

Since the user can modify the points across the screen, a way to drag shapes is required. The Implementing Drag-and-Drop Functionality with Mouse Events and Capture (Silverlight 2) article provides a complete guide on how add dragging capabilities to a Silverlight shape.

Here's the implementation of a helper class that implements this functionality.


class ElementDraggingTracker
def is_captured
return @captured
end
def initialize
@captured = false
@last_position = ScreenPoint.new(0,0)
end

def handle_mouse_down(sender,e)
current_pos = e.GetPosition(nil)
@last_position.x = current_pos.X
@last_position.y = current_pos.Y
@captured = true
sender.CaptureMouse()
end
def handle_mouse_move(sender,e)
if @captured
new_position = e.GetPosition(nil)
deltav = new_position.Y - @last_position.y
deltah = new_position.X - @last_position.x
sender.Data.Center = Point.new(sender.Data.Center.X+deltah,sender.Data.Center.Y+deltav)
@last_position.x = new_position.X
@last_position.y = new_position.Y
end
end
def handle_mouse_up(sender,e)
sender.ReleaseMouseCapture()
@captured = false
end
end


This implementation was made to work only with Path objects that have an EllipseGeometry as the Data. That's why the Data and Center properties are used. This code could be improved to be independent of the object being dragged.

Presenting the polynomial

In order to show a textual representation of the calculated polynomial, a sequence of TextBlock objects was used. This was necessary since I wanted to show the exponent of each term of the polynomial. The only way I found to do that was to add an horizontal StackPanel and add TextBlock for each term and use a TranslateTransform for the exponents. Here's the code:


def create_polynomial_text_elements(p)
first_time = false
panel = polyTextPanel

panel.Children.Clear
length = p.coefficients.length
(0..length-1).each do |pos|
i = (length - 1) - pos
c = p.coefficients[i]
exponent = i

if c.abs > 0.000001 then
text = ""
text = text + ("%.4g" % c)
text = text + "x" if exponent > 0

b = create_text_block text,"FormulaTextStyle"
panel.Children.Add b
if exponent > 1
b = create_text_block exponent.to_s,"FormulaExponentTextStyle"
t = TranslateTransform.new
t.Y = -2
b.RenderTransform = t
panel.Children.Add b
end

if !first_time and exponent != 0
b = create_text_block " + " ,"FormulaTextStyle"
panel.Children.Add b
else
first_time = false
end
end

end
end
end


The main program

The XAML for this program is very simple:


<UserControl x:Class="System.Windows.Controls.UserControl"
xmlns="http://schemas.microsoft.com/client/2007"
xmlns:x="http://schemas.microsoft.com/winfx/2006/xaml"
x:Name="ucontrol">
<UserControl.Resources>

...

</UserControl.Resources>
<StackPanel>
<StackPanel x:Name="polyTextPanel" Orientation="Horizontal">
</StackPanel>
<Canvas x:Name="theCanvas" Width="480" Height="480" Background="White">
<Polyline x:Name="polynomialPolyline" Style="{StaticResource PolylineStyle}"/>
<Line Style="{StaticResource AxisLineStyle}" X1="0" Y1="240" X2="480" Y2="240"/>
<Line Style="{StaticResource AxisLineStyle}" X1="240" Y1="0" X2="240" Y2="480"/>
</Canvas>
</StackPanel>
</UserControl>


The App class implements the entry point of the program:


require "Silverlight"
require 'screen_point'
require 'element_dragging_tracker'
require 'plane_to_screen_converter'
require 'neville_calculator'
require 'function_plotter'
require 'polynomial'

include System::Windows
include System::Windows::Controls
include System::Windows::Media
include System::Windows::Shapes


class App < SilverlightApplication
use_xaml

...

end

App.new


The SilverlightApplication class and the referenced Silverlight.rb file are provided as part of a template for IronRuby/Silverlight project from the Silvelight Dynamic SDK.

The initialize method of the App class looks like this:


def initialize
(0..(480/24)).each do |i|
theCanvas.Children.Add create_line(i*24,0,i*24,480,"GridLineStyle")
end
(0..(480/24)).each do |i|
theCanvas.Children.Add create_line(0,i*24,480,i*24,"GridLineStyle")
end

@points = [ScreenPoint.new(100,300),
ScreenPoint.new(200,400),
ScreenPoint.new(350,300),
ScreenPoint.new(400,200)
]

@converter = PlaneToScreenConverter.new(480.0,0.0,0.0,480.0,20.0,-20.0,20.0,-20.0)

@tracker = ElementDraggingTracker.new

canvas = theCanvas

@points.each do |p|
c = create_circle p.x,p.y,10,"ControlPointStyle"
t = create_text_block "","PointTextStyle"
adjust_point_text_block(p,t)

c.mouse_left_button_down do |sender,args|
@tracker.handle_mouse_down(sender,args)
end
c.mouse_left_button_up do |sender,args|
@tracker.handle_mouse_up(sender,args)
p.x = sender.Data.Center.X
p.y = sender.Data.Center.Y
adjust_point_text_block(p,t)
replot
end
c.mouse_move do |sender,args|
@tracker.handle_mouse_move(sender,args)
if @tracker.is_captured
p.x = sender.Data.Center.X
p.y = sender.Data.Center.Y
adjust_point_text_block(p,t)

replot
end
end
canvas.Children.Add c
canvas.Children.Add t
end

replot
end


Two important things happen in this method. First the grid lines are added to the canvas and then the control points are added to the canvas and the dragging event handlers are also associated with each point. The event handlers also take care of synchronizing the update of each point's label and to recalculate and re-plot the polynomial.

The replot method executes the Neville's algorithm and create the new points for the Polyline.


def replot
@calc = NevilleCalculator.new(@converter)

@plotter = FunctionPlotter.new(@converter,200,@calc.create_polynomial(@points))

@plotter.recalculate_points

pc = PointCollection.new
@plotter.points.each do |aP|
pc.Add(Point.new(@converter.convert_to_screen_x(aP[0]),
@converter.convert_to_screen_y(aP[1])))
end

polynomialPolyline.Points = pc
create_polynomial_text_elements @plotter.polynomial
end


Additional methods for creating Silverlight shapes were required:


def create_line(x1,y1,x2,y2,style_key)
p = Path.new
p.Data = LineGeometry.new
p.Data.StartPoint = Point.new x1,y1
p.Data.EndPoint = Point.new x2,y2
p.Style = ucontrol.Resources.Item(style_key.ToString())
return p
end

def create_circle(x1,y1,radius,style_key)
p = Path.new
p.Data = EllipseGeometry.new
p.Data.Center = Point.new x1,y1
p.Data.RadiusX = radius
p.Data.RadiusY = radius
p.Style = ucontrol.Resources.Item(style_key.ToString())
return p
end

def create_text_block(text,style_key)
t = TextBlock.new
t.Text = text
t.Style = ucontrol.Resources.Item(style_key.ToString())
return t
end

def adjust_point_text_block(p,t)
t.Text = "("+("%.3f" % @converter.convert_to_plane_x(p.x)) +
","+("%.3f" % @converter.convert_to_plane_y(p.y)) + ")"
Canvas.SetTop(t,p.y+5)
Canvas.SetLeft(t,p.x-5)
end


Separating the styles

Silverlight style separationprovides a way to separate style definitions for UI elements. For this program, all the style definitions are defined in a separate section of the XAML file.


<UserControl.Resources>
<Style TargetType="TextBlock" x:Key="FormulaTextStyle">
<Setter Property="FontSize" Value="13"/>
</Style>
<Style TargetType="TextBlock" x:Key="FormulaExponentTextStyle">
<Setter Property="FontSize" Value="12"/>
</Style>
<Style TargetType="TextBlock" x:Key="PointTextStyle">
<Setter Property="FontSize" Value="10"/>
</Style>
<Style TargetType="Line" x:Key="AxisLineStyle">
<Setter Property="Stroke" Value="Black" />
<Setter Property="StrokeThickness" Value="3" />
</Style>
<Style TargetType="Polyline" x:Key="PolylineStyle">
<Setter Property="Stroke" Value="Black" />
</Style>
<Style TargetType="Path" x:Key="GridLineStyle">
<Setter Property="Stroke" Value="Cyan" />
</Style>
<Style TargetType="Path" x:Key="ControlPointStyle">
<Setter Property="Fill" Value="Blue" />
</Style>
</UserControl.Resources>


In order to assign styles to elements in IronRuby the following code was used:


p.Style = ucontrol.Resources.Item(style_key.ToString())


Given that style_key is an IronRuby variable with a string. Note that I had to use the ToString method. If the ToString method as not used I received a runtime error saying: ArgumentException: key must be a string.

Deploying the application

The creation of the XAP file to be deployed is VERY simple. The following command creates an app.xap file from a existing app folder.

Chiron.exe /z:app.xap /d:app


The /z parameter adds all the libraries required for executing IronRuby.

Final words

The only issue I see is the lack of documentation for using Silverlight features with scripting languages. The main thing missing is how to use data binding (if possible) which is a very nice feature which I enjoyed using in JavaFX Script for the previous post.

Because of the inclusion of the IronRuby support libraries, the final XAP size was be bigger than I expected (~700K in this case). However it was not as big as the one from the JavaFX example which included all the JavaFX runtime libraries.

For this example I had to take care of the performance. I stared using an almost direct port of the JavaFX script code of the previous post for the algorithm and the polynomial operations which lead to bad performance.

The integration of IronRuby with .NET is very nice, translating examples from C# was very easy, for example with the element dragging code described above. One thing that can be improved is to give more information on where an exception occurred in a program.

Overall the experience of working with IronRuby and Silverlight was very nice. I was very easy to get feedback of code changes just by hitting refresh in the browser.

Code for this post can be found here.

The running version of the example can be found here.

Sunday, July 13, 2008

JavaFX Script Overview

Introduction

In this post I'll show a little program written in JavaFX Script that exercises some of its features such as graphics, data binding and programming language interaction.

This is the first of a series of posts exploring these features across different platforms such as Silverlight or Flex.

The example


A little program that calculates and plots a polynomial that touches four points selected by the user. The user can move any of the given points in the screen and the polynomial will be recalculated and replotted while moving it.

Neville's algorithm

The Neville's algorithm is used to calculate the polynomial that traverses the points selected by the user.


The user will select a series of points (x0,y0),(x1,y1),etc. that will be used as the input for this algorithm given that y0 = f(x0). Each entry of the Q matrix will stored as a Polynomial object, so the final result Qn,n will be the Polynomial to be plotted.

More information on this algorithm can be found in its Wikipedia page, its MathWorld page or a Numerial Analysis book such as the one by Burden & Faires.

JavaFX Script

Although JavaFX Script is a very interesting language, the biggest problem of working with it today its that is still on development, so there're many sites that contain tutorials and code snippets that references APIs or language constructs that are no longer valid. The James Weaver’s JavaFX Blog
and the JavaFX wiki were very useful resources to find out about the latest updates. Also the Converting JavaFX™ Script Programming Language Code from Interpreted to Compiled Syntax guide provides nice information on language changes.

I think this will be solved as soon a the first official release of the JavaFX SDK is published.

For now, the code snippets shown in this post were created using the build from July 11, 2008.

The program

The final program looks like this:


The applet can also be found here.


Implementing Neville's algorithm

In order to obtain the polynomial for the given selected points using Neville's algorithm we required a polynomial class with a couple of operations for multiplication and addition.


class Polynomial {
attribute coefficients : Number[];

function evaluate(x:Number):Number {
var result = 0.0;
for(i in [0..(sizeof coefficients) - 1]) {
result = result + coefficients[i]*Math.pow(x,i);
}
return result;
}

function multiplyByTerm(coefficient:Number,exponent:Integer):Polynomial {
var origExponent = sizeof coefficients;
if (coefficient == 0.0) {
return Polynomial{coefficients:[]}
} else {
return Polynomial {
coefficients: for (i in [0 .. (origExponent + exponent - 1) ])
if (i < exponent) 0
else coefficients[i - exponent]*coefficient
}
}
}

function multiply(p : Polynomial):Polynomial {
var parts = for (i in [0 .. (sizeof coefficients) - 1])
p.multiplyByTerm(coefficients[i],i);

var result = Polynomial{coefficients:[]};
for (part in parts) {
result = result.add(part);
}
return result;
}

function add(p : Polynomial):Polynomial {
var length1 = sizeof coefficients;
var length2 = sizeof p.coefficients;
var result:Number[];

if (length1 == length2) {
result = for(i in [0 .. length1 - 1])
coefficients[i] + p.coefficients[i];
} else {
if (length1 > length2) {
result = for(i in [0 .. length2 - 1])
coefficients[i] + p.coefficients[i];
for (i in [length2 .. length1 -1]) {
insert coefficients[i] into result
}
} else {
result = for(i in [0 .. length1 - 1])
coefficients[i] + p.coefficients[i];
for (i in [length1 .. length2 -1]) {
insert p.coefficients[i] into result
}
}
}
return Polynomial {
coefficients: result
};
}

function toString():String {
var result:java.lang.StringBuilder = new java.lang.StringBuilder();
var firstTime = true;
result.append("<html>");
for (i in [0 .. (sizeof coefficients) - 1]) {
var theIndex = (sizeof coefficients) - 1 - i;
if (Math.abs(coefficients[theIndex]) > 0.000001) {
if (not firstTime) {
result.append(" + ");
}
if (theIndex != 0) {
result.append("{%3.3f coefficients[theIndex]}x");
if (theIndex != 1) {
result.append("<sup>{theIndex}</sup>");
}
} else {
result.append("{%3.3f coefficients[theIndex]}");
}
firstTime = false;
}
}
result.append("</html>");
return result.toString();
}
}


Some elements of the JavaFX Script language that were really useful include the Sequence Comprehensions. Also the embedded expressions in string are an interesting feature.

An element to convert the coordinates between the screen and the Cartesian plane is also required to implement the algorithm.

The following code shows the implementation of this converter.


class PlaneToScreenConverter {
attribute screenMaxX : Number;
attribute screenMaxY : Number;
attribute screenMinX : Number;
attribute screenMinY : Number;
attribute planeMinX : Number;
attribute planeMinY : Number;
attribute planeMaxX : Number;
attribute planeMaxY : Number;


function convertToScreenX(x:Number):Integer {
var m = ((screenMaxX - screenMinX)/(planeMaxX - planeMinX));
var b = screenMinX - planeMinX*m ;
return (m*x + b).intValue();

}
function convertToScreenY(y:Number):Integer {
var m = ((screenMaxY - screenMinY)/(planeMaxY - planeMinY));
var b = screenMinY - planeMinY*m ;
return (m*y + b).intValue();
}
function convertToPlaneX(x:Integer):Number{
var m = ((planeMaxX - planeMinX)/(screenMaxX - screenMinX));
var b = planeMinX- screenMinX*m ;
return (m*x + b).intValue();

}
function convertToPlaneY(y:Integer):Number {
var m = ((planeMaxY - planeMinY)/(screenMaxY - screenMinY));
var b = planeMinY - screenMinY *m ;
return (m*y + b).intValue();
}
}


Finally we can implement the algorithm as follows:


class MRow {
attribute polynomials : Polynomial[];
}

class NevilleCalculator {
attribute converter : PlaneToScreenConverter;

function createPolynomial(points: FunctionPoint[]):Polynomial {
var numberOfPoints = sizeof points;
var matrix = for(i in [0..numberOfPoints - 1])
MRow {
polynomials:(for (j in [0..i])
Polynomial{coefficients:[]})} ;

for(i in [0..numberOfPoints - 1]) {
matrix[i].polynomials[0] =
Polynomial {
coefficients:[ converter.convertToPlaneY(points[i].y) ]
};
}

var xs = for(i in [0..numberOfPoints - 1]) converter.convertToPlaneX(points[i].x);
var ys = for(i in [0..numberOfPoints - 1]) converter.convertToPlaneY(points[i].y);

for(i in [1..numberOfPoints-1]) {
for(j in [1..i]) {
var q = xs[i]-xs[i-j];
var p1 = Polynomial { coefficients: [-1.0*xs[i-j]/q,1.0/q] };
var p2 = Polynomial { coefficients: [xs[i]/q,-1.0/q] };

matrix[i].polynomials[j] =
p1.multiply(matrix[i].polynomials[j-1]).add(p2.multiply(matrix[i-1].polynomials[j-1]));
}
}
return matrix[numberOfPoints-1].polynomials[numberOfPoints-1];
}
}


The MRow class was created because I was unable to create a sequence of sequences.


Plotting the function

In order to generate screen points for a given polynomial, a FunctionPlotter class was created as follows:


class FunctionPlotter {
attribute converter : PlaneToScreenConverter;
attribute steps = 250;
attribute initialX = -1.0;
attribute finalX = 1.0;

attribute poly = Polynomial {
coefficients:[0,0,1]
}
on replace {
points = getPolyPoints();
}

attribute points = getPolyPoints();

function getPolyPoints():Number[] {
var m = (finalX - initialX)/(250 - 0);
var b = finalX - m*250;
var increment = Math.abs(converter.planeMaxX - converter.planeMinX) / steps;
var currentX = Math.min(converter.planeMaxX , converter.planeMinX);
var i = 0;
var result = for (x in [0..steps*2 - 1]) 1.0;
while (i < steps*2) {
var currentY = poly.evaluate(currentX);
result[i] = converter.convertToScreenX(currentX)*1.0;
result[i+1] = converter.convertToScreenY(currentY)*1.0;

currentX = currentX + increment;
i = i + 2;
}
return result;
}
}


Connecting all the elements


Now that we have all the pieces of the program we can connect them using data binding.

Data binding provides a very nice way for expressing connections between parts of the UI and the model of the application.

For our program we want to allow the user to move around the control points (the blue circles) and have the polynomial recalculated and replotted while moving them. In order to accomplish this we need to create the following databinding connections:


The code that represents the "model" section of the diagram is the following:


var userPoints =
Domain {
points: [
FunctionPoint{
x: 100
y: 300 },
FunctionPoint{
x: 200
y: 400 },
FunctionPoint{
x: 350
y: 300 },
FunctionPoint{
x: 400
y: 200 }

]
}

var converter = PlaneToScreenConverter {
screenMaxX: 480
screenMaxY: 0
screenMinX: 0
screenMinY: 480
planeMinX: -20
planeMinY: -20
planeMaxX: 20
planeMaxY: 20
}

var nevilleCalculator = NevilleCalculator {
converter: converter
}


var plotter = FunctionPlotter {
poly: bind nevilleCalculator.createPolynomial(
for(p in userPoints.points)
FunctionPoint{x:p.x,y:p.y})
converter: converter;
}


Notice that in the bind expression of the poly property of the FunctionPlotter we use a for comprehension instead of passing the complete collection. This is required to allow the update of the polynomial when moving just one point.

The UI part of the program looks like this:


Application {
stage:
Stage {
content:
ComponentView {
component:
BorderPanel {
background: Color.WHITE
top:
Label {
text: bind plotter.poly.toString()
}

center:
Canvas {
content: [
...
]
}
}
}
}
}


Notice that the label is also bound to the polynomial of the function plotter.

The plotted function line and the control points are located inside the canvas with the following code:


Polyline {
stroke:Color.BLACK
points: bind plotter.points
},
Group {
content: bind for (p in userPoints.points)
Group {
content: [
Circle {
centerX: p.x
centerY: p.y
radius:10
fill: Color.BLUE

var dragStartX:Number;
var dragStartY:Number;
onMousePressed:
function(event:MouseEvent) {
dragStartX = p.x;
dragStartY = p.y;
}
onMouseDragged:
function(event:MouseEvent):Void {
p.x = dragStartX + event.getDragX();
p.y = dragStartY + event.getDragY();
}
},
Text { x: p.x+4,y:p.y+10,
content: bind "({%3.2f converter.convertToPlaneX(p.x)},{%3.2f converter.convertToPlaneY(p.y)})" }
]}
}


The mouse pressed and mouse dragged handler are used to allow the user to move the control points.

Also inside the canvas is the code for the axis and the grid.


Group {
content: for(x in [0 .. Math.max(converter.screenMaxX,converter.screenMinX)/24])
Line {
stroke:Color.CYAN
startX: x*24, startY:converter.screenMinY
endX:x*24 , endY:converter.screenMaxY
}
},
Group {
content: for(y in [0 .. Math.max(converter.screenMinY,converter.screenMaxY)/24])
Line {
stroke:Color.CYAN
startX:converter.screenMinX,startY:y*24
endX:converter.screenMaxX, endY:y*24
}
},
Line {
startX: Math.abs((converter.screenMaxX - converter.screenMinX)/2)
startY: converter.screenMinY
endX: Math.abs((converter.screenMaxX - converter.screenMinX)/2)
endY: converter.screenMaxY
stroke:Color.BLACK
strokeWidth:2
},
Line {
startX: converter.screenMinX
startY: Math.abs((converter.screenMaxY - converter.screenMinY)/2)
endX: converter.screenMaxX
endY: Math.abs((converter.screenMaxY - converter.screenMinY)/2)
stroke:Color.BLACK
strokeWidth:2
},


Final words

JavaFX Script provides a nice programming language and powerful graphics and UI elements. One of the most interesting features is data binding. It will be very interesting to see how this feature is implemented in the other platforms.

The biggest problem right now is that JavaFX Script is on development so it's difficult to get documentation of the last changes. Also another problem is that right now in order to create an applet all the Jars of the distribution must be included adding a couple of MB to the size of final download.


Code for this post can be found here.

The applet can also be found here.

Wednesday, June 25, 2008

AbcExplorationLib: Starting an open source project

A couple of months ago I started working on a F# library to read and write ActionScript Byte Code (ABC) files based on the ActionScript Virtual Machine 2 (AVM2) Overview document. I though this was a great opportunity to learn more about both F# and ActionScript.

Although the library is still pretty incomplete, I'll continue the development as an open source project. The project is called AbcExplorationLib and is hosted in CodePlex .

Inspiration for this library comes from excellent bytecode manipulation libraries such as BCEL, ASM, Cecil or System.Reflection.Emit.

When completed this library could be used as part of a complied code analysis tool or as part of the back end of a experimental compiler.

An example of using this library to load a compiled script and print all the names of the opcodes is the following:


let loadedFile =
using(new BinaryReader(new FileStream("Hello.abc",FileMode.Open)))
(fun aInput -> AbcFile.ReadFrom(aInput))


let loadedScript =
AvmScript.Create(loadedFile.Scripts.[0],
loadedFile.Methods,
loadedFile.MethodBodies,
loadedFile.ConstantPool);

Array.iter
(fun (x:AbcFileInstruction) -> printf "%s\n" x.Name)
(loadedScript.InitMethod.Body.Value.BodyInfo.GetInstructions())


An example for generating a "Hello world" program:


let abcFileCreator = AbcFileCreator()
let cpCreator = abcFileCreator.ConstantPoolCreator

let instructions =
[| GetLocal0 ;
PushScope ;
FindPropertyStrict(cpCreator.GetMultiname([|""|],"print"));
PushString(cpCreator.AddString( "Hola!"));
CallProperty(cpCreator.GetMultiname([|""|],"print"),1) ;
CoerceA ;
SetLocal_1 ;
GetLocal1 ;
ReturnValue ;
Kill(1);
|];

let code = ConvertToByteArray(instructions)

let script =
AvmScript(
AvmMethod( "",
SQualifiedName("*"),
[||],
Some (
AvmMethodBody(
AbcMethodBodyInfo(
0, 2, 2, 1, 2,
code,
[||],[||]
)))));

abcFileCreator.AddScript(script.ToLowerIr(abcFileCreator))

let fileRep = abcFileCreator.CreateFile()

using (new BinaryWriter(new FileStream("Hello.abc",FileMode.Create))) (fun f -> fileRep.WriteTo(f))


As you can see this is the part that requires more work! :) .

Future posts will cover the progress of this library.

Monday, June 9, 2008

Using F# option types in C#

This post shows a small example of how to use F# option type instances in C#.

Option types

The F# option type provides a very nice way for defining variables that can may or may not hold a value. For example, in the following class definition, the description field is optional .


type Product(name : string, description : string option) =
class

member this.Name
with get() = name

member this.Description
with get() = description

end


F# Optional types are constructed using the Some and None constructors. For example:


let p1 = Product("Foo",Some "A description")
let p2 = Product("Goo",None)


Optional types are available in many functional languages, for example: Haskell's Maybe, Scala's Option, OCaml's option, among others.

Using option types in C#

Manipulating a option instance from C# requires some considerations since it is defined in F# as a discriminated union. Some useful documentation on how to manipulate discriminated unions from C# includes: Creating and Consuming F# discriminated unions from F#'s manual and this entry from the hubFS.

An instance of the class defined above can be created in C# like this:


Product p = new Product("Foo", Option<string>.Some("A description"));
Product p2 = new Product("Goo", Option<string>.None);


As shown here the Option<A> class (defined in Microsoft.FSharp.Core) provide static methods to construct both cases of the discriminated union.

Several techniques can be used to verify if an instance of Option<A> was created with Some or None. For example, there are static methods called get_IsNone or get_Some which can be used as follows:


if (Option<string>.get_IsNone(p.Description))
{
...
}
...
if (Option<string>.get_IsSome(p.Description))
{
...
}


Another alternative is to use the GetTag method as follows:


if(Option<string>.GetTag(p.Description) == Option<string>.tag_Some) {
...
}


Extension methods

C# extension methods can be used to avoid calling static methods on the Option<A> class. For example:


static class Utility
{
public static bool IsSome(this Option<string> option)
{
return Option<string>.get_IsSome(option);
}

public static bool IsNone(this Option<string> option)
{
return Option<string>.get_IsNone(option);
}
}


Having these extension methods the code could be changed to:


if (p.Description.IsSome())
{
...
}

if (p2.Description.IsSome())
{
...
}


C# extension methods could also be implemented directly in F# . This could be accomplished by applying the System.Runtime.CompilerServices.ExtensionAttribute attribute. For example:


[<System.Runtime.CompilerServices.Extension>]
module Methods =

[<System.Runtime.CompilerServices.Extension>]
let Exists(opt : string option) =
match opt with
| Some _ -> true
| None -> false


This method could be used in C# only by adding the namespace (using using) to the file where it will be used.


if (p2.Description.Exists())
{
...
}

Sunday, June 1, 2008

Creating a simple AIR/Flex UI for a Snobol program

This post presents a little experiment for communicating an Snobol program with an AIR/Flex interface using HTTP.

This post is inspired by the Put a Flex UI On Your Application article by Bruce Eckel.

The example

The example that will be presented is a simple form showing sudo attempts recorded in the /var/log/auth.log log in a Linux box.

A simple program written in Snobol4 using CSnobol4 is used to extract the entries from auth.log . A AIR/Flex program is used to display the data. Both programs are communicated using HTTP.

Although there are several ways to communicate a AIR application with a server side element, HTTP was chosen because of its simplicity to implement in Snobol.

Simple HTTP in Snobol

A way to answer simple HTTP GET method requests from Snobol was required. This requires the creation of a server socket to answer requests. Luckly CSnobol4 includes a nice example for creating a server socket (snolib/serv.sno) using the SERV_LISTEN function. Having this element it was very simple to implement the GET method support.


serverPort = 8080
...
SLOOP FD = SERV_LISTEN("inet", "stream", serverPort) :F(LERR)

INPUT(.NET, 9, "UWT", "/dev/fd/" FD) :F(IERR)
OUTPUT(.NET, 9)

OUTPUT = "Accepting request "

LINE = NET

LINE "GET " GetStringPat $ getString " HTTP/" NUMBER "." NUMBER :F(LERR)

getString ARB "username=" ARB $ requestedUserName ("&" | RPOS(0))

OUTPUT = "Requesting SUDOS for user: " requestedUserName

INPUT(.LOGFILE,10,,"/var/log/auth.log")

NET = "HTTP/1.1 200 OK" CRLF
NET = "Server: SNOBOL4/1.1 (Linux)" CRLF
NET = "Content-Type: text/xml" CRLF
NET = CRLF


Extracting the data

The data extraction process is presented in the following code.


LetterU = "ABCDEFGHIJKLMNOPQRSTUVWXYZ"
LetterL = "abcdefghijklmnopqrstuvwxyz"
Digit = "0123456789"
DirectorySeparator = "/"
GetQuerySeparator = "?"
EscapeChar = "%.&="

GetStringChar = LetterU LetterL Digit DirectorySeparator EscapeChar GetQuerySeparator

GetStringPat = SPAN(GetStringChar)

...


NET = "<sudosdata>"

&ANCHOR = 1
LETTER = LetterU LetterL
USERNAMECHAR = Digit LetterU LetterL
USERNAMEPAT = SPAN(USERNAMECHAR)


READLINE LINE = LOGFILE :F(DONE)
LINE SPAN(LETTER) $ month SPAN(" ") SPAN(Digit) $ day ARB " sudo: " USERNAMEPAT . USER :F(READLINE)
LINE ARB "COMMAND=" ARB . COMMAND RPOS(0)

USER requestedUserName :F(READLINE)

NET = "<sudo><date>" month " " day "</date><user>" USER "</user><command>" COMMAND "</command></sudo>" :(READLINE)

DONE

NET = "</sudosdata>" :S(END)


The answer is formated as XML.

The Interface Code

The interface is a very simple program containing a text input to filter the query for a specify user. The useful HTTPService component is used to get the data from the Snobol program.

The Flex part of the program is the following:


<?xml version="1.0" encoding="utf-8"?>
<mx:WindowedApplication xmlns:mx="http://www.adobe.com/2006/mxml"
title="Sudos Test">
<mx:Script>
<![CDATA[
import flash.utils.Dictionary;
private function callQuery():void {
request.send();
}
]]>
</mx:Script>
<mx:HBox>
<mx:Label text="Sudos" />
<mx:TextInput id="userName" />
</mx:HBox>
<mx:Button label="Query!" click="callQuery()"/>
<mx:DataGrid id="data" dataProvider="{request.lastResult.sudosdata.sudo}">
<mx:columns>
<mx:DataGridColumn headerText="date" dataField="date"/>
<mx:DataGridColumn headerText="user" dataField="user"/>
<mx:DataGridColumn headerText="command" dataField="command"/>
</mx:columns>
</mx:DataGrid>

<mx:HTTPService id="request" url="http://localhost:8080"
useProxy="false"
method="GET">
<mx:request xmlns="">
<username>{userName.text}</username>
</mx:request>
</mx:HTTPService>
</mx:WindowedApplication>


How it looks

An example of running these programs is the following:


Code for this post can be found here.