Monday, December 1, 2008

A quick look at MEF with F#

In this post I'm going to show a little example of using the Managed Extensibility Framework (MEF) from F#.

The Managed Extensibility Framework (MEF) is a very interesting framework for building extensible applications. It is planned to be used in products such as Visual Studio 2010.

Episode .NET Rocks #398: Glenn Block on MEF is a nice source of information the project.

The MEF Codeplex page has documentation on how to start using it. Also the Addicted to MEF series is a nice source of information on how to start using it.

The example


For this example I want to define a little program F# program that plots math functions. Function definitions will be represented as classes that implement the IFunction interface. These definitions will be taken from DLLs stored in a "extensions" directory.

Here's the definition of the IFunction interface:


type IFunction = interface
abstract Apply : double -> double
end


The following code shows the definition of the Winforms Form that is used to display the function:


open System
open System.Windows.Forms
open System.Drawing
open FunctionDefinitions
open System.ComponentModel.Composition
open System.Collections.Generic

type MyForm() as this = class
inherit System.Windows.Forms.Form()

let mutable functions : IEnumerable<IFunction> = Seq.empty

do this.Size <- new System.Drawing.Size(300,300)
do this.BackColor <- Color.White
do this.Text <- "Functions"
do this.Paint.Add(
fun (pargs:PaintEventArgs) ->
using(new Pen(Brushes.Black))
(fun(p) -> pargs.Graphics.DrawLine(p,
new Point(this.Size.Width/2,0),
new Point(this.Size.Width/2,this.Size.Height))

pargs.Graphics.DrawLine(p,
new Point(0,this.Size.Height/2),
new Point(this.Size.Width,this.Size.Height/2))
Seq.iter (fun func -> pargs.Graphics.DrawLines(p,this.CalcPoints(func))) functions
))

member this.CalcPoints(func:IFunction) : Point array =
{ 0..300} |> Seq.map (fun x -> -1.0/30.0 * double(x) + 5.0) |>
Seq.map (fun x -> x,func.Apply(x)) |>
Seq.map (fun(x,y) -> new Point(int32(x*30.0+150.0),
int32(y*(-30.0)+150.0))) |>
Seq.to_array

[<Import>]
member this.Functions
with get() : IEnumerable<IFunction> = functions
and set (f : IEnumerable<IFunction>) = functions <- f

end


In order to say that we want all available functions(IFunction) identified by MEF we declare the Functions property with type IEnumerable<IFunction> and decorated with the Import attribute.

The following code shows the how we use MEF to compose the application and run the winforms app:


let f = new MyForm()
let catalog = new DirectoryPartCatalog("c:\\temp\\Extensions")
let container = new CompositionContainer(catalog,[||])

container.AddPart(f)
container.Compose()

System.Windows.Forms.Application.Run(f)


Notice that by using DirectoryPartCatalog we say that we want to take all extensions(math function definitions) stored in c:\temp\Extensions.

It is important to notice that the program that has the Winforms application is stored in a different assembly from where IFunction is defined. The reason is that the extension DLLs need a reference to it.

Running this program without extensions shows the following form:


The following code shows an extension written in F#:


#light

namespace MoreFunctions
open FunctionDefinitions
open System.ComponentModel.Composition

[<Export(typeof<IFunction>)>]
type AFunction() = class
interface IFunction with
member this.Apply(x:double) = System.Math.Sin(x)
end


We compile this file and copy the result to the extensions directory.


fsc.exe other.fs -r FunctionDefinitions.dll -r System.ComponentModel.Composition.dll -a
copy other.dll c:\temp\Extensions


By running the program again the following form is shown


Since we're working with common .NET assemblies we can write a function definition using C#, for example:


using FunctionDefinitions;
using System.ComponentModel.Composition;
namespace Test2 {
[Export(typeof(IFunction))]
public class AFunction : IFunction
{
public double Apply(double d)
{
return d*d;
}
}
}


We compile this file and copy it to the extensions directory:


csc /reference:FunctionDefinitions.dll;System.ComponentModel.Composition.dll /t:library AFunc.cs
copy AFunc.dll c:\temp\Extensions


Running this program shows the following form:


Final words


MEF provides a nice/simple way to add extensions to .NET applications. I was really impressed by how simple it is to define Exports and Imports and how little MEF-specific code you have to write in order to make it work.

One thing that will be interesting to see is how this framework is going to interact with things such as the DLR. A nice example of this is Intellipad which, as mentioned in the .NET Rocks interview, is used to allow IronPython extensions.

Code for this post uses MEF Preview 3 release.

Friday, November 21, 2008

Using the Canvas Html element

In this post I'm going to show a little example of using the HTML 5 Canvas element.

The Canvas element provides a way to draw graphics using Javascript. It is currently supported in browsers such as Safari, Firefox, Opera and Chrome. Sadly it is not supported in IE.

There's a lot of documentation on how to use this element. The Mozilla Developer Center provides a nice tutorial: Canvas tutorial. Also the HTML 5 specification document provides a detailed description of the element in The canvas element section.

The Example


In order to play learn about this element I decided to create a toy program that takes an image and creates a little Jigsaw Puzzle of it.

Here's how the page looks:


The running version of this program can be found here.

The Code


The code to create this little program is very simple. First the canvas element is specified as follows:


...
<body onload="init();" >
<p>Canvas Object Tests</p>
<canvas id="myCanvas" width="700" height="600"
onmousemove="moveHandler(event);"
onmousedown="mouseDownHandler(event);"
onmouseup="mouseUpHandler(event);"
onmouseout="mouseUpHandler(event);"></canvas>
<hr/>
<div id="notSup" ></div>

</body>
...


Four event handlers are added to the canvas element to handle mouse interactions to move the pieces of the puzzle.

The init function is called in the "load" event of the body element.


var imageName = 'http://farm3.static.flickr.com/2161/2543461722_a68f3d1e2e_m.jpg';
...
function init() {
img = new Image();

img.onload = function() {
imageLoaded = true;
draw();
}
img.src = imageName;

theObjects = createImageSegments(3,3,{width:240,height:180},{x:5,y:10});

draw();
}


The createImageSegments function creates the pieces of the puzzle.


function createImageSegments(lines,cols,imageSize,basePosition)
{
var incrY = imageSize.height/lines;
var incrX = imageSize.width/cols;
var theX = basePosition.x;
var theY = basePosition.y;
var result = new Array();
for(var i = 0;i < lines;i++) {
for(var j = 0;j < cols;j++) {
result.push(new ImageSegment(this.img,
{x:theX,y:theY},
{width:incrX,height:incrY},
{x:(j*incrX),y:(i*incrY)},
{width:incrX,height:incrY}));
theY += 2 + incrY;
}
}
return shuffleArray(result);
}


The ImageSegment objects are defined by the following function:


function ImageSegment(image,position,size,insidePoint,insideSize){
this.image = image;
this.position = position;
this.size = size;
this.insidePoint = insidePoint;
this.insideSize = insideSize;

this.draw = function(context) {
context.drawImage(
this.image,
this.insidePoint.x,
this.insidePoint.y,
this.insideSize.width,
this.insideSize.height,
this.position.x,
this.position.y,
this.size.width,this.size.height);
};

this.isInside = function(point) {
return (this.position.x <= point.x &&
this.position.y <= point.y &&
this.position.x + this.size.width >= point.x &&
this.position.y + this.size.height >= point.y);
}
}


Two methods are defined: one to draw the section of the image and one to determine of a given point hits the current object.

In order to draw the image the following function is defined:


function draw() {
var myCanvas = document.getElementById("myCanvas");
if(myCanvas.getContext) {

var ctxt = myCanvas.getContext('2d');
ctxt.clearRect(0,0,myCanvas.width,myCanvas.height);
if (imageLoaded) {
for(var i = 0;i < theObjects.length;i++) {
theObjects[i].draw(ctxt);
}
}

// Draw the frame
...


In order to allow the user to drag the pieces of the puzzle across the canvas the following mouse event handlers were added to the canvas.


function mouseDownHandler(e)
{
var x = e.pageX - e.target.offsetLeft;
var y = e.pageY - e.target.offsetTop;
for(var i = 0; i < theObjects.length;i++) {
var theObject = theObjects[i];
if (theObject.isInside({x:x,y:y})) {
dragging = true;
lastPoint.x = x;
lastPoint.y = y;
currentDragObject = theObject;
}
}
}

function mouseUpHandler(e)
{
dragging = false;
lastPoint.x = -1;
lastPoint.y = -1;
}

function moveHandler(e) {
if (dragging) {
var x = e.pageX - e.target.offsetLeft;
var y = e.pageY - e.target.offsetTop;
var deltaX = x - lastPoint.x;
var deltaY = y - lastPoint.y;


currentDragObject.position.x += deltaX;
currentDragObject.position.y += deltaY;


lastPoint.x = x;
lastPoint.y = y;
draw();
}
}


Basically what these event handlers do is to calculate the new position of the image being dragged and update the canvas.

Conclusion


The Html Canvas object provides a nice way to draw custom graphics in a web page using Javascript. For future posts I'm going to try to rewrite the example from the
JavaFX Script, Silverlight and Flex posts using Javascript and Canvas.

Thursday, November 13, 2008

Using a MGrammar parser from F#

In this post I'm going to show a little example of manipulating the output tree of a MGrammar parser using some F# features.

MGrammar


MGrammar is one of the components of the "Oslo" Modeling Platform which allows the definition of domain specific languages.

In his post I'm not giving an introduction to MGrammar. There are really nice articles about it for example: MGrammar in a Nutshell, Parsing with Oslo’s MGrammar (Mg) and Creating a WatiN DSL using MGrammar. Also the Oslo:Building Textual DSLs talk provides a very nice introduction to the topic.

The example


For this post I'm going to create a MGrammar definition of a little language that describes the structure of a binary file. Then I'm going to create a F# program that interprets these definitions to load binary files.

The following code shows an example of the language to be defined:


test = begin
byte == 0x22
int32 x
int16 w
bytes[16] k
end


This code describes binary files that start with a byte with the 0x22 value, followed by a int32 value associated with the "x" name, followed by an int16 value named "w" followed by an array of 16 bytes named "k".

The grammar


The grammar for this language is the following:


module LangexplTests
{
language BinaryRecognizer
{
token Int32Type = "int32";
token Int16Type = "int16";
token ByteType = "byte";

token Bytes = "bytes";

token Integer = ("0".."9")+;
token HexNumber = "0x" ("0".."9"|"A".."F")+;
token Symbol = (("A".."Z") | ("a".."z"))+;

token NewLine = "\n";
token LineFeed = "\r";
token LineBreak = LineFeed? NewLine;

token Begin = "begin";
token End = "end";

syntax TypeName = Int32Type => Int32[] |Int16Type => Int16[] |ByteType => Byte[];

syntax Expression = i:Integer=>Int[i] | s:Symbol => Var[s] | h:HexNumber => Hex[h];

syntax TypeDeclaration = TypeName Symbol;

syntax MultipleBytesDeclaration = Bytes "[" n:Expression "]" s:Symbol =>
MultipleBytesDeclaration[n,s];
syntax LiteralValueDeclaration = t:TypeName "==" e:Expression => LiteralValueDeclaration[t,e];

syntax ItemDeclaration = TypeDeclaration|MultipleBytesDeclaration|LiteralValueDeclaration;

syntax Sequence(G,Separator) =
e:G => [e]
| es:Sequence(G,Separator) Separator e:G => [valuesof(es),e];


syntax Definition = name:Symbol "=" Begin LineBreak
decs:Sequence(ItemDeclaration, LineBreak)
LineBreak
End
LineBreak* => Recognizer[name,decs];

syntax Main = Definition;

interleave Whitespace = " ";
}
}


Parsing the code


After compiling the grammar we can now load it in F#. Based on the example presented the in the introductory articles we can write:


open Microsoft.M.Grammar
open System.Dataflow

...

let runProgram() =
printf "Start\n"
let parser = MGrammarCompiler.LoadParserFromMgx(basepath+"BinaryFileRecognizer.mgx", null);
let parsedDocument = parser.ParseObject(basepath+"sample.brg",ErrorReporter.Standard)
let reco = buildRecognizer(parsedDocument)
...


The buildRecognizer will navigate the MGraph structure generated by the parser and generate a binary file recognizer based on the code from the "Using F# computation expressions to read binary files" post.

Active patterns for the parsed AST


As described in the C# samples provided in the "Programatic" section of the MGrammar in a Nutshell article, the GraphBuilder class provides a way to access parts of the parsed AST.

By defining a some F# Active Patterns we can improve the experience of navigating this tree structure. For example:


let (|SequenceElements|_|)(x) =
let gb = new GraphBuilder()
in
if (gb.IsSequence(x)) then
Some(Seq.to_list <| gb.GetSequenceElements(x))
else
None


let (|Entity|_|)(x) =
let gb = new GraphBuilder()
in
if (gb.IsEntity(x)) then
Some(gb.GetEntityLabel(x),
gb.GetEntityMembers(x)
|> Seq.map (fun (kvp:System.Collections.Generic.KeyValuePair) -> kvp.Value)
|> Seq.to_list)
else
None


let (|EntityName|_|)(x) =
let gb = new GraphBuilder()
in
if (gb.IsEntity(x)) then
Some(gb.GetEntityLabel(x))
else
None

let (|Identifier|_|)(x:obj) =
if (x :? System.Dataflow.Identifier) then
let identifier = (x :?> System.Dataflow.Identifier)
in
Some(identifier.Text)
else
None

let (|AString|_|)(x:obj) =
if (x :? System.String) then
Some(x :?> System.String)
else
None


These active pattern definitions allow the extraction of parts of a MGraph structure.

For example given following code:


test = begin
int32 x
end


The following tree structure is created by the parser.


Main[
Recognizer[
"test",
[
ItemDeclaration[
TypeDeclaration[
Int32[
],
"x"
]
]
]
]
]


Based on this example we can look at the definition of the buildRecognizer function that was referenced above.


let buildRecognizer(ast:obj) =
match ast with
| Entity(Identifier("Main"),
[Entity(Identifier("Recognizer"),
[AString(name);
SequenceElements(definitions)])])
->
printf "Processing %s \n" name
buildingRecognizer(definitions,Map.empty,new BinParserBuilder())
| _ -> raise (new System.InvalidOperationException("Invalid document"))


Notice that by combining the Entity and SequenceElements active patterns we can easily get the sequence of definitions for a given file.


In the buildingRecognizer we can process each different case of definitions specified in the grammar. For example for the following code:


int32 x


We get the following tree structure:


ItemDeclaration[
TypeDeclaration[
Int32[
],
"x"
]
]


And the case that processes this definition is the following:


let rec buildingRecognizer(definitions:obj list,variables: Map<int64,string>,builder:BinParserBuilder) =
match definitions with
| ((Entity(Identifier("ItemDeclaration"),[declaration]))::rest) ->
...
match declaration with
| Entity(Identifier("TypeDeclaration"),
[EntityName(Identifier(typeName));AString(name)])
->
let restParser = buildingRecognizer(rest,variables,builder)
in builder.Bind( (match typeName with
| "Int32" -> BRInt(name)
| "Int16" -> BRShort(name)
| "Byte" -> BRByte(name)
| _ -> raise(new System.InvalidOperationException("Unknown type"))), fun _ -> restParser)
...


In another example, for the following input code:


bytes[a] content


We get the following tree:


MultipleBytesDeclaration[
Var[
"a"
],
"content"
]


Which is processed by the following case:


| Entity(Identifier("MultipleBytesDeclaration"),
[Entity(Identifier("Var"),[AString(lengthVarName)]);
AString(varName)]) ->

let restParser = buildingRecognizer(rest,variables,builder)
in builder.Bind(
BoundFixedByteSequence(varName,lengthVarName,RByte), fun _ -> restParser)


Reading a BMP file


The following code shows a simple recognizer for reading 8 bit BMP files.


bmpFile = begin
byte == 0x42
byte == 0x4D
int32 fileSize
int16 resF
int16 resS
int32 pixelOffset
int32 headerSize
int32 width
int32 height
int16 colorPlanes
int16 == 8
int32 compression
int32 imageSize
int32 hResolution
int32 vResolution
int32 == 0x0
int32 == 0x0
bytes[1024] paletteColors
bytes[imageSize] bitmapData
end


By running this programming with a 32x32 8bit bmp file we get the following output (by printing the values of the variables):


Start
Parsed
Processing bmpFile
bitmapData = Bytes ff , ff , ff , ff ...
colorPlanes = 1
compression = 0
fileSize = 2102
hResolution = 0
headerSize = 40
height = 32
imageSize = 1024
paletteColors = Bytes 0 , 0 , 0 , 0 ...
pixelOffset = 1078
resF = 0
resS = 0
vResolution = 0
width = 32
2102


Final words


The use of Active Patterns can simplify the manipulation of the default AST generated by a MGrammar parser.

Something bad about this implementation is that it requires the creation of a GraphBuilder instance for each use of the active pattern. Maybe this could be solved by creating a single GraphBuilder instance for the module where the active patterns are defined.

Code for this post can be found here.

Thursday, October 30, 2008

Using F# Active Patterns to encapsulate complex conditions

In this post I'm going to show a little of example of using F# Active Patterns to encapsulate complex conditions.


While working on AbcExplorationLib I needed way to generate "friendly" labels for branch instruction destinations. According to the ActionScript Virtual Machine 2 Overview document, the branch instructions (jump,ifgt,ifeq,etc.) have a S24(signed 24 bit value) offset that specifies the destination. What I wanted to do was to modify the original instruction list to add a special(non existent ) instruction called ArtificalCodeBranchLabel which has a name which is referenced in the in the branch instruction.

Every branch instruction in the library representation has an object of type:


type JumpLabelReference =
| UnSolvedReference of int
| SolvedReference of string


Every instruction in the library is described in a big discriminated union like this:


type AbcFileInstruction =
| ArtificalCodeBranchLabel of string
| Add
| AsType of int
| BitAnd
| BitNot
| BitOr
| BitXor
...
| IfEq of JumpLabelReference
| IfFalse of JumpLabelReference
| IfGe of JumpLabelReference
| IfGt of JumpLabelReference
| IfLe of JumpLabelReference
...


Notice that essentially, every branch instruction(except for lookupswitch) have a single JumpLabelReference instance as its argument, and in order to write the process of solving the branch destination we can have to write code for each instruction.

So in order to assist the process of solving the reference the following active pattern was created:


let (|UnsolvedSingleBranchInstruction|_|)(pair:int64*AbcFileInstruction) =
let (instructionOffset,instruction) = pair in
let absoluteOffset(relativeOffset:int) = int64(3 + 1 + relativeOffset) + instructionOffset in
let result(offset,createFunction) = Some(absoluteOffset <| offset,createFunction)
in
match instruction with
| IfEq(UnSolvedReference offset) -> result(offset,fun o -> IfEq(o))
| IfFalse(UnSolvedReference offset) -> result(offset,fun o -> IfFalse(o))
| IfGe(UnSolvedReference offset) -> result(offset,fun o -> IfGe(o))
| IfGt(UnSolvedReference offset) -> result(offset,fun o -> IfGt(o))
| IfLe(UnSolvedReference offset) -> result(offset,fun o -> IfLe(o))
| IfLt(UnSolvedReference offset) -> result(offset,fun o -> IfLt(o))
| IfNGe(UnSolvedReference offset) -> result(offset,fun o -> IfNGe(o))
| IfNGt(UnSolvedReference offset) -> result(offset,fun o -> IfNGt(o))
| IfNLe(UnSolvedReference offset) -> result(offset,fun o -> IfNLe(o))
| IfNLt(UnSolvedReference offset) -> result(offset,fun o -> IfNLt(o))
| IfNE(UnSolvedReference offset) -> result(offset,fun o -> IfNE(o))
| IfStrictEq(UnSolvedReference offset) -> result(offset,fun o -> IfStrictEq(o))
| IfStrictNEq(UnSolvedReference offset) -> result(offset,fun o -> IfStrictNEq(o))
| IfTrue(UnSolvedReference offset) -> result(offset,fun o -> IfTrue(o))
| Jump(UnSolvedReference offset) -> result(offset,fun o -> Jump(o))
| _ -> None


This active pattern is used for a couple of things. First, it matches every branch instruction and provides a function to rebuild the instruction with a new destination. Also it calculates the absolute offset of the branch instruction.

Now we can use it in the process of solving the references:


member this.UpdateCodeWithDestinations(destinations:Map<int64,string>,
instructions,
resultingInstructions) =
let processedInstructions =
match instructions with
| (((offset,_) & UnsolvedSingleBranchInstruction( jumpOffset,f))::rest)
when (destinations.ContainsKey(jumpOffset)) ->
(offset,f(SolvedReference(destinations.[jumpOffset])))::rest
| _ -> instructions
in
match processedInstructions with
| ((offset,instruction)::rest) when (destinations.ContainsKey(int64(offset))) ->
this.UpdateCodeWithDestinations(destinations,
rest,
instruction::ArtificalCodeBranchLabel(destinations.[int64(offset)])::resultingInstructions)
| ((_,instruction)::rest) ->
this.UpdateCodeWithDestinations(destinations,
rest,
instruction::resultingInstructions)
| [] -> List.rev(resultingInstructions)


Although this problem could be expressed using other strategies (for example a separate class for each instruction and branch instructions inheriting from the same base class) the use of Active Patterns was very useful to write a simpler implementation of the UpdateCodeWithDestinations method.

Monday, October 20, 2008

Using F# computation expressions to read binary files

In this post I'm going to show a little experiment of using F# computation expression syntax to build a binary file reader.

Computation expressions


F# Computation expressions provides a way to override the interpretation of a subset of language constructs(for example let,for,while) in a given context. This feature provides similar functionality to Haskell's do-notation or LINQ's query syntax.

Two excellent resources to learn about this feature are: Don Syme's "Some Details on F# Computation Expressions" and Robert Pickering's "Beyond Foundations of F# - Workflows".

As described by Don Syme, this feature is related to Monads:


... Likewise the kinds of operations used under the hood are much like the operations used in both LINQ and Haskell monads. Indeed, computation expressions can be seen as a general monadic syntax for F#.


There's a lot of nice documentation available on the net about this topic.

Monads and Parsers


While learning this feature I decided to create a little example based on the monadic parser combinators technique. The "Monadic Parsing in Haskell" paper by Graham Hutton and Erik Meijer provides a nice introduction to this topic.

There are some blog posts that talk about parser combinators in F#, for example the Inside F# blog has a nice post called Monadic parser combinators... in F#. Also Harry Pierson wrote a nice post called Monadic Philosophy Part 4 - The Parser Monad in F# treating this topic. Finally there's an adaptation of the Parsec library to F# called FParsec.

This time I wanted to create something that helps reading the content of a binary file.


Binary parser


The binary parser definition:


type ParseResult<'a> =
| Success of 'a * BinaryReader
| Failure of int64 * string

type BinParser<'a> =
| BinParser of (BinaryReader -> ParseResult<'a>)
with
member this.Function =
match this with
BinParser pFunc -> pFunc

end


Notice that I'm using a BinaryReader as the input instead of a byte list or array. By doing this I'm sacrificing flexibility (for example when creating a choice) for some useful methods included in BinaryReader.


The following code shows some basic binary parsers for bytes,int16 and int32 values.


let IOExceptionHandlingWrapper(f:BinaryReader -> ParseResult<'a>) =
fun i -> try
f(i)
with
(e & :? IOException ) -> Failure(i.BaseStream.Position,e.Message)


let RByte =
BinParser(IOExceptionHandlingWrapper(
fun (i:BinaryReader) -> Success(i.ReadByte(),i)))

let RShort =
BinParser(IOExceptionHandlingWrapper(
fun (i:BinaryReader) -> Success(i.ReadInt16(),i)))

let RInt =
BinParser(IOExceptionHandlingWrapper(
fun (i:BinaryReader) -> Success(i.ReadInt32(),i)))


Notice that the IOExceptionHandlingWrapper handles the case of a IOException and makes the parser fail.

An additional parser for reading an expected byte is the following:


let AByte(b:byte) =
BinParser(IOExceptionHandlingWrapper(
fun (i:BinaryReader) ->
let rB = i.ReadByte() in
if (rB = b) then
Success(byte(rB),i)
else
Failure(i.BaseStream.Position,
System.String.Format("Expecting {0}, got {1}",b,rB))))


Another useful parser let's you read a fixed sequence of elements recognized by another parser.


let ParsingStep (func:'a -> BinParser<'b>) (accumulatedResult:ParseResult<'b list>) currentSeqItem =
match accumulatedResult with
| Success(result,inp) ->
match ((func currentSeqItem).Function inp) with
| Success(result2,inp2) -> Success(result2::result,inp2)
| Failure(offset,description) -> Failure(offset,description)
| Failure(offset,description) -> Failure(offset,description)


let FixedSequence (s:seq<'b>,parser:BinParser<'a>) =
BinParser(fun i ->
match (Seq.fold (ParsingStep (fun _ -> parser)) (Success([],i)) s) with
| Success(result,input) -> Success(List.rev(result),input)
| Failure(offset,description) -> Failure(offset,description))


A fixed sequence of elements is recognized. The number of elements is given by the seq instance.

Finally the definitions required to use the computation expression are the following:


type BinParserBuilder() =
member this.Bind(p:BinParser<'a>,rest:'a -> BinParser<'b>) : BinParser<'b> =
BinParser(fun i -> match p.Function(i) with
| Success(r:'a,i2) -> ((rest r).Function i2)
| Failure(offset,description) -> Failure(offset,description)
)

member this.Return(x) = BinParser(fun i -> Success(x,i))


Notice that we're only defining the behavior for the let! and return elements.

Sample use


The following code shows a parser for uncompressed BMP file using the computational expression syntax.


let theBmpBinParser = pBuilder {
let! _ = AByte(byte(0x42))
let! _ = AByte(byte(0x4D))
let! size = RInt
let! reserved1 = RShort
let! reserved2 = RShort
let! dataOffset = RInt
let! headerSize = RInt
let! width = RInt
let! height = RInt
let! colorPlanes = RShort
let! bpp = RShort
let! compression = RInt
let! imageSize = RInt
let! hResolution = RInt
let! vResolution = RInt
let! paletteColors = RInt
let! importantColors = RInt
let numberOfColorsInPalette =
if int(bpp) < 16 && paletteColors = 0
then (pown 2 (int(bpp)))
else paletteColors
let! palette = FixedSequence({1..numberOfColorsInPalette },RInt)
let! content = FixedSequence({1..height},
FixedSequence({1..adjust_to_32_boundary(width,bpp)},RByte))
return (headerSize,bpp,width,height,compression,paletteColors,content)
}


The following example shows how to use this binary parser to print the contents of a monochrome BMP file:


let PrintMonoBmpData(data: byte list) =
Seq.iter(fun (x:byte) ->
Seq.iter (fun w -> match int(x &&& byte(128 >>> w)) with
| 0 -> (System.Console.Write(0))
| _ -> System.Console.Write(1)) { 0..7}
) data


let prsed = (theBmpBinParser.Function br)

match prsed with
| Success((_,bpp,_,_,_,pc,ctnt),_) when bpp = int16(1) ->
Seq.iter(fun r ->PrintMonoBmpData(r)
System.Console.WriteLine()) ctnt
| Failure(x,y) -> System.Console.WriteLine("Error: {0},in {1}",y,x)
| _ -> System.Console.WriteLine("Done");


Running this program with a monochrome BMP with a single square shows:


11111111111111111111111111111111
11111111111111111111111111111111
11111111111111111111111111111111
11111111111111111111111111111111
11111111111111111111111111111111
11111111111111111111111111111111
11111111111111111111111111111111
11111111111111111111111111111111
11111111111111111111111111111111
11111111111111111111111111111111
11111110000000000000000001111111
11111110111111111111111101111111
11111110111111111111111101111111
11111110111111111111111101111111
11111110111111111111111101111111
11111110111111111111111101111111
11111110111111111111111101111111
11111110111111111111111101111111
11111110111111111111111101111111
11111110111111111111111101111111
11111110111111111111111101111111
11111110111111111111111101111111
11111110111111111111111101111111
11111110111111111111111101111111
11111110111111111111111101111111
11111110000000000000000001111111
11111111111111111111111111111111
11111111111111111111111111111111
11111111111111111111111111111111
11111111111111111111111111111111
11111111111111111111111111111111
11111111111111111111111111111111


Code for this post can be found here.

Tuesday, October 7, 2008

A quick look at Flex

This post presents a little Flex program exercises features such as graphics, language interaction and style separation.

This is the third of series of posts that explore features across different platforms such as JavaFX Script or Silverlight with IronRuby.

Code is this post was created using Flex SDK 3.1.

The example


As described in the first post the example is a:

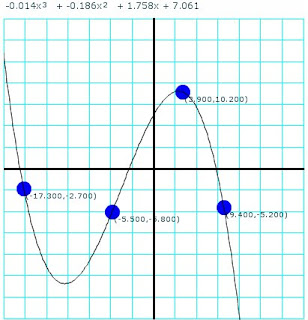
A little program that calculates and plots a polynomial that touches four points selected by the user. The user can move any of the given points in the screen and the polynomial will be recalculated and replotted while moving it.


The Neville's algorithm is used in order to find the polynomial that touches all the given points.

Developing Flex programs


Working with Flex was a nice experience. Adobe provides a lot of documentation along with lots blogs and articles from developers using it.

As with JavaFX Script and Silverlight Dynamic Languages SDK the Flex SDK provides command line tools to develop programs. Only a text editor is required to start programming! . For creating this example I used Emacs with an actionscript-mode and for MXML the nxml-mode.


The program


The final program looks like this:

Neville Flex program

A running version of this program can be found here.

In the following sections some parts of the program will be presented.

Utility classes


The following utility function was very handy when creating new arrays.


public class Utils
{
public static function createArray(numberOfElements:int,aFunction:Function):Array
{
var result:Array = new Array(numberOfElements);
for(var i:int = 0;i < numberOfElements;i++)
{
result[i] = aFunction(i);
}
return result;
}
}


It creates an array of numberOfElements elements and initializes each entry with the result of calling a function for each index.

The Polynomial class


This class provides basic functionality for manipulating polynomials.


public class Polynomial
{
private var coefficients:Array;
public function get coefficientValues():Array
{
return coefficients;
}

public function Polynomial(coefficients:Array)
{
this.coefficients = coefficients;
}

public function evaluate(x:Number):Number
{
var result:Number = 0.0;
for ( var i:int = 0; i < coefficients.length; i++ )
{
result += coefficients[i]*Math.pow(x,i);
}
return result;
}

public function multiplyByTerm(coefficient:Number,exponent:int):Polynomial
{
var originalExponent:int = coefficients.length;
if (coefficient == 0.0)
return new Polynomial(new Array(0));
else
return new Polynomial(
Utils.createArray(originalExponent+exponent ,
function(i:int):Number {
return (i < exponent) ? 0 : coefficients[i-exponent]*coefficient;
}));
}

public function multiply(p:Polynomial):Polynomial
{
var parts:Array = Utils.createArray(coefficients.length,
function(i:int):Polynomial {
return p.multiplyByTerm(coefficients[i],i);
});
var result:Polynomial = new Polynomial(new Array());
for each (var aPart:Polynomial in parts)
{
result = result.add(aPart);
}
return result;
}

public function add(p:Polynomial) : Polynomial
{
var length1:int= coefficients.length;
var length2:int = p.coefficients.length;
var resultArray:Array = null;

if (length1 == length2)
{
resultArray = Utils.createArray(length1,
function(i:int):Number {
return coefficients[i]+p.coefficients[i];
});

}
else
{
if (length1 > length2)
{
resultArray = Utils.createArray(length2,
function(i:int):Number {
return coefficients[i]+p.coefficients[i];
});
for(var i:int = length2;i <= length1 - 1;i++)
{
resultArray.push(coefficients[i]);
}
}
else
{
resultArray = Utils.createArray(length1,
function(i:int):Number {
return coefficients[i]+p.coefficients[i];
});
for(var j:int = length1;j <= length2 - 1;j++)
{
resultArray.push(p.coefficients[j]);
}
}
}

return new Polynomial(resultArray);
}
}


The Algorithm


The implementation of Neville's algorithm is the following:


public class NevilleCalculator
{
private var theConverter : PlaneToScreenConverter;

...

public function createPolynomial(screenPoints:Array):Polynomial
{
var numberOfPoints:int = screenPoints.length;
var matrix:Array = Utils.createArray(numberOfPoints,
function(i:int):Array {
return Utils.createArray(i+1,
function(i:int):Polynomial
{
return new Polynomial([]);
}
);
});

for(var pindex:int = 0;pindex < numberOfPoints;pindex++)
{
var coefficients:Array = [converter.convertToPlaneY(screenPoints[pindex].y)];
matrix[pindex][0] = new Polynomial(coefficients);
}

var xs:Array = Utils.createArray(numberOfPoints,function(i:int):Number { return converter.convertToPlaneX(screenPoints[i].x); } );
var ys:Array = Utils.createArray(numberOfPoints,function(i:int):Number { return converter.convertToPlaneY(screenPoints[i].y); } );
for(var i:int = 1; i < numberOfPoints;i++) {
for(var j:int = 1;j <= i;j++) {
var q:Number = xs[i] - xs[i-j];
var p1:Polynomial = new Polynomial([ -1.0*xs[i-j]/q, 1.0/q]);
var p2:Polynomial = new Polynomial([ xs[i]/q, -1.0/q ]);

matrix[i][j] = p1.multiply(matrix[i][j-1]).add(p2.multiply(matrix[i-1][j-1]));
}
}


return matrix[numberOfPoints-1][numberOfPoints-1];
}
}


Plane to screen conversion


As with the other examples, a class was used to convert between screen and Cartesian plane coordinates.


public class PlaneToScreenConverter
{

public var screenMaxX : Number;
public var screenMaxY : Number;
public var screenMinX : Number;
public var screenMinY : Number;
public var planeMinX : Number;
public var planeMinY : Number;
public var planeMaxX : Number;
public var planeMaxY : Number;

...

public function convertToScreenX(x:Number):int {
var m:Number = ((screenMaxX - screenMinX)/(planeMaxX - planeMinX));
var b:Number = screenMinX - planeMinX*m ;
return (m*x + b);
}
public function convertToScreenY(y:Number):int {
var m:Number = ((screenMaxY - screenMinY)/(planeMaxY - planeMinY));
var b:Number = screenMinY - planeMinY*m ;
return (m*y + b);
}
public function convertToPlaneX(x:int):Number{
var m:Number = ((planeMaxX - planeMinX)/(screenMaxX - screenMinX));
var b:Number = planeMinX- screenMinX*m ;
return (m*x + b);
}
public function convertToPlaneY(y:int):Number {
var m:Number = ((planeMaxY - planeMinY)/(screenMaxY - screenMinY));
var b:Number = planeMinY - screenMinY *m ;
return (m*y + b);
}
}


Plotting the polynomial


In order to plot the polynomial two classes were created. One that used to create all the points to be plotted(FunctionPlotter) and the other to represent the graphic elements in the screen(PlottedFunction).

The FunctionPlotter class looks like this:


public class FunctionPlotter
{
private var converter : PlaneToScreenConverter;
private var steps:int = 250;
private var initialX:Number = -1.0;
private var finalX:Number = 1.0;
private var poly:Polynomial;

public function FunctionPlotter(aConverter : PlaneToScreenConverter,poly:Polynomial)
{
converter = aConverter;
this.poly = poly;
}

public function createPolyPoints():Array
{
var m:Number = (finalX - initialX)/(steps - 0);
var b:Number = finalX - m*steps;
var increment:Number = Math.abs(converter.planeMaxX - converter.planeMinX) / steps;
var currentX:Number = Math.min(converter.planeMaxX, converter.planeMinX);

var result:Array = new Array(steps);
for (var i:int = 0; i < steps;i++)
{
var currentY:Number = poly.evaluate(currentX);
result[i] = new Point(converter.convertToScreenX(currentX)*1.0,
converter.convertToScreenY(currentY)*1.0);
currentX = currentX + increment;
}
return result;


}
}


The PlottedFunction class looks like this:


public class PlottedFunction extends UIComponent
{
private var points:Array;

public function PlottedFunction()
{
this.points = new Array();
}

public function get pointsToPlot():Array
{
return points;
}
public function set pointsToPlot(newPoints:Array):void
{
points = newPoints;
invalidateDisplayList();
}

protected override function updateDisplayList(w:Number,h:Number):void
{
graphics.clear();

graphics.lineStyle(1, 1, 1);
if (points.length > 0)
{
graphics.moveTo(points[0].x,points[0].y);
}

for (var i:int = 1; i < points.length;i++) {
graphics.lineTo(points[i].x,points[i].y);
}
}
}


Dragging elements


In order to allow the user to modify the control points a ControlPoint class was created.


[Style(name="pointColor",type="uint",format="Color",inherit="no")]
[Event(name="change", type="flash.events.Event")]
public class ControlPoint extends UIComponent
{

private var theSize:Number = 10;
private var theColor:int = 0x000000;
private var pointLabel:Label;
private var pconverter:PlaneToScreenConverter;
private var numberFormatter:NumberFormatter;

public function ControlPoint()
{
addEventListener(MouseEvent.MOUSE_DOWN,onMouseDown);
addEventListener(MouseEvent.MOUSE_UP,onMouseUp);
pointLabel = new Label();
setPointText();
}

public function get converter() : PlaneToScreenConverter
{
return pconverter;
}

public function set converter(theConverter:PlaneToScreenConverter) : void
{
pconverter = theConverter;
setPointText();
}

public function get formatter() : NumberFormatter
{
return numberFormatter;
}
public function set formatter(numberFormatter:NumberFormatter):void
{
this.numberFormatter = numberFormatter;
setPointText();
}

private function onMouseDown(e:MouseEvent):void
{
startDrag();
addEventListener(MouseEvent.MOUSE_MOVE,onMouseMovingWhileDragging);
}
private function onMouseUp(e:MouseEvent):void
{
removeEventListener(MouseEvent.MOUSE_MOVE,onMouseMovingWhileDragging);
stopDrag();
setPointText();
}

private function onMouseMovingWhileDragging(e:MouseEvent):void
{
dispatchEvent(new Event(Event.CHANGE));
setPointText();
}

public function get size() : Number
{
return theSize;
}

public function set size(value:Number):void
{
theSize = value;
}

override protected function createChildren():void {
super.createChildren();
addChild(pointLabel);

setPointText();

}

private function setPointText() : void
{
this.pointLabel.move(0,0);
if (converter != null && numberFormatter != null) {
var xText:String = numberFormatter.format(converter.convertToPlaneX(x));
var yText:String = numberFormatter.format(converter.convertToPlaneY(y));
pointLabel.text = "("+xText+","+yText+")";
}
}


protected override function updateDisplayList(w:Number,h:Number):void
{
super.updateDisplayList(w,h);
this.pointLabel.move(0,0);
var metrics:TextLineMetrics = pointLabel.getLineMetrics(0);
pointLabel.setActualSize(metrics.width+5,metrics.height+3);
graphics.beginFill(getStyle("pointColor"));
graphics.drawCircle(0,0,size);
graphics.endFill();
}
}


The Capturing mouse input section of the documentation shows a nice way to allow drag and drop operations on a given object. The only thing that is required is to call the startDrag method when the mouse button is pressed and call stopDrag when it is released.

A handler to the MOUSE_MOVE event is added so the coordinates are updated while moving while also raising a CHANGE event which will be useful when trying to update line graph.

One important lesson learned while creating this custom control is that, when having nested controls, the setActualSize method must be call in the updateDisplayList method. If not, the nested control will not be presented.

Presenting the polynomial's formula


As with the Silverlight example, I wasn't able to present superscript characters in in one label control. The Flex label control supports HTML for formatting, however the <sub> and <sup> tag aren't supported.

The solution was to create an horizontal box that holds a sequence of labels with vertical alignment set to top.


public function createFormulaTextComponents(p:Polynomial,b:Box):void
{
var firstTime:Boolean = true;
b.removeAllChildren();

for(var i:int = 0;i < p.coefficientValues.length;i++)
{
var result:String = "";
var theIndex:Number = p.coefficientValues.length - 1 - i;
if (Math.abs(p.coefficientValues[i]) > 0.001)
{
if (!firstTime)
{
result = result + " + ";
}
if(theIndex != 0)
{
result = result + formatter.format(p.coefficientValues[theIndex]) + "x";
var l:Label = new Label();
l.text = result;
l.styleName = "formula";
b.addChild(l);
if(theIndex != 1)
{
var le:Label = new Label();
le.htmlText = theIndex.toString();
le.styleName = "formulaExponent";
b.addChild(le);
}
}
else
{
result = result + formatter.format(p.coefficientValues[theIndex]);
var cl:Label = new Label();
cl.styleName = "formula";
cl.text = result;
b.addChild(cl);
}
firstTime = false;
}
}


Styling custom controls


Flex supports CSS styling for controls. Some considerations must be taken when creating properties in custom controls that will be configured using this mechanism.

The Creating Style Properties article gives a complete explanation on how to create this kind of properties.

Mainly what it requires it's to add an Style annotation to the control's type annotation. For example in the ControlPoint class
the color of the point can be configured using the pointColor style property.


[Style(name="pointColor",type="uint",format="Color",inherit="no")]
[Event(name="change", type="flash.events.Event")]
public class ControlPoint extends UIComponent
{
....
}


Changing this property using a mx:Style block looks like this:


<mx:Style>
.pointStyle {
pointColor: #0000F5;
}
</mx:Style>

The main program


The main MXML file is presented below. It shows the basic scene with a vertical box that has an horizontal box for the formula's text and a canvas for the function's graph.

The init is responsible for synchronizing the function's graph with the given control points.


<mx:Application xmlns:langexplr="langexplr.*"
xmlns:mx="http://www.adobe.com/2006/mxml"
initialize="init();"
backgroundColor="0xFFFFFF"
paddingLeft="0" paddingRight="0" paddingTop="0" paddingBottom="0">
<mx:Style>
.alines {
gridLineColor: #00FFFF;
axisLineWidth: 3;
}
.pointStyle {
pointColor: #0000F5;
}
.formula {
paddingLeft: 0;
paddingRight: 0;
textIndent: 0;
fontSize:12;
}
.formulaExponent {
paddingLeft: 0;
paddingRight: 0;
textIndent: 0;
fontSize: 10;
}
</mx:Style>

<mx:Script>
<![CDATA[
import langexplr.*;
import mx.controls.Label;

private var p:Polynomial = null;

private var plotter:FunctionPlotter;

private function init():void
{
var somePoints:Array = [new Point(p1.x,p1.y),
new Point(p2.x,p2.y),
new Point(p3.x,p3.y),
new Point(p4.x,p4.y)];

var poly:Polynomial = nevilleCalculator.createPolynomial(somePoints);
plotter = new FunctionPlotter(converter,poly);
var pointsToPlot:Array = plotter.createPolyPoints();
plotted.pointsToPlot = pointsToPlot;
createFormulaTextComponents(poly,formulaBox);
}

...
}
]]>
</mx:Script>
<mx:NumberFormatter id="formatter" precision="3"/>
<langexplr:PlaneToScreenConverter id="converter"
screenMaxX="400" screenMaxY="0"
screenMinX="0" screenMinY="400"
planeMinX="-20" planeMinY="-20"
planeMaxX="20" planeMaxY="20"/>
<langexplr:NevilleCalculator id="nevilleCalculator" converter="{converter}" />
<mx:Box direction="vertical" width="100%" height="100%">
<mx:Box id="formulaBox" direction="horizontal" verticalAlign="top" horizontalGap="-4" verticalGap="0" paddingLeft="0" paddingRight="0">
</mx:Box>
<mx:Canvas id="c" width="400" height="400" clipContent="true" backgroundColor="0xFFFFFF">
<langexplr:AxisLines converter="{converter}" numberOfSteps="14" styleName="alines"/>
<langexplr:ControlPoint id="p1" x="30" y="120" change="init();" converter="{converter}" formatter="{formatter}" styleName="pointStyle" />
<langexplr:ControlPoint id="p2" x="80" y="100" change="init();" converter="{converter}" formatter="{formatter}" styleName="pointStyle"/>
<langexplr:ControlPoint id="p3" x="190" y="30" change="init();" converter="{converter}" formatter="{formatter}" styleName="pointStyle"/>
<langexplr:ControlPoint id="p4" x="250" y="185" change="init();" converter="{converter}" formatter="{formatter}" styleName="pointStyle"/>
<langexplr:PlottedFunction id="plotted" x="0" y="0" />

</mx:Canvas>
</mx:Box>
</mx:Application>


Deploying the application


Compiling and the application and making it available in a web page is pretty straightforward.

By calling the compiler using the following command:

mxmlc Neville.mxml

A Neville.swf file is created. This file could be embedded like any other Flash program.

Final words


The experience of developing this little example using Flex was great. The documentation provided by Adobe was very useful.

As with JavaFX script and Silverlight Dynamic Languages SDK it was very nice to be able to create this example using only command line tools and a text editor.

It was interesting to learn a little bit about ActionScript 3. The language has some interesting things. I hope I could learn more about it in the future.

One feature that may be nice to have in AS3 is type inference for local variables. It could be useful to avoid scenarios such as typing var v:MyClass = new MyClass();
to avoid the "variable 'v' has no type declaration" warning.

Then creation of basic graphic shapes such as circles or lines was a little more difficult compared to JavaFX or Silverlight, since it cannot be specified directly in the MXML. That is something that seems to be different in
Flex 4 with FXG.

Code for this post can be found here.

A running version of this program can be found here.

Wednesday, October 1, 2008

Creating Flex unit tests with FlexUnit

While working on a little Flex example for an upcoming post, I needed a way to validate the parts of the code before finishing the complete example. By doing a search for unit testing frameworks for Flex I found FlexUnit.

In this post I'll show my experiences on writing my first unit tests for Flex code using FlexUnit.

There's already several excellent articles explaining how to start with FlexUnit. For example "Unit Testing with FlexUnit" and "How to use FlexUnit in Flex" provide a very nice introduction.

Creating a test cases


As in testing frameworks for other languages, test cases are defined as classes that inherit from a TestCase class. Individual tests are represented by methods.

The following example shows a method that tests a Polynomial class.


package tests
{
import flexunit.framework.TestCase;
import flexunit.framework.TestSuite;
import langexplr.Polynomial;

public class PolynomialTests extends TestCase
{
/***** Utility methods ********/
public static function suite():TestSuite
{
var theSuite:TestSuite = new TestSuite();
theSuite.addTestSuite( PolynomialTests );
return theSuite;
}

/***** Tests ********/
public function testAdditionDiffExponents():void
{
var p2:Polynomial = new Polynomial([4,3,9]);
var p1:Polynomial = new Polynomial([3.0]);


var p3:Polynomial = p1.add(p2);

assertEquals("Exponent",3,p3.coefficientValues.length);
assertEquals("x^0",7.0,p3.coefficientValues[0]);
assertEquals("x^1",3.0,p3.coefficientValues[1] );
assertEquals("x^2",9.0,p3.coefficientValues[2] );
}
...
}


The suite method is just an utility method that creates a TestSuite for all the tests in current test case. By calling theSuite.addTestSuite( PolynomialTests ); all the methods in the PolynomialTests class containing the word "test" will be included in the test suite.

The testAdditionDiffExponents method shows a simple test for the add method of the Polynomial class. As with other unit test frameworks, assertions are made inside the test method to verify the behavior of the code.

Creating a test runner


The test runner provides a nice UI for displaying test results. The following code shows the creation of the runner.


<mx:Application xmlns:mx="http://www.adobe.com/2006/mxml" xmlns="*"
xmlns:flexunit="flexunit.flexui.*"
creationComplete="onCreationComplete()">

<mx:Script>
<![CDATA[
import flexunit.framework.TestSuite;
import tests.PolynomialTests;
import tests.ConverterTests;
import tests.NevilleCalculatorTests;

private function onCreationComplete():void
{
testRunner.test = createSuite();
testRunner.startTest();
}

private function createSuite():TestSuite {
var ts:TestSuite = new TestSuite();

ts.addTest( PolynomialTests.suite() );
ts.addTest( ConverterTests.suite() );
ts.addTest( NevilleCalculatorTests.suite() );

return ts;
}

]]>
</mx:Script>

<flexunit:TestRunnerBase id="testRunner" width="100%" height="100%" />
</mx:Application>


The createSuite method creates all the test suites that will be executed.

Running a tests


By loading a page that references the generated SWF file we can execute the tests and browse the results.

The following screenshot shows a successful execution of the tests:

Successful FlexUnit tests execution

If a test fails message of the failed assertion is presented.

Failed FlexUnit execution

Creating a new kind of assertion


An assertion that compares two floating point numbers given a minimum difference is very useful while creating tests for the Polynomial operations. The following class was created to be the base class for test cases that require this kind of assertions.


package tests
{
import flexunit.framework.TestCase;
import flexunit.framework.TestSuite;
import flexunit.framework.AssertionFailedError;

public class NumericTestCase extends TestCase
{
public static function assertNumberEquals(message:String,num1:Number,num2:Number,d:Number=0.00001):void
{
oneAssertionHasBeenMade();
if (Math.abs(num1 - num2) > d) {
throw new AssertionFailedError(message+" "+ "expected:<" + num1 + "> but was:<" + num2 + ">");
}
}
}
}


An example of a use of this assertion is the following:

assertNumberEquals("First evaluation",c.convertToPlaneY(40.0),p.evaluate(c.convertToPlaneX(30.0)));


By using the default value of the d we're not required to always specify the tolerance value.