Showing posts with label actionscript. Show all posts

Tuesday, October 6, 2009

AS3 Getter/Setter support in AbcExplorationLib

Recently I added initial support for reading and writing AS3/Avm2 getters and setters to AbcExplorationLib.

Given the following ActionScript class:


class Complex {
public var radius:Number;
public var angle:Number;
public function Complex(ar:Number,aa:Number):void {
radius = ar;
angle = aa;
}

public function set imaginary(newImaginary:Number):void
{
var oldReal = this.real;
angle = Math.atan(newImaginary/oldReal);
radius = Math.sqrt(oldReal*oldReal + newImaginary*newImaginary);
}
public function get imaginary():Number
{
return radius*Math.sin(angle);
}

public function set real(newReal:Number):void
{
var oldImaginary = this.real;
angle = Math.atan(oldImaginary/newReal);
radius = Math.sqrt(newReal*newReal + oldImaginary*oldImaginary);
}
public function get real():Number
{
return radius*Math.cos(angle);
}
}


We compile it using the Flex SDK:
java -jar c:\flexsdk\lib\asc.jar complexclasstest.as


Then we can load it using the library:


Microsoft F# Interactive, (c) Microsoft Corporation, All Rights Reserved
F# Version 1.9.6.16, compiling for .NET Framework Version v2.0.50727

Please send bug reports to fsbugs@microsoft.com
For help type #help;;

> #r "abcexplorationlib.dll";;

--> Referenced 'abcexplorationlib.dll'

> open System.IO;;
> open Langexplr.Abc;;
> let f = using (new FileStream("complexclasstest.abc",FileMode.Open)) (fun s -> AvmAbcFile.Create(s));;

val f : AvmAbcFile

> let complexClass = List.hd f.Classes;;

val complexClass : AvmClass


> complexClass.Properties |> List.map (fun p -> p.Name);;
val it : QualifiedName list =
[CQualifiedName (Ns ("",PackageNamespace),"real");
CQualifiedName (Ns ("",PackageNamespace),"imaginary")]
> let realGetter = complexClass.Properties |> List.map (fun p -> p.Getter.Value) |> List.hd;;

val realGetter : AvmMemberMethod:
> realGetter.Method.Body.Value.Instructions |> Array.map (fun x -> x.Name);;
val it : string array =
[|"getlocal_0"; "pushscope"; "getlocal_0"; "getproperty";
"findpropertystrict"; "getproperty"; "getlocal_0"; "getproperty";
"callprop"; "multiply"; "returnvalue"|]


The library can be found here.

Sunday, May 17, 2009

Modifying an AS3 class with AbcExplorationLib

Recently, I made a couple of changes to AbcExplorationLib to allow the modification of a compiled ActionScript 3 (AS3) class.

The following code will be used to illustrate this feature:


class Shape {
public function foo() {


print("Base foo");
}
public function paint():void {
foo();
}
}

class Rectangle extends Shape{
public override function paint():void {
super.paint();
print( "Rectangle");
}
}

class Circle extends Shape{
public override function paint():void {
super.paint();
print( "Circle");
}
}

var shapes = [new Rectangle(),new Circle()];

for each(var s:Shape in shapes) {
s.paint();
}


Compiling this program using the Flex SDK and running it using the Tamarin binaries shows the following output:


$ java -jar asc.jar -import builtin.abc Shapes.as

Shapes.abc, 678 bytes written
$ avmshell Shapes.abc
Base foo
Rectangle
Base foo
Circle


Say that we want to create a definition of the foo method in the Rectangle class that overrides the definition from Shape.

1. First we load the class file:


let abcFile = using (new FileStream(sourceFile,FileMode.Open)) (
fun stream -> AvmAbcFile.Create(stream))


2. Then we need a definition for the new foo implementation. The following function creates a foo override that prints a message to the screen:


let newFooMethod(message:string) =
AvmMemberMethod(
CQualifiedName(Ns("",NamespaceKind.PackageNamespace),"foo"),
AvmMethod(
"",
SQualifiedName("*"),
[||],
Some <|
AvmMethodBody(
2,1,4,5,
[|
GetLocal0;
PushScope;
FindPropertyStrict(
MQualifiedName(
[|Ns("",
NamespaceKind.PackageNamespace)|],
"print"));
PushString message;
CallProperty(
MQualifiedName(
[|Ns("",
NamespaceKind.PackageNamespace)|],
"print"),
1);
Pop;
ReturnVoid
|],[||],[||]
)
),
AbcTraitAttribute.Override
)


3. We need a function to add a method to a existing class. Notice that the modification consists in only creating a new instance of the AvmClass with the same values as the original but adding the new method.


let addClassMethod(aClass,newMethod) =
match aClass with
| AvmClass(name,
superclassname,
init,
cinit,
slots,
methods,
pns) ->
AvmClass(name,
superclassname,
init,cinit,
slots,
newMethod::methods,
pns)


4. The following method is used to locate the rectangle class and apply the modification:


let modifyFileToAddMethod(f:AvmAbcFile) =
AvmAbcFile(f.Scripts,
f.Classes |>
List.map (fun (c:AvmClass) ->

match c.Name with
| CQualifiedName(_,"Rectangle") ->
addClassMethod(
c,
newFooMethod("New foo for Rectange!!!"))
| _ -> c))


5. Finally we write the input file back to disk:


let modifiedAbcFile = modifyFileToAddMethod(abcFile)
let abcFileCreator = AbcFileCreator()
let file = modifiedAbcFile.ToLowerIr(abcFileCreator)
using (new BinaryWriter(new FileStream(targetFileName,FileMode.Create)))
(fun f -> file.WriteTo(f))


After running this program we can execute the bytecode again to get the new results:


$ mono modify.exe Shapes.abc
...
$ avmshell Shapes_t.abc
New foo for Rectange!!!
Rectangle
Base foo
Circle


One area that really needs works is name handling. A particular challenge is to find a good way to represent multinames ( name references in a set of name spaces ).

In general the way of defining a method from scratch(for example in newFooMethod) needs some work since it is requires lots of details that might not be interesting for the developer.

Finally, another area that really needs improvement is the output file generation. Right now it requires the user to write three instructions to write the file to disc. This will be changed to be similar to the load process.


Code for this program can be found as part of the AbcExplorationLib samples.

Sunday, March 15, 2009

Support for the LookupSwitch opcode in AbcExplorationLib

The LookupSwitch AVM2 opcode is used to represent the ActionScript switch statement.

This is an interesting branch instruction because it has multiple targets. It is almost a direct translation of the switch statement because it has two parameters, a default case and an array of possible targets.

Recently support for this opcode was added to AbcExplorationLib.

Given the following ActionScript code:


var x;
for(x = 1;x < 5;x++) {
switch(x) {
case 1:
print("one");
break;
case 2:
print("two");
break;
case 3:
print("three");
break;
case 4:
print("four");
break;
}
}


We compile this file to a .abc file using the following command:


$ java -jar /opt/flex3sdk/lib/asc.jar testswitch.as

testswitch.abc, 280 bytes written


By using a little IronPython example included with AbcExplorationLib we can see how this library interprets the LookupSwitch opcode:


$ mono /opt/IronPython-2.0/ipy.exe ../ipyexample/abccontents.py testswitch.abc
...
Instructions:
getlocal_0
pushscope
pushbyte 1
getglobalscope
swap
setslot 1
jump dest177
dest12:
label
jump dest74
dest17:
label
findpropertystrict M.print
pushstring "one"
callprop M.print
pop
jump dest165
dest30:
label
findpropertystrict M.print
pushstring "two"
callprop M.print
pop
jump dest165
dest43:
label
findpropertystrict M.print
pushstring "three"
callprop M.print
pop
jump dest165
dest56:
label
findpropertystrict M.print
pushstring "four"
callprop M.print
pop
jump dest165
dest69:
label
jump dest165
dest74:
getglobalscope
getslot 1
setlocal_1
pushbyte 1
getlocal_1
ifstrictneq dest91
pushshort 0
jump dest143
dest91:
pushbyte 2
getlocal_1
ifstrictneq dest104
pushshort 1
jump dest143
dest104:
pushbyte 3
getlocal_1
ifstrictneq dest117
pushshort 2
jump dest143
dest117:
pushbyte 4
getlocal_1
ifstrictneq dest130
pushshort 3
jump dest143
dest130:
pushfalse
iffalse SolvedReference dest141
pushshort 4
jump dest143
dest141:
pushshort 4
dest143:
kill
lookupswitch dest69 dest17,dest30,dest43,dest56,dest69
dest165:
getglobalscope
getslot 1
increment
setlocal_1
getlocal_1
getglobalscope
swap
setslot 1
kill
dest177:
getglobalscope
getslot 1
pushbyte 5
iflt dest12
returnvoid


As described in the documentation the parameters of the LookupSwitch instruction are specified as relative byte offsets that specify the target. In order to give a higher level representation of the code, these relative offsets are converted to symbolic references. This process is detailed in the "Using F# Active Patterns to encapsulate complex conditions" post.

This process starts in the following functions:


static member ReadAndProcessInstructions(aInput:BinaryReader,
count,
constantPool:ConstantPoolInfo) =
let instructionsAndOffsets =
(AvmMethodBody.ReadingInstructions([],
aInput,
count,
constantPool)) in
let destinations =
AvmMethodBody.CollectDestinations(instructionsAndOffsets,
Map.empty,
instructionsAndOffsets)
in
AvmMethodBody.UpdateCodeWithDestinations(
destinations,
instructionsAndOffsets,[]) |> List.to_array


The CollectDestinations method collects all the absolute offsets used by branch instructions and stores them in a dictionary with a generated label. The UpdateCodeWithDestinations method modifies the instruction list use the generated labels.

For example to add support in CollectDestinations the following code was added:


static member CheckLookupSwitchCase baseOffset
(totalInstructions:(int64*AbcFileInstruction)
list) =
fun (destinations:Map<int64,string>) target ->
match target with
| UnSolvedReference(relativeOffset) when
(AvmMethodBody.IsDestinationDefined(int(baseOffset+relativeOffset),
totalInstructions)) ->
destinations.Add(int64(baseOffset+relativeOffset),
sprintf "dest%d" (baseOffset+relativeOffset))
| _ -> destinations

static member CollectDestinations(instructions:(int64*AbcFileInstruction) list,
destinations:Map<int64,string>,
totalInstructions:(int64*AbcFileInstruction) list) =
match instructions with
...
| ((offset,(LookupSwitch(defaultBranch,cases)))::rest) ->
let baseOffset = int(offset) in
AvmMethodBody.CollectDestinations(rest,
Seq.append [defaultBranch] cases |>
Seq.fold (AvmMethodBody.CheckLookupSwitchCase baseOffset totalInstructions ) destinations,
totalInstructions)
...


Then the code is modified in the UpdateCodeWithDestinations method to use the generated labels.


static member UpdateCodeWithDestinations(destinations:Map<int64,string>,
instructions,
resultingInstructions) =
let processedInstructions =
match instructions with
...
| ((offset,LookupSwitch(defaultCase,cases))::rest) ->
(offset,
LookupSwitch(AvmMethodBody.SolveSwitchCase defaultCase offset destinations,
Array.map (fun c->AvmMethodBody.SolveSwitchCase c offset destinations) cases))::rest
| _ -> instructions
...

Tuesday, March 3, 2009

Manipulating AVM2 byte code with F#

In this post I'm going to show an example of using AbcExplorationLib to manipulate simple AVM2 byte code (ActionScript). This example show how load a .ABC file and write it back to disk.

AbcExplorationLib is a library that will allow the manipulation of AVM2 Byte Code(described here). Although it's still incomplete, some basic examples work as the ones presented in this post .

The following ActionScript code will be compiled to byte code .


var i = 0;
for( i = 0;i < 10;i++) {
print("inside loop");
}
print("Done");


To generate the ".abc" file we type:

c:\test\> java -jar c:\flexsdk\lib\asc.jar test.as


Loading the compiled file


We're going to use the F# REPL(fsi.exe) to manipulate the file. We start by referencing the library.


> #r "abcexplorationlib.dll";;

--> Referenced 'C:\test\abcexplorationlib.dll'

> open Langexplr.Abc;;

Now we load the file:


> let abcFile = using (new System.IO.FileStream("test.abc",System.IO.FileMode.Open)) (
fun s -> AvmAbcFile.Create(s));;


Now abcFile contains the code of the compiled program.


> abcFile;;
val it : AvmAbcFile
= Langexplr.Abc.AvmAbcFile {Classes = [];
Scripts = [Langexplr.Abc.AvmScript];}


Inspecting the instructions


We're interested in the instructions of the top-level script for this .abc file. By typing the following expression we can get to this section:


> abcFile.Scripts.[0].InitMethod.Body.Value.Instructions;;
val it : AbcFileInstruction array
= [|GetLocal0; PushScope; PushByte 0uy; GetGlobalScope; Swap; SetSlot 1;
PushByte 0uy; GetGlobalScope; Swap; SetSlot 1;
Jump (SolvedReference "dest39"); ArtificialCodeBranchLabel "dest18"; Label
FindPropertyStrict
(MQualifiedName
([|Ns ("",CONSTANT_Namespace); Ns ("test.as$0",CONSTANT_PrivateNs)|],
"print")); PushString "inside loop";
CallProperty
(MQualifiedName
([|Ns ("",CONSTANT_Namespace); Ns ("test.as$0",CONSTANT_PrivateNs)|],
"print"),1); Pop; GetGlobalScope; GetSlot 1; Increment; SetLocal_2;
GetLocal2; GetGlobalScope; Swap; SetSlot 1; Kill 2;
ArtificialCodeBranchLabel "dest39"; GetGlobalScope; GetSlot 1;
PushByte 10uy; IfLt (SolvedReference "dest18");
FindPropertyStrict
(MQualifiedName
([|Ns ("",CONSTANT_Namespace); Ns ("test.as$0",CONSTANT_PrivateNs)|],
"print")); PushString "Done";
CallProperty
(MQualifiedName
([|Ns ("",CONSTANT_Namespace); Ns ("test.as$0",CONSTANT_PrivateNs)|],
"print"),1); CoerceA; SetLocal_1; GetLocal1; ReturnValue; Kill 1|]


We're going to define the following function to assist in the presentation of instruction listings.


> open Langexplr.Abc.InstructionPatterns;;
> let pr (i:AbcFileInstruction) =
- match i with
- | ArtificialCodeBranchLabel t -> printf "%s:\n" <| t.ToString()
- | i & UnsolvedSingleBranchInstruction(d,_) -> printf " %s %d\n" i.Name d
- | i & SolvedSingleBranchInstruction(l,_) -> printf " %s %s\n" i.Name l
- | _ -> printf " %s\n" i.Name;;

val pr : AbcFileInstruction -> unit


Now we can type:


> abcFile.Scripts.[0].InitMethod.Body.Value.Instructions |> Array.iter pr;;
getlocal_0
pushscope
pushbyte
getglobalscope
swap
setslot
pushbyte
getglobalscope
swap
setslot
jump dest39
dest18:
label
findpropertystrict
pushstring
callprop
pop
getglobalscope
getslot
increment
setlocal_2
getlocal_2
getglobalscope
swap
setslot
kill
dest39:
getglobalscope
getslot
pushbyte
iflt dest18
findpropertystrict
pushstring
callprop
coerce_a
setlocal_1
getlocal_1
returnvalue
kill
val it : unit = ()


A note on branch instructions


In order to make it easy to manipulate and analyze the code AbcExplorationLib adds a non-existing instruction called ArtificialCodeBranchLabel to mark the position where a branch instruction will jump. When these labels are generated the branch instructions are modified to point to the label's name instead of a relative byte offset. Details on how this process is briefly described in "Using F# Active Patterns to encapsulate complex conditions"

Converting from label references to byte offsets is also necessary to write code back to an .abc file. This process is performed by a function called ConvertSymbolicLabelsToByteReferences, for example:


> let c = AbcFileCreator();;

val c : AbcFileCreator

> abcFile.Scripts.[0].InitMethod.Body.Value.Instructions |>
- InstructionManipulation.ConvertSymbolicLabelsToByteReferences c |>
- Array.iter pr;;
getlocal_0
pushscope
pushbyte
getglobalscope
swap
setslot
pushbyte
getglobalscope
swap
setslot
jump 21
dest18:
label
findpropertystrict
pushstring
callprop
pop
getglobalscope
getslot
increment
setlocal_2
getlocal_2
getglobalscope
swap
setslot
kill
dest39:
getglobalscope
getslot
pushbyte
iflt -30
findpropertystrict
pushstring
callprop
coerce_a
setlocal_1
getlocal_1
returnvalue
kill
val it : unit = ()
>


Modifying the code


Values for branch instruction targets are adjusted if new code added, for example, lets add some code to print "Hola!" inside the loop.


> let printName = CQualifiedName(Ns("",NamespaceKind.CONSTANT_Namespace),"print"
- ) ;;

val printName : QualifiedName

> let printCode = [| FindPropertyStrict printName ;
- PushString "Hola!" ;
- CallProperty(printName,1);
- Pop |] ;;

val printCode : AbcFileInstruction array

> Seq.append instr.[0..16] <| Seq.append printCode instr.[17..] |>
- Seq.to_array |>
- InstructionManipulation.ConvertSymbolicLabelsToByteReferences c |>
- Array.iter pr;;
getlocal_0
pushscope
pushbyte
getglobalscope
swap
setslot
pushbyte
getglobalscope
swap
setslot
jump 29
dest18:
label
findpropertystrict
pushstring
callprop
pop
findpropertystrict
pushstring
callprop
pop

getglobalscope
getslot
increment
setlocal_2
getlocal_2
getglobalscope
swap
setslot
kill
dest39:
getglobalscope
getslot
pushbyte
iflt -38
findpropertystrict
pushstring
callprop
coerce_a
setlocal_1
getlocal_1
returnvalue
kill
val it : unit = ()


Writing the new file


We can write this code back to a .abc file by doing this:


> let newCode = Seq.append instr.[0..16] <| Seq.append printCode instr.[17..] |
- > Seq.to_array;;

val newCode : AbcFileInstruction array

> let newBody = AvmMethodBody(oldbody.Method,
- oldbody.MaxStack,
- oldbody.LocalCount,
- oldbody.InitScopeDepth,
- oldbody.MaxScopeDepth,
- newCode,
- oldbody.Exceptions,
- oldbody.Traits);;

val newBody : AvmMethodBody

> let newFile = AvmAbcFile( [AvmScript( abcFile.Scripts.[0].InitMethod.CloneWithBody(newBody), abcFile.Scripts.[0].Members)], []);;

val newFile : AvmAbcFile
> open System.IO;;
> let c = AbcFileCreator();;

val c : AbcFileCreator

>
- using (new BinaryWriter(new FileStream("test_modified.abc",FileMode.Create)))
-
- (fun f -> let file = newFile.ToLowerIr(c) in file.WriteTo(f));;
val it : unit = ()


Running this program using Tamarin shows:


c:\test\>avmplus_sd.exe test_modified.abc
inside loop
Hola!
inside loop
Hola!
inside loop
Hola!
inside loop
Hola!
inside loop
Hola!
inside loop
Hola!
inside loop
Hola!
inside loop
Hola!
inside loop
Hola!
inside loop
Hola!
Done


The AbcExplorationLib library is still pretty incomplete. Also there's a lot to improve, for example name handling and instruction modification. Future posts will present new features/experiments.

Tuesday, October 7, 2008

A quick look at Flex

This post presents a little Flex program exercises features such as graphics, language interaction and style separation.

This is the third of series of posts that explore features across different platforms such as JavaFX Script or Silverlight with IronRuby.

Code is this post was created using Flex SDK 3.1.

The example


As described in the first post the example is a:

A little program that calculates and plots a polynomial that touches four points selected by the user. The user can move any of the given points in the screen and the polynomial will be recalculated and replotted while moving it.


The Neville's algorithm is used in order to find the polynomial that touches all the given points.

Developing Flex programs


Working with Flex was a nice experience. Adobe provides a lot of documentation along with lots blogs and articles from developers using it.

As with JavaFX Script and Silverlight Dynamic Languages SDK the Flex SDK provides command line tools to develop programs. Only a text editor is required to start programming! . For creating this example I used Emacs with an actionscript-mode and for MXML the nxml-mode.


The program


The final program looks like this:
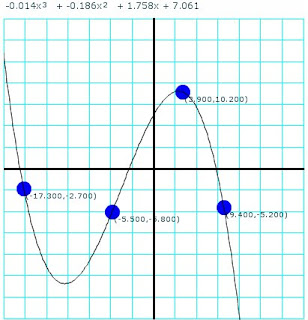
Neville Flex program

A running version of this program can be found here.

In the following sections some parts of the program will be presented.

Utility classes


The following utility function was very handy when creating new arrays.


public class Utils
{
public static function createArray(numberOfElements:int,aFunction:Function):Array
{
var result:Array = new Array(numberOfElements);
for(var i:int = 0;i < numberOfElements;i++)
{
result[i] = aFunction(i);
}
return result;
}
}


It creates an array of numberOfElements elements and initializes each entry with the result of calling a function for each index.

The Polynomial class


This class provides basic functionality for manipulating polynomials.


public class Polynomial
{
private var coefficients:Array;
public function get coefficientValues():Array
{
return coefficients;
}

public function Polynomial(coefficients:Array)
{
this.coefficients = coefficients;
}

public function evaluate(x:Number):Number
{
var result:Number = 0.0;
for ( var i:int = 0; i < coefficients.length; i++ )
{
result += coefficients[i]*Math.pow(x,i);
}
return result;
}

public function multiplyByTerm(coefficient:Number,exponent:int):Polynomial
{
var originalExponent:int = coefficients.length;
if (coefficient == 0.0)
return new Polynomial(new Array(0));
else
return new Polynomial(
Utils.createArray(originalExponent+exponent ,
function(i:int):Number {
return (i < exponent) ? 0 : coefficients[i-exponent]*coefficient;
}));
}

public function multiply(p:Polynomial):Polynomial
{
var parts:Array = Utils.createArray(coefficients.length,
function(i:int):Polynomial {
return p.multiplyByTerm(coefficients[i],i);
});
var result:Polynomial = new Polynomial(new Array());
for each (var aPart:Polynomial in parts)
{
result = result.add(aPart);
}
return result;
}

public function add(p:Polynomial) : Polynomial
{
var length1:int= coefficients.length;
var length2:int = p.coefficients.length;
var resultArray:Array = null;

if (length1 == length2)
{
resultArray = Utils.createArray(length1,
function(i:int):Number {
return coefficients[i]+p.coefficients[i];
});

}
else
{
if (length1 > length2)
{
resultArray = Utils.createArray(length2,
function(i:int):Number {
return coefficients[i]+p.coefficients[i];
});
for(var i:int = length2;i <= length1 - 1;i++)
{
resultArray.push(coefficients[i]);
}
}
else
{
resultArray = Utils.createArray(length1,
function(i:int):Number {
return coefficients[i]+p.coefficients[i];
});
for(var j:int = length1;j <= length2 - 1;j++)
{
resultArray.push(p.coefficients[j]);
}
}
}

return new Polynomial(resultArray);
}
}


The Algorithm


The implementation of Neville's algorithm is the following:


public class NevilleCalculator
{
private var theConverter : PlaneToScreenConverter;

...

public function createPolynomial(screenPoints:Array):Polynomial
{
var numberOfPoints:int = screenPoints.length;
var matrix:Array = Utils.createArray(numberOfPoints,
function(i:int):Array {
return Utils.createArray(i+1,
function(i:int):Polynomial
{
return new Polynomial([]);
}
);
});

for(var pindex:int = 0;pindex < numberOfPoints;pindex++)
{
var coefficients:Array = [converter.convertToPlaneY(screenPoints[pindex].y)];
matrix[pindex][0] = new Polynomial(coefficients);
}

var xs:Array = Utils.createArray(numberOfPoints,function(i:int):Number { return converter.convertToPlaneX(screenPoints[i].x); } );
var ys:Array = Utils.createArray(numberOfPoints,function(i:int):Number { return converter.convertToPlaneY(screenPoints[i].y); } );
for(var i:int = 1; i < numberOfPoints;i++) {
for(var j:int = 1;j <= i;j++) {
var q:Number = xs[i] - xs[i-j];
var p1:Polynomial = new Polynomial([ -1.0*xs[i-j]/q, 1.0/q]);
var p2:Polynomial = new Polynomial([ xs[i]/q, -1.0/q ]);

matrix[i][j] = p1.multiply(matrix[i][j-1]).add(p2.multiply(matrix[i-1][j-1]));
}
}


return matrix[numberOfPoints-1][numberOfPoints-1];
}
}


Plane to screen conversion


As with the other examples, a class was used to convert between screen and Cartesian plane coordinates.


public class PlaneToScreenConverter
{

public var screenMaxX : Number;
public var screenMaxY : Number;
public var screenMinX : Number;
public var screenMinY : Number;
public var planeMinX : Number;
public var planeMinY : Number;
public var planeMaxX : Number;
public var planeMaxY : Number;

...

public function convertToScreenX(x:Number):int {
var m:Number = ((screenMaxX - screenMinX)/(planeMaxX - planeMinX));
var b:Number = screenMinX - planeMinX*m ;
return (m*x + b);
}
public function convertToScreenY(y:Number):int {
var m:Number = ((screenMaxY - screenMinY)/(planeMaxY - planeMinY));
var b:Number = screenMinY - planeMinY*m ;
return (m*y + b);
}
public function convertToPlaneX(x:int):Number{
var m:Number = ((planeMaxX - planeMinX)/(screenMaxX - screenMinX));
var b:Number = planeMinX- screenMinX*m ;
return (m*x + b);
}
public function convertToPlaneY(y:int):Number {
var m:Number = ((planeMaxY - planeMinY)/(screenMaxY - screenMinY));
var b:Number = planeMinY - screenMinY *m ;
return (m*y + b);
}
}


Plotting the polynomial


In order to plot the polynomial two classes were created. One that used to create all the points to be plotted(FunctionPlotter) and the other to represent the graphic elements in the screen(PlottedFunction).

The FunctionPlotter class looks like this:


public class FunctionPlotter
{
private var converter : PlaneToScreenConverter;
private var steps:int = 250;
private var initialX:Number = -1.0;
private var finalX:Number = 1.0;
private var poly:Polynomial;

public function FunctionPlotter(aConverter : PlaneToScreenConverter,poly:Polynomial)
{
converter = aConverter;
this.poly = poly;
}

public function createPolyPoints():Array
{
var m:Number = (finalX - initialX)/(steps - 0);
var b:Number = finalX - m*steps;
var increment:Number = Math.abs(converter.planeMaxX - converter.planeMinX) / steps;
var currentX:Number = Math.min(converter.planeMaxX, converter.planeMinX);

var result:Array = new Array(steps);
for (var i:int = 0; i < steps;i++)
{
var currentY:Number = poly.evaluate(currentX);
result[i] = new Point(converter.convertToScreenX(currentX)*1.0,
converter.convertToScreenY(currentY)*1.0);
currentX = currentX + increment;
}
return result;


}
}


The PlottedFunction class looks like this:


public class PlottedFunction extends UIComponent
{
private var points:Array;

public function PlottedFunction()
{
this.points = new Array();
}

public function get pointsToPlot():Array
{
return points;
}
public function set pointsToPlot(newPoints:Array):void
{
points = newPoints;
invalidateDisplayList();
}

protected override function updateDisplayList(w:Number,h:Number):void
{
graphics.clear();

graphics.lineStyle(1, 1, 1);
if (points.length > 0)
{
graphics.moveTo(points[0].x,points[0].y);
}

for (var i:int = 1; i < points.length;i++) {
graphics.lineTo(points[i].x,points[i].y);
}
}
}


Dragging elements


In order to allow the user to modify the control points a ControlPoint class was created.


[Style(name="pointColor",type="uint",format="Color",inherit="no")]
[Event(name="change", type="flash.events.Event")]
public class ControlPoint extends UIComponent
{

private var theSize:Number = 10;
private var theColor:int = 0x000000;
private var pointLabel:Label;
private var pconverter:PlaneToScreenConverter;
private var numberFormatter:NumberFormatter;

public function ControlPoint()
{
addEventListener(MouseEvent.MOUSE_DOWN,onMouseDown);
addEventListener(MouseEvent.MOUSE_UP,onMouseUp);
pointLabel = new Label();
setPointText();
}

public function get converter() : PlaneToScreenConverter
{
return pconverter;
}

public function set converter(theConverter:PlaneToScreenConverter) : void
{
pconverter = theConverter;
setPointText();
}

public function get formatter() : NumberFormatter
{
return numberFormatter;
}
public function set formatter(numberFormatter:NumberFormatter):void
{
this.numberFormatter = numberFormatter;
setPointText();
}

private function onMouseDown(e:MouseEvent):void
{
startDrag();
addEventListener(MouseEvent.MOUSE_MOVE,onMouseMovingWhileDragging);
}
private function onMouseUp(e:MouseEvent):void
{
removeEventListener(MouseEvent.MOUSE_MOVE,onMouseMovingWhileDragging);
stopDrag();
setPointText();
}

private function onMouseMovingWhileDragging(e:MouseEvent):void
{
dispatchEvent(new Event(Event.CHANGE));
setPointText();
}

public function get size() : Number
{
return theSize;
}

public function set size(value:Number):void
{
theSize = value;
}

override protected function createChildren():void {
super.createChildren();
addChild(pointLabel);

setPointText();

}

private function setPointText() : void
{
this.pointLabel.move(0,0);
if (converter != null && numberFormatter != null) {
var xText:String = numberFormatter.format(converter.convertToPlaneX(x));
var yText:String = numberFormatter.format(converter.convertToPlaneY(y));
pointLabel.text = "("+xText+","+yText+")";
}
}


protected override function updateDisplayList(w:Number,h:Number):void
{
super.updateDisplayList(w,h);
this.pointLabel.move(0,0);
var metrics:TextLineMetrics = pointLabel.getLineMetrics(0);
pointLabel.setActualSize(metrics.width+5,metrics.height+3);
graphics.beginFill(getStyle("pointColor"));
graphics.drawCircle(0,0,size);
graphics.endFill();
}
}


The Capturing mouse input section of the documentation shows a nice way to allow drag and drop operations on a given object. The only thing that is required is to call the startDrag method when the mouse button is pressed and call stopDrag when it is released.

A handler to the MOUSE_MOVE event is added so the coordinates are updated while moving while also raising a CHANGE event which will be useful when trying to update line graph.

One important lesson learned while creating this custom control is that, when having nested controls, the setActualSize method must be call in the updateDisplayList method. If not, the nested control will not be presented.

Presenting the polynomial's formula


As with the Silverlight example, I wasn't able to present superscript characters in in one label control. The Flex label control supports HTML for formatting, however the <sub> and <sup> tag aren't supported.

The solution was to create an horizontal box that holds a sequence of labels with vertical alignment set to top.


public function createFormulaTextComponents(p:Polynomial,b:Box):void
{
var firstTime:Boolean = true;
b.removeAllChildren();

for(var i:int = 0;i < p.coefficientValues.length;i++)
{
var result:String = "";
var theIndex:Number = p.coefficientValues.length - 1 - i;
if (Math.abs(p.coefficientValues[i]) > 0.001)
{
if (!firstTime)
{
result = result + " + ";
}
if(theIndex != 0)
{
result = result + formatter.format(p.coefficientValues[theIndex]) + "x";
var l:Label = new Label();
l.text = result;
l.styleName = "formula";
b.addChild(l);
if(theIndex != 1)
{
var le:Label = new Label();
le.htmlText = theIndex.toString();
le.styleName = "formulaExponent";
b.addChild(le);
}
}
else
{
result = result + formatter.format(p.coefficientValues[theIndex]);
var cl:Label = new Label();
cl.styleName = "formula";
cl.text = result;
b.addChild(cl);
}
firstTime = false;
}
}


Styling custom controls


Flex supports CSS styling for controls. Some considerations must be taken when creating properties in custom controls that will be configured using this mechanism.

The Creating Style Properties article gives a complete explanation on how to create this kind of properties.

Mainly what it requires it's to add an Style annotation to the control's type annotation. For example in the ControlPoint class
the color of the point can be configured using the pointColor style property.


[Style(name="pointColor",type="uint",format="Color",inherit="no")]
[Event(name="change", type="flash.events.Event")]
public class ControlPoint extends UIComponent
{
....
}


Changing this property using a mx:Style block looks like this:


<mx:Style>
.pointStyle {
pointColor: #0000F5;
}
</mx:Style>

The main program


The main MXML file is presented below. It shows the basic scene with a vertical box that has an horizontal box for the formula's text and a canvas for the function's graph.

The init is responsible for synchronizing the function's graph with the given control points.


<mx:Application xmlns:langexplr="langexplr.*"
xmlns:mx="http://www.adobe.com/2006/mxml"
initialize="init();"
backgroundColor="0xFFFFFF"
paddingLeft="0" paddingRight="0" paddingTop="0" paddingBottom="0">
<mx:Style>
.alines {
gridLineColor: #00FFFF;
axisLineWidth: 3;
}
.pointStyle {
pointColor: #0000F5;
}
.formula {
paddingLeft: 0;
paddingRight: 0;
textIndent: 0;
fontSize:12;
}
.formulaExponent {
paddingLeft: 0;
paddingRight: 0;
textIndent: 0;
fontSize: 10;
}
</mx:Style>

<mx:Script>
<![CDATA[
import langexplr.*;
import mx.controls.Label;

private var p:Polynomial = null;

private var plotter:FunctionPlotter;

private function init():void
{
var somePoints:Array = [new Point(p1.x,p1.y),
new Point(p2.x,p2.y),
new Point(p3.x,p3.y),
new Point(p4.x,p4.y)];

var poly:Polynomial = nevilleCalculator.createPolynomial(somePoints);
plotter = new FunctionPlotter(converter,poly);
var pointsToPlot:Array = plotter.createPolyPoints();
plotted.pointsToPlot = pointsToPlot;
createFormulaTextComponents(poly,formulaBox);
}

...
}
]]>
</mx:Script>
<mx:NumberFormatter id="formatter" precision="3"/>
<langexplr:PlaneToScreenConverter id="converter"
screenMaxX="400" screenMaxY="0"
screenMinX="0" screenMinY="400"
planeMinX="-20" planeMinY="-20"
planeMaxX="20" planeMaxY="20"/>
<langexplr:NevilleCalculator id="nevilleCalculator" converter="{converter}" />
<mx:Box direction="vertical" width="100%" height="100%">
<mx:Box id="formulaBox" direction="horizontal" verticalAlign="top" horizontalGap="-4" verticalGap="0" paddingLeft="0" paddingRight="0">
</mx:Box>
<mx:Canvas id="c" width="400" height="400" clipContent="true" backgroundColor="0xFFFFFF">
<langexplr:AxisLines converter="{converter}" numberOfSteps="14" styleName="alines"/>
<langexplr:ControlPoint id="p1" x="30" y="120" change="init();" converter="{converter}" formatter="{formatter}" styleName="pointStyle" />
<langexplr:ControlPoint id="p2" x="80" y="100" change="init();" converter="{converter}" formatter="{formatter}" styleName="pointStyle"/>
<langexplr:ControlPoint id="p3" x="190" y="30" change="init();" converter="{converter}" formatter="{formatter}" styleName="pointStyle"/>
<langexplr:ControlPoint id="p4" x="250" y="185" change="init();" converter="{converter}" formatter="{formatter}" styleName="pointStyle"/>
<langexplr:PlottedFunction id="plotted" x="0" y="0" />

</mx:Canvas>
</mx:Box>
</mx:Application>


Deploying the application


Compiling and the application and making it available in a web page is pretty straightforward.

By calling the compiler using the following command:

mxmlc Neville.mxml

A Neville.swf file is created. This file could be embedded like any other Flash program.

Final words


The experience of developing this little example using Flex was great. The documentation provided by Adobe was very useful.

As with JavaFX script and Silverlight Dynamic Languages SDK it was very nice to be able to create this example using only command line tools and a text editor.

It was interesting to learn a little bit about ActionScript 3. The language has some interesting things. I hope I could learn more about it in the future.

One feature that may be nice to have in AS3 is type inference for local variables. It could be useful to avoid scenarios such as typing var v:MyClass = new MyClass();
to avoid the "variable 'v' has no type declaration" warning.

Then creation of basic graphic shapes such as circles or lines was a little more difficult compared to JavaFX or Silverlight, since it cannot be specified directly in the MXML. That is something that seems to be different in
Flex 4 with FXG.

Code for this post can be found here.

A running version of this program can be found here.

Wednesday, October 1, 2008

Creating Flex unit tests with FlexUnit

While working on a little Flex example for an upcoming post, I needed a way to validate the parts of the code before finishing the complete example. By doing a search for unit testing frameworks for Flex I found FlexUnit.

In this post I'll show my experiences on writing my first unit tests for Flex code using FlexUnit.

There's already several excellent articles explaining how to start with FlexUnit. For example "Unit Testing with FlexUnit" and "How to use FlexUnit in Flex" provide a very nice introduction.

Creating a test cases


As in testing frameworks for other languages, test cases are defined as classes that inherit from a TestCase class. Individual tests are represented by methods.

The following example shows a method that tests a Polynomial class.


package tests
{
import flexunit.framework.TestCase;
import flexunit.framework.TestSuite;
import langexplr.Polynomial;

public class PolynomialTests extends TestCase
{
/***** Utility methods ********/
public static function suite():TestSuite
{
var theSuite:TestSuite = new TestSuite();
theSuite.addTestSuite( PolynomialTests );
return theSuite;
}

/***** Tests ********/
public function testAdditionDiffExponents():void
{
var p2:Polynomial = new Polynomial([4,3,9]);
var p1:Polynomial = new Polynomial([3.0]);


var p3:Polynomial = p1.add(p2);

assertEquals("Exponent",3,p3.coefficientValues.length);
assertEquals("x^0",7.0,p3.coefficientValues[0]);
assertEquals("x^1",3.0,p3.coefficientValues[1] );
assertEquals("x^2",9.0,p3.coefficientValues[2] );
}
...
}


The suite method is just an utility method that creates a TestSuite for all the tests in current test case. By calling theSuite.addTestSuite( PolynomialTests ); all the methods in the PolynomialTests class containing the word "test" will be included in the test suite.

The testAdditionDiffExponents method shows a simple test for the add method of the Polynomial class. As with other unit test frameworks, assertions are made inside the test method to verify the behavior of the code.

Creating a test runner


The test runner provides a nice UI for displaying test results. The following code shows the creation of the runner.


<mx:Application xmlns:mx="http://www.adobe.com/2006/mxml" xmlns="*"
xmlns:flexunit="flexunit.flexui.*"
creationComplete="onCreationComplete()">

<mx:Script>
<![CDATA[
import flexunit.framework.TestSuite;
import tests.PolynomialTests;
import tests.ConverterTests;
import tests.NevilleCalculatorTests;

private function onCreationComplete():void
{
testRunner.test = createSuite();
testRunner.startTest();
}

private function createSuite():TestSuite {
var ts:TestSuite = new TestSuite();

ts.addTest( PolynomialTests.suite() );
ts.addTest( ConverterTests.suite() );
ts.addTest( NevilleCalculatorTests.suite() );

return ts;
}

]]>
</mx:Script>

<flexunit:TestRunnerBase id="testRunner" width="100%" height="100%" />
</mx:Application>


The createSuite method creates all the test suites that will be executed.

Running a tests


By loading a page that references the generated SWF file we can execute the tests and browse the results.

The following screenshot shows a successful execution of the tests:

Successful FlexUnit tests execution

If a test fails message of the failed assertion is presented.

Failed FlexUnit execution

Creating a new kind of assertion


An assertion that compares two floating point numbers given a minimum difference is very useful while creating tests for the Polynomial operations. The following class was created to be the base class for test cases that require this kind of assertions.


package tests
{
import flexunit.framework.TestCase;
import flexunit.framework.TestSuite;
import flexunit.framework.AssertionFailedError;

public class NumericTestCase extends TestCase
{
public static function assertNumberEquals(message:String,num1:Number,num2:Number,d:Number=0.00001):void
{
oneAssertionHasBeenMade();
if (Math.abs(num1 - num2) > d) {
throw new AssertionFailedError(message+" "+ "expected:<" + num1 + "> but was:<" + num2 + ">");
}
}
}
}


An example of a use of this assertion is the following:

assertNumberEquals("First evaluation",c.convertToPlaneY(40.0),p.evaluate(c.convertToPlaneX(30.0)));


By using the default value of the d we're not required to always specify the tolerance value.

Wednesday, June 25, 2008

AbcExplorationLib: Starting an open source project

A couple of months ago I started working on a F# library to read and write ActionScript Byte Code (ABC) files based on the ActionScript Virtual Machine 2 (AVM2) Overview document. I though this was a great opportunity to learn more about both F# and ActionScript.

Although the library is still pretty incomplete, I'll continue the development as an open source project. The project is called AbcExplorationLib and is hosted in CodePlex .

Inspiration for this library comes from excellent bytecode manipulation libraries such as BCEL, ASM, Cecil or System.Reflection.Emit.

When completed this library could be used as part of a complied code analysis tool or as part of the back end of a experimental compiler.

An example of using this library to load a compiled script and print all the names of the opcodes is the following:


let loadedFile =
using(new BinaryReader(new FileStream("Hello.abc",FileMode.Open)))
(fun aInput -> AbcFile.ReadFrom(aInput))


let loadedScript =
AvmScript.Create(loadedFile.Scripts.[0],
loadedFile.Methods,
loadedFile.MethodBodies,
loadedFile.ConstantPool);

Array.iter
(fun (x:AbcFileInstruction) -> printf "%s\n" x.Name)
(loadedScript.InitMethod.Body.Value.BodyInfo.GetInstructions())


An example for generating a "Hello world" program:


let abcFileCreator = AbcFileCreator()
let cpCreator = abcFileCreator.ConstantPoolCreator

let instructions =
[| GetLocal0 ;
PushScope ;
FindPropertyStrict(cpCreator.GetMultiname([|""|],"print"));
PushString(cpCreator.AddString( "Hola!"));
CallProperty(cpCreator.GetMultiname([|""|],"print"),1) ;
CoerceA ;
SetLocal_1 ;
GetLocal1 ;
ReturnValue ;
Kill(1);
|];

let code = ConvertToByteArray(instructions)

let script =
AvmScript(
AvmMethod( "",
SQualifiedName("*"),
[||],
Some (
AvmMethodBody(
AbcMethodBodyInfo(
0, 2, 2, 1, 2,
code,
[||],[||]
)))));

abcFileCreator.AddScript(script.ToLowerIr(abcFileCreator))

let fileRep = abcFileCreator.CreateFile()

using (new BinaryWriter(new FileStream("Hello.abc",FileMode.Create))) (fun f -> fileRep.WriteTo(f))


As you can see this is the part that requires more work! :) .

Future posts will cover the progress of this library.

Sunday, June 1, 2008

Creating a simple AIR/Flex UI for a Snobol program

This post presents a little experiment for communicating an Snobol program with an AIR/Flex interface using HTTP.

This post is inspired by the Put a Flex UI On Your Application article by Bruce Eckel.

The example

The example that will be presented is a simple form showing sudo attempts recorded in the /var/log/auth.log log in a Linux box.

A simple program written in Snobol4 using CSnobol4 is used to extract the entries from auth.log . A AIR/Flex program is used to display the data. Both programs are communicated using HTTP.

Although there are several ways to communicate a AIR application with a server side element, HTTP was chosen because of its simplicity to implement in Snobol.

Simple HTTP in Snobol

A way to answer simple HTTP GET method requests from Snobol was required. This requires the creation of a server socket to answer requests. Luckly CSnobol4 includes a nice example for creating a server socket (snolib/serv.sno) using the SERV_LISTEN function. Having this element it was very simple to implement the GET method support.


serverPort = 8080
...
SLOOP FD = SERV_LISTEN("inet", "stream", serverPort) :F(LERR)

INPUT(.NET, 9, "UWT", "/dev/fd/" FD) :F(IERR)
OUTPUT(.NET, 9)

OUTPUT = "Accepting request "

LINE = NET

LINE "GET " GetStringPat $ getString " HTTP/" NUMBER "." NUMBER :F(LERR)

getString ARB "username=" ARB $ requestedUserName ("&" | RPOS(0))

OUTPUT = "Requesting SUDOS for user: " requestedUserName

INPUT(.LOGFILE,10,,"/var/log/auth.log")

NET = "HTTP/1.1 200 OK" CRLF
NET = "Server: SNOBOL4/1.1 (Linux)" CRLF
NET = "Content-Type: text/xml" CRLF
NET = CRLF


Extracting the data

The data extraction process is presented in the following code.


LetterU = "ABCDEFGHIJKLMNOPQRSTUVWXYZ"
LetterL = "abcdefghijklmnopqrstuvwxyz"
Digit = "0123456789"
DirectorySeparator = "/"
GetQuerySeparator = "?"
EscapeChar = "%.&="

GetStringChar = LetterU LetterL Digit DirectorySeparator EscapeChar GetQuerySeparator

GetStringPat = SPAN(GetStringChar)

...


NET = "<sudosdata>"

&ANCHOR = 1
LETTER = LetterU LetterL
USERNAMECHAR = Digit LetterU LetterL
USERNAMEPAT = SPAN(USERNAMECHAR)


READLINE LINE = LOGFILE :F(DONE)
LINE SPAN(LETTER) $ month SPAN(" ") SPAN(Digit) $ day ARB " sudo: " USERNAMEPAT . USER :F(READLINE)
LINE ARB "COMMAND=" ARB . COMMAND RPOS(0)

USER requestedUserName :F(READLINE)

NET = "<sudo><date>" month " " day "</date><user>" USER "</user><command>" COMMAND "</command></sudo>" :(READLINE)

DONE

NET = "</sudosdata>" :S(END)


The answer is formated as XML.

The Interface Code

The interface is a very simple program containing a text input to filter the query for a specify user. The useful HTTPService component is used to get the data from the Snobol program.

The Flex part of the program is the following:


<?xml version="1.0" encoding="utf-8"?>
<mx:WindowedApplication xmlns:mx="http://www.adobe.com/2006/mxml"
title="Sudos Test">
<mx:Script>
<![CDATA[
import flash.utils.Dictionary;
private function callQuery():void {
request.send();
}
]]>
</mx:Script>
<mx:HBox>
<mx:Label text="Sudos" />
<mx:TextInput id="userName" />
</mx:HBox>
<mx:Button label="Query!" click="callQuery()"/>
<mx:DataGrid id="data" dataProvider="{request.lastResult.sudosdata.sudo}">
<mx:columns>
<mx:DataGridColumn headerText="date" dataField="date"/>
<mx:DataGridColumn headerText="user" dataField="user"/>
<mx:DataGridColumn headerText="command" dataField="command"/>
</mx:columns>
</mx:DataGrid>

<mx:HTTPService id="request" url="http://localhost:8080"
useProxy="false"
method="GET">
<mx:request xmlns="">
<username>{userName.text}</username>
</mx:request>
</mx:HTTPService>
</mx:WindowedApplication>


How it looks

An example of running these programs is the following:


Code for this post can be found here.

Wednesday, February 6, 2008

Handling a call to a missing method in different languages, Part 2

This is the second of a two-part series of posts about the way different languages allow you to handle a call to method that doesn't exist. For this part I'm going to show Python, Objective-C, Haxe, ActionScript and Perl . At the end a note on languages not covered.


Python

In Python, this feature is available by implementing the __getattr__(self, name) method. This method is used to handle the access to a attribute.

The CsvFileEntry class code looks like this:


class CsvFileEntry(object):
def __init__(self,headers,contents):
self.headers = headers
self.contents = contents

def __getattr__(self, name):

if (self.headers.has_key(name)):
return self.contents[self.headers[name]]
else:
raise AttributeError,name


The implementation of CsvFile is the following(without the file loading part):


class CsvFile(object):
contents = []
headers = {}
def __init__(self, filename):
...

def entries(self):
for e in self.contents:
yield CsvFileEntry(self.headers,e)


A use of these classes:


f = csvfile.CsvFile('testfile.csv')
cars = csvfile.CsvFile('cars.csv')


for e in f.entries():
print "%s , %s\n" % (e.Name,e.Age)

for e in cars.entries():
print "%s , %s\n" % (e.Model,e.Year)


As someone commented in the previous post, __getattr__ could also return a function. A nice example of this is available here: Python's getattr.

Objective-C

The method forwarding capabilities of Objective-C could be used to implement this feature.

For this example I'm using GNUstep. A nice description of the forwaring mecanism using GNUstep is available from its documentation: 5.3 Forwarding.


The definition of the CsvFileEntry class is the following:

Declaration:


#include <Foundation/Foundation.h>

@interface CsvFileEntry: NSObject
{
NSArray* entryContents;
NSDictionary* headers;
}
- (id)init:(NSArray*)contents headers: (NSDictionary*)theHeaders;
- (NSString*) getField:(NSString*)name;
- (void) forwardInvocation: (NSInvocation*)invocation;
- (NSMethodSignature *)methodSignatureForSelector:(SEL)sel;

@end


Implementation:


@implementation CsvFileEntry

- (id)init:(NSArray*)contents headers: (NSDictionary*)theHeaders
{
entryContents = contents;
headers = theHeaders;
}

- (NSString*) getField:(NSString*)name
{
if ([headers objectForKey: name] != nil) {
NSNumber* index = [headers objectForKey: name];
NSString* result = [entryContents objectAtIndex: [index intValue]];
return [entryContents objectAtIndex: [index intValue]];
} else {
return nil;
}
}

- (void) forwardInvocation: (NSInvocation*)invocation
{
NSString* a = NSStringFromSelector([invocation selector]);
[invocation setArgument: &a atIndex: 2];
[invocation setSelector: NSSelectorFromString(@"getField:")];
return [invocation invokeWithTarget:self];

}
- (NSMethodSignature *)methodSignatureForSelector:(SEL)sel
{
if([headers objectForKey: NSStringFromSelector(sel)] != nil) {
NSMethodSignature* sig;
sig = [[self class]
instanceMethodSignatureForSelector:
NSSelectorFromString(@"getField:") ];
return sig;
} else {
return [super methodSignatureForSelector: sel];
}

}
@end


The methodSignatureFromSelector method returns information about the method to be invoked. Here what we do is to return the information of the getFieldMethod. The forwardInvocation method forwards the invocation to the getField method and sets the name of field as its first argument (arguments starts at index number 2).


The implementation of the CsvFile class is the following (without the file loading part):


@interface CsvFile: NSObject
{
NSArray* contentsData;
NSDictionary* headers;
NSString* fileName;
}
- init: (NSString*)filePath;
- (NSArray*) entries;
@end


@implementation CsvFile
-init: (NSString*)filePath
{
...
}

- (NSArray*) entries
{
int contentsSize = [contentsData count];
NSMutableArray* entriesArray = [NSMutableArray arrayWithCapacity: contentsSize];

int i;
for(i = 0;i < contentsSize;i++) {
[entriesArray
addObject:
[[[CsvFileEntry new]
init: [contentsData objectAtIndex: i]
headers: headers ]
autorelease]];
}
return entriesArray;
}
@end


A use of these classes is the following:


...
CsvFile* csv = [[CsvFile alloc] init: @"testfile.csv"];
CsvFile* cars = [[CsvFile alloc] init: @"cars.csv"];

int i;
NSArray* entries;
NSLog(@"--------------");

entries = [csv entries];
for( i = 0;i < [entries count];i++)
{
CsvFileEntry* entry = [entries objectAtIndex: i];
NSLog(@"Name: %@ Score: %@",[entry Name], [entry Score]);
}

NSLog(@"--------------");

entries = [cars entries];
for( i = 0;i < [entries count];i++)
{
CsvFileEntry* entry = [entries objectAtIndex: i];
NSLog(@"Model: %@ Year: %@",[entry Model], [entry Year]);
}
...


A nice experiment will be to try this code in a Mac environment.

Haxe

Haxe is an interesting language that comes with a compiler with backends for Javascript, Flash and the Neko virtual machine. Haxe provides this functionality with the __resolve method a description of this mecanism can be found here: missing_method, the haxe way.

The implementation of the CsvFileEntry class is the following:


class CsvFileEntry implements Dynamic<Array<Dynamic>->Dynamic>
{
private var headers : Array<String>;
private var contents : Array<String>;
public function new(aHeaders : Array<String>, aContents : Array<String>) {
headers = aHeaders;
contents = aContents;
}

function __resolve( name : String ) : Array<Dynamic>->Dynamic {
var index = getHeaderPosition(name);
var contents = this.contents;
if(index != -1) {
return function(args:Array<Dynamic> ):Dynamic {
return contents[index];
};
} else {
return null;
}
}
...
}


The implementation of the CsvFile (without the file load part):


class CsvFile {
var fileName : String;
var contents : List<Array<String>>;
var headers : Array<String>;

public function new(aFileName:String) {
...
}

public function entries() : List<CsvFileEntry> {
var headers = this.headers;
return contents.map(
function(data:Array<String>) :CsvFileEntry {
return new CsvFileEntry(headers,data);} );
}
}


A use of these classes is the following:


...
var f:CsvFile = new CsvFile("testfile.csv");
var cars:CsvFile = new CsvFile("cars.csv");


for (e in f.entries()) {
var v:String = e.Name([]);

neko.Lib.print(v);
neko.Lib.print("<br/>");
}
for (c in cars.entries()) {
var v:String = c.Model([]);
neko.Lib.print(v);
neko.Lib.print("<br/>");
}
...


ActionScript

ActionScript 3 provides this functionality by using inheriting from the Proxy class. An excellent description of this mecanism can be found in method_missing in ActionScript 3/Flex.

The implementation of the CsvFileEntry is the following:


dynamic public class CsvFileEntry extends Proxy
{

private var headers: Dictionary;
private var contents: Array;
public function CsvFileEntry(headers : Dictionary, contents : Array )
{
this.headers = headers;
this.contents = contents;
}

flash_proxy override function callProperty(method: *, ...args): * {
if (headers[method] == null)
{
throw( new Error("Method not found: "+method.toString()));
}
else
{
var i:int = headers[method];
return contents[i];
}
}
}
}


The CsvFile class without the file loading code:


public class CsvFile
{
private var file : File;
private var contents : ArrayCollection;
private var headers: Dictionary;
public function CsvFile(file:File)
{
...
}
public function getEntries() : ArrayCollection
{
var result : ArrayCollection = new ArrayCollection();
for each (var entry:Array in contents) {
result.addItem(new CsvFileEntry(headers,entry));
}
return result;
}
}


A use of these classes:


var f:CsvFile = new CsvFile(new File("testfile.csv"));
var cars:CsvFile = new CsvFile(new File("cars.csv"));
for each( var e:CsvFileEntry in f.getEntries()) {
aList.addItem(e.Name());
}
for each( var c:CsvFileEntry in cars.getEntries()) {
aList.addItem(c.Year());
}


Perl


As commented in the previous post, Perl provides this functionality with the AUTOLOAD method. A nice description is provided here: AUTOLOAD: Proxy Methods


Implementation of the CsvFileEntry class is the following:


package CsvFileEntry;
use strict;
use Carp;
our $AUTOLOAD;


sub new {
my $self = {};
my $class = shift;

my %headers = %{$_[0]};
my @data = @{$_[1]};

$self->{Headers} = \%headers;
$self->{Data} = \@data;

my $al = scalar(@{$self->{Data}});

bless($self,$class);
return $self;
}

sub getfield {
my $self = shift;
my $key = shift;
my %headers = %{$self->{Headers}};
my @data = @{$self->{Data}};
return $data[$headers{$key}];
}

sub AUTOLOAD {
my $self = shift;
my $name = $AUTOLOAD;
$name =~ s/CsvFileEntry:://;

my %headers = %{$self->{Headers}};

unless (exists $headers{$name}) {
croak "Cannot access member $name";
}

my $key = $headers{$name};
my @data = @{$self->{Data}};

return $data[$key];
}

1;


Implementation of the CsvFile class is the following:


package CsvFile;
use strict;
use CsvFileEntry;

sub new {
...
}
...
sub content {
my $self = shift;
my @entries = map {CsvFileEntry->new($self->{Headers},\@{$_})} @{$self->{Content}};
return @entries;
}
1;


A use of this code is the following:


use CsvFile;

$f = CsvFile->new("testfile.csv");
$cars = CsvFile->new("cars.csv");

foreach $person ($f->content) {
my $name= $person->Name;
my $age = $person->Age;
print "$name $age \n";
}
foreach $car ($cars->content) {
my $model= $car->Model;
print "$model\n";
}


Languages not covered.

Some languages were not covered in these posts. For example in the previous post schlenk commented that Tcl provides this functionality with the unknown proc.

Also EcmaScript 4 seems to provide this functionality, in slide 14 of Tamarin and ECMAScript 4.

I hope I can cover more on these languages in the future.

Code for this post can be found here.