This is the second of series of posts that explore features across different platforms such as JavaFX Script or Flex. The first post can be found here.
Code is this post is based on Silverlight 2 Beta 2.
The example
As described in the previous post:
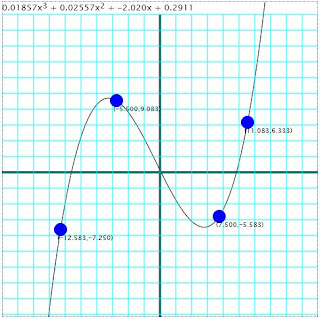
A little program that calculates and plots a polynomial that touches four points selected by the user. The user can move any of the given points in the screen and the polynomial will be recalculated and replotted while moving it.
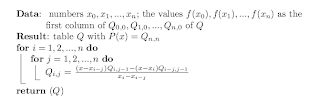
The Neville's algorithm is used in order to find the polynomial that touches all the given points.
Dynamic languages and Silverlight
The Silverlight web site provides documentation and examples to get you started using dynamic languages with Silverlight also the Silverlight Dynamic Languages SDK provides examples and useful code templates.
However, most of the documentation that talks about specific features of Silverlight focused in working with C#.
One of the thing that I wanted to explore was to use the data binding feature, however I didn't find a way to use it in conjunction with IronRuby classes.
John Lam's blog is a good place to find specific samples for working with IronRuby and Silverlight.
One of the benefits of working with dynamic languages and Silveright is that it's very easy to just start trying examples and experiment with it. You only need the Silverlight 2 SDK beta 2 and any text editor (no Visual Studio is required). The Chiron local web server is a very useful tool that let's you execute the Silverlight program and let's you see the changes just by just refreshing the page.
The program
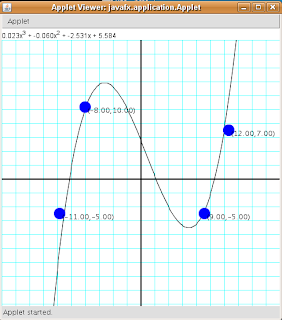
The final program looks like this:

The running version of this program can be found here.
Polynomial class
The following program shows the implementation of the
Polynomial class.
class Polynomial
  def initialize(coefficients)
    @coefficients = coefficients
  end
  def evaluate(x)
    i = @coefficients.length - 1
    result = 0.0
    while (i >= 0)
      result += (x**i)*@coefficients[i]
      i = i - 1
    end
    return result
  end

  def coefficients
    @coefficients
  end


  def add(p)

    if @coefficients.length > p.coefficients.length
      c1 = @coefficients
      c2 = p.coefficients
    else
      c1 = p.coefficients
      c2 = @coefficients
    end
    length1 = c1.length
    length2 = c2.length

    result = (0..length1-1).map do |i|
      if i < length2
        c1[i]+c2[i]
      else
        c1[i]
      end
    end

    return Polynomial.new(result)
  end

  def add_destructive(p)

    if @coefficients.length > p.coefficients.length
      c1 = @coefficients
      c2 = p.coefficients
    else
      c1 = p.coefficients
      c2 = @coefficients
    end

    length2 = c2.length

    (0..length2-1).each do |i|
        c1[i] = c1[i]+c2[i]
    end

    return Polynomial.new(c1)
  end


  def multiply(p)
    results = Array.new(p.coefficients.length+@coefficients.length - 1,0.0)
    current_exponent = 0
    p.coefficients.each do |coefficient|
      if coefficient.abs > 0.000001
        current_self_exponent = 0
        @coefficients.each do |self_coefficient|
           results[current_self_exponent+current_exponent] = (self_coefficient*coefficient) + results[current_self_exponent+current_exponent]
           current_self_exponent = current_self_exponent + 1
         end
      end
      current_exponent = current_exponent + 1
    end

    Polynomial.new(results)
  end
end
This class contains a couple of methods for polynomial evaluation, addition and multiplication. These operations are required to implement the algorithm.
Algorithm
The following code shows the implementation of Neville's algorithm.
class NevilleCalculator
  def initialize(converter)
    @converter = converter
  end
  def create_polynomial(points)
    number_of_points = points.length
    matrix = (0..number_of_points-1).map {|i|(0..i).map{|j| Polynomial.new([])}}
    (0..number_of_points-1).each do |i|
      matrix[i][0] = Polynomial.new([@converter.convert_to_plane_y(points[i].y)])
    end
    xs = points.map {|point| @converter.convert_to_plane_x(point.x) }

    (1..number_of_points-1).each do |i|
      (1..i).each do |j|
        q =  xs[i]-xs[i-j]
        p1 = Polynomial.new  [-1.0*xs[i-j]/q,1.0/q]
        p2 = Polynomial.new  [xs[i]/q,-1.0/q]
        matrix[i][j] = p1.multiply(matrix[i][j-1]).add_destructive(p2.multiply(matrix[i-1][j-1]))
      end
    end

    return matrix[number_of_points-1][number_of_points-1]
  end
end
The
create_polynomial method receives an array of user selected points in the screen. The converter object (described below) converts coordinates from the screen to the Cartesian coordinate system.Screen to plane coordinate conversion
In order to convert the coordinates the
Converter class was used.
class PlaneToScreenConverter
  def initialize(screen_max_x,screen_min_x,screen_max_y,screen_min_y,
                 plane_max_x,plane_min_x,plane_max_y,plane_min_y)
      ...
    @m_to_plane_x = ((@plane_max_x - @plane_min_x)/(@screen_max_x - @screen_min_x))
    @b_to_plane_x =  @plane_min_x- @screen_min_x*@m_to_plane_x

    @m_to_plane_y = ((@plane_max_y - @plane_min_y)/(@screen_max_y - @screen_min_y))
    @b_to_plane_y =  @plane_min_y - @screen_min_y  *@m_to_plane_y

  end

  ...

  def convert_to_screen_x(x)
    m = ((@screen_max_x - @screen_min_x)/(@plane_max_x - @plane_min_x))
    b =  @screen_min_x  - @plane_min_x*m
    return (m*x + b)
  end
  def convert_to_screen_y(y)
    m = ((@screen_max_y - @screen_min_y)/(@plane_max_y - @plane_min_y))
    b =  @screen_min_y  - @plane_min_y*m
    return (m*y + b)
  end
  def convert_to_plane_x(x)
    return (@m_to_plane_x*x + @b_to_plane_x)

  end
  def convert_to_plane_y(y)
    return (@m_to_plane_y*y + @b_to_plane_y)
  end
end
Also a class to represent a user selected point was created:
class ScreenPoint
  def x
    @x
  end

  def x=(v)
    @x = v
  end

  def y
    @y
  end

  def y=(v)
    @y = v
  end
  def initialize(x,y)
    @x = x
    @y = y
  end
end
For some reason I couldn't use
attr_accessor with the version of IronRuby shipped with the Silverlight SDK 2 Beta 2.Plotting the polynomial
In order to plot the polynomial a Polyline object will be used. The
FunctionPlotter class is used to create the list of points to create the list of Polyline points.
class FunctionPlotter
  def initialize(converter,steps,polynomial)
    @converter = converter
    @steps = steps
    @polynomial = polynomial
    @points = []
  end

  def points
    @points
  end
  def polynomial
    @polynomial
  end
  def recalculate_points

    increment = ((@converter.plane_max_x - @converter.plane_min_x)/@steps).abs
    current_x = [@converter.plane_max_x,@converter.plane_min_x].min
    @points = (0..@steps - 1).map do
      x = current_x
      y = @polynomial.evaluate(x)
      current_x = current_x+increment
      [x,y]
    end
  end
end
Dragging elements
Since the user can modify the points across the screen, a way to drag shapes is required. The Implementing Drag-and-Drop Functionality with Mouse Events and Capture (Silverlight 2) article provides a complete guide on how add dragging capabilities to a Silverlight shape.
Here's the implementation of a helper class that implements this functionality.
class ElementDraggingTracker
  def is_captured
    return @captured
  end
  def initialize
    @captured = false
    @last_position = ScreenPoint.new(0,0)
  end

  def handle_mouse_down(sender,e)
     current_pos = e.GetPosition(nil)
     @last_position.x =  current_pos.X
     @last_position.y = current_pos.Y
     @captured = true
     sender.CaptureMouse()
  end
  def handle_mouse_move(sender,e)
    if @captured
      new_position = e.GetPosition(nil)
      deltav = new_position.Y - @last_position.y
      deltah = new_position.X - @last_position.x
      sender.Data.Center = Point.new(sender.Data.Center.X+deltah,sender.Data.Center.Y+deltav)
      @last_position.x = new_position.X
      @last_position.y = new_position.Y
    end
  end
  def handle_mouse_up(sender,e)
     sender.ReleaseMouseCapture()
     @captured = false
  end
end
This implementation was made to work only with Path objects that have an EllipseGeometry as the Data. That's why the
Data and Center properties are used. This code could be improved to be independent of the object being dragged.Presenting the polynomial
In order to show a textual representation of the calculated polynomial, a sequence of TextBlock objects was used. This was necessary since I wanted to show the exponent of each term of the polynomial. The only way I found to do that was to add an horizontal StackPanel and add
TextBlock for each term and use a TranslateTransform for the exponents. Here's the code:
  def create_polynomial_text_elements(p)
    first_time = false
    panel = polyTextPanel

    panel.Children.Clear
    length = p.coefficients.length
    (0..length-1).each do |pos|
      i = (length - 1) - pos
      c = p.coefficients[i]
      exponent = i

      if c.abs > 0.000001 then
        text = ""
        text = text + ("%.4g" % c)
        text = text + "x" if exponent > 0

        b = create_text_block text,"FormulaTextStyle"
        panel.Children.Add b
        if exponent > 1
          b = create_text_block exponent.to_s,"FormulaExponentTextStyle"
          t = TranslateTransform.new
          t.Y = -2
          b.RenderTransform = t
          panel.Children.Add b
        end

        if !first_time and exponent != 0
          b = create_text_block " + " ,"FormulaTextStyle"
          panel.Children.Add b
        else
          first_time = false
        end
      end

    end
  end
end
The main program
The XAML for this program is very simple:
<UserControl x:Class="System.Windows.Controls.UserControl"
 xmlns="http://schemas.microsoft.com/client/2007"
 xmlns:x="http://schemas.microsoft.com/winfx/2006/xaml"
        x:Name="ucontrol">
   <UserControl.Resources>

     ...

   </UserControl.Resources>
   <StackPanel>
      <StackPanel x:Name="polyTextPanel" Orientation="Horizontal">
      </StackPanel>
      <Canvas x:Name="theCanvas" Width="480" Height="480" Background="White">
         <Polyline x:Name="polynomialPolyline" Style="{StaticResource PolylineStyle}"/>
         <Line Style="{StaticResource AxisLineStyle}" X1="0" Y1="240" X2="480" Y2="240"/>
         <Line Style="{StaticResource AxisLineStyle}" X1="240" Y1="0" X2="240" Y2="480"/>
      </Canvas>
   </StackPanel>
</UserControl>
The
App class implements the entry point of the program:
require "Silverlight"
require 'screen_point'
require 'element_dragging_tracker'
require 'plane_to_screen_converter'
require 'neville_calculator'
require 'function_plotter'
require 'polynomial'

include System::Windows
include System::Windows::Controls
include System::Windows::Media
include System::Windows::Shapes


class App < SilverlightApplication
  use_xaml

  ...

end

App.new
The
SilverlightApplication class and the referenced Silverlight.rb file are provided as part of a template for IronRuby/Silverlight project from the Silvelight Dynamic SDK.The
initialize method of the App class looks like this:
def initialize
  (0..(480/24)).each do |i|
    theCanvas.Children.Add create_line(i*24,0,i*24,480,"GridLineStyle")
  end
  (0..(480/24)).each do |i|
    theCanvas.Children.Add create_line(0,i*24,480,i*24,"GridLineStyle")
  end

  @points = [ScreenPoint.new(100,300),
    ScreenPoint.new(200,400),
    ScreenPoint.new(350,300),
    ScreenPoint.new(400,200)
  ]

  @converter = PlaneToScreenConverter.new(480.0,0.0,0.0,480.0,20.0,-20.0,20.0,-20.0)

  @tracker = ElementDraggingTracker.new

  canvas = theCanvas

  @points.each do |p|
    c = create_circle p.x,p.y,10,"ControlPointStyle"
    t = create_text_block "","PointTextStyle"
    adjust_point_text_block(p,t)

    c.mouse_left_button_down do |sender,args|
      @tracker.handle_mouse_down(sender,args)
    end
    c.mouse_left_button_up do |sender,args|
      @tracker.handle_mouse_up(sender,args)
      p.x = sender.Data.Center.X
      p.y = sender.Data.Center.Y
      adjust_point_text_block(p,t)
      replot
    end
    c.mouse_move do |sender,args|
      @tracker.handle_mouse_move(sender,args)
      if @tracker.is_captured
        p.x = sender.Data.Center.X
        p.y = sender.Data.Center.Y
        adjust_point_text_block(p,t)

        replot
      end
    end
    canvas.Children.Add c
    canvas.Children.Add t
  end

  replot
end
Two important things happen in this method. First the grid lines are added to the canvas and then the control points are added to the canvas and the dragging event handlers are also associated with each point. The event handlers also take care of synchronizing the update of each point's label and to recalculate and re-plot the polynomial.
The
replot method executes the Neville's algorithm and create the new points for the Polyline.
def replot
  @calc = NevilleCalculator.new(@converter)

  @plotter = FunctionPlotter.new(@converter,200,@calc.create_polynomial(@points))

  @plotter.recalculate_points

  pc = PointCollection.new
  @plotter.points.each do |aP|
    pc.Add(Point.new(@converter.convert_to_screen_x(aP[0]),
        @converter.convert_to_screen_y(aP[1])))
  end

  polynomialPolyline.Points = pc
  create_polynomial_text_elements @plotter.polynomial
end
Additional methods for creating Silverlight shapes were required:
def create_line(x1,y1,x2,y2,style_key)
  p = Path.new
  p.Data = LineGeometry.new
  p.Data.StartPoint = Point.new x1,y1
  p.Data.EndPoint = Point.new x2,y2
  p.Style = ucontrol.Resources.Item(style_key.ToString())
  return p
end

def create_circle(x1,y1,radius,style_key)
  p = Path.new
  p.Data = EllipseGeometry.new
  p.Data.Center = Point.new x1,y1
  p.Data.RadiusX = radius
  p.Data.RadiusY = radius
  p.Style = ucontrol.Resources.Item(style_key.ToString())
  return p
end

def create_text_block(text,style_key)
  t = TextBlock.new
  t.Text = text
  t.Style = ucontrol.Resources.Item(style_key.ToString())
  return t
end

def adjust_point_text_block(p,t)
  t.Text = "("+("%.3f" % @converter.convert_to_plane_x(p.x)) +
           ","+("%.3f" % @converter.convert_to_plane_y(p.y)) + ")"
  Canvas.SetTop(t,p.y+5)
  Canvas.SetLeft(t,p.x-5)
end
Separating the styles
Silverlight style separationprovides a way to separate style definitions for UI elements. For this program, all the style definitions are defined in a separate section of the XAML file.
<UserControl.Resources>
   <Style TargetType="TextBlock" x:Key="FormulaTextStyle">
        <Setter Property="FontSize" Value="13"/>
   </Style>
   <Style TargetType="TextBlock" x:Key="FormulaExponentTextStyle">
        <Setter Property="FontSize" Value="12"/>
   </Style>
   <Style TargetType="TextBlock" x:Key="PointTextStyle">
        <Setter Property="FontSize" Value="10"/>
   </Style>
   <Style TargetType="Line" x:Key="AxisLineStyle">
        <Setter Property="Stroke" Value="Black" />
        <Setter Property="StrokeThickness" Value="3" />
   </Style>
   <Style TargetType="Polyline" x:Key="PolylineStyle">
        <Setter Property="Stroke" Value="Black" />
   </Style>
   <Style TargetType="Path" x:Key="GridLineStyle">
        <Setter Property="Stroke" Value="Cyan" />
   </Style>
   <Style TargetType="Path" x:Key="ControlPointStyle">
        <Setter Property="Fill" Value="Blue" />
   </Style>
</UserControl.Resources>
In order to assign styles to elements in IronRuby the following code was used:
p.Style = ucontrol.Resources.Item(style_key.ToString())
Given that
style_key is an IronRuby variable with a string. Note that I had to use the ToString method. If the ToString method as not used I received a runtime error saying: ArgumentException: key must be a string. Deploying the application
The creation of the XAP file to be deployed is VERY simple. The following command creates an
app.xap file from a existing app folder. Chiron.exe /z:app.xap /d:app
The
/z parameter adds all the libraries required for executing IronRuby.Final words
The only issue I see is the lack of documentation for using Silverlight features with scripting languages. The main thing missing is how to use data binding (if possible) which is a very nice feature which I enjoyed using in JavaFX Script for the previous post.
Because of the inclusion of the IronRuby support libraries, the final XAP size was be bigger than I expected (~700K in this case). However it was not as big as the one from the JavaFX example which included all the JavaFX runtime libraries.
For this example I had to take care of the performance. I stared using an almost direct port of the JavaFX script code of the previous post for the algorithm and the polynomial operations which lead to bad performance.
The integration of IronRuby with .NET is very nice, translating examples from C# was very easy, for example with the element dragging code described above. One thing that can be improved is to give more information on where an exception occurred in a program.
Overall the experience of working with IronRuby and Silverlight was very nice. I was very easy to get feedback of code changes just by hitting refresh in the browser.
Code for this post can be found here.
The running version of the example can be found here.


