Monday, January 31, 2011

IronPython & Silverlight Part VI: Using the TreeView control

In this post I'm going to show a small example of using the Silverlight 4 TreeView control with IronPython.

Referencing System.Windows.Controls.dll


Before we start using the TreeView control we need to add a reference to System.Windows.Controls.dll . This assembly can be found in the "Microsoft Silverlight 4 Tools for Visual Studio 2010" package.

You need to copy this assembly to the location of chiron.exe (ex. IronPython2.7\Silverlight\bin) and add a reference to it in the AppManifest.xaml file.

<Deployment xmlns="http://schemas.microsoft.com/client/2007/deployment" 
xmlns:x="http://schemas.microsoft.com/winfx/2006/xaml"
RuntimeVersion="4.0.50917.0"
EntryPointAssembly="Microsoft.Scripting.Silverlight"
EntryPointType="Microsoft.Scripting.Silverlight.DynamicApplication"
ExternalCallersFromCrossDomain="ScriptableOnly">
<!-- Add assembly references here -->
<Deployment.Parts>
...
<AssemblyPart Source="System.Windows.Controls.dll" />
</Deployment.Parts>
...
</Deployment>


Since we're using Silverlight 4 we need to change the runtime version to "4.0.50917.0" (see this post for more details).

Using the TreeView in XAML


Now that we have access to the assembly we can use it in app.xaml.

<UserControl x:Class="System.Windows.Controls.UserControl"
xmlns="http://schemas.microsoft.com/client/2007"
xmlns:x="http://schemas.microsoft.com/winfx/2006/xaml"
xmlns:sdk="clr-namespace:System.Windows.Controls;assembly=System.Windows.Controls"
xmlns:wsdk="clr-namespace:System.Windows;assembly=System.Windows.Controls">
<StackPanel x:Name="layout_root" Background="White">
<TextBlock x:Name="Message" FontSize="30" Text="TreeView experiment" />
<sdk:TreeView x:Name="tree">
<sdk:TreeView.ItemTemplate>
<wsdk:HierarchicalDataTemplate ItemsSource="{Binding nodes}">
<TextBlock Foreground="Red" Text="{Binding label}" />
</wsdk:HierarchicalDataTemplate>
</sdk:TreeView.ItemTemplate>
</sdk:TreeView>
</StackPanel>
</UserControl>


TreeView data binding


The XAML file above shows that we're binding the content of the tree view to the nodes property of the data source object. Here's the definition of the Python class used for this example:

from System.Windows import Application
from System.Windows.Controls import UserControl
from System import Object
from System.Collections.ObjectModel import ObservableCollection
import clrtype
import clr

clr.AddReferenceToFile('GalaSoft.MvvmLight.SL4.dll')

from GalaSoft.MvvmLight.Command import RelayCommand


class Node:
__metaclass__ = clrtype.ClrClass
__clrnamespace = "LangexplrExperiments"


def __init__(self,label,children):
self.text = label
self.children = children

@property
@clrtype.accepts()
@clrtype.returns(str)
def label(self):
return self.text

@property
@clrtype.accepts()
@clrtype.returns(Object)
def nodes(self):
return self.children


class App:
def __init__(self):
root = Application.Current.LoadRootVisual(UserControl(), "app.xaml")
root.tree.ItemsSource = [Node('level1',
[Node('level11',[]),
Node('level12',[Node('level121',[])])
])]


App()


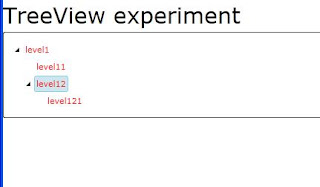
With this changes we can run chiron.exe /b and we get:
Saturday, January 29, 2011

IronPython & Silverlight Part V: Using the MVVM Light Toolkit

In this post I'm going to show a small example of using the MVVM Light Toolkit in Silverlight with IronPython.

MVVM Light


According to its website, MVVM Light Toolkit is a:

...set of components helping people to get started in the Model - View - ViewModel pattern in Silverlight and WPF...

It provides useful elements such an implementation of "Relay Command" and a feature to expose events as commands (EventToCommand).

In the context of IronPython it will save us a lot of code.

Adding a reference to MVVM Light


There are several ways to add a reference to the MVVM Light Toolkit assembly. However the first step is to set the Silverlight version to 4 (see this post for more information).

Adding the reference using the manifest


One way to add the reference is to use the manifest AppManifest.xaml. Once we generated this file(using chiron.exe /m and copying it to app/) and changed the Silverlight version to 4 (see here) we can add an entry referencing the GalaSoft.MvvmLight.SL4.dll assembly.

<Deployment xmlns="http://schemas.microsoft.com/client/2007/deployment" 
xmlns:x="http://schemas.microsoft.com/winfx/2006/xaml"
RuntimeVersion="4.0.50401.0"
EntryPointAssembly="Microsoft.Scripting.Silverlight"
EntryPointType="Microsoft.Scripting.Silverlight.DynamicApplication"
ExternalCallersFromCrossDomain="ScriptableOnly">
<!-- Add assembly references here -->
<Deployment.Parts>
...
<AssemblyPart Source="GalaSoft.MvvmLight.SL4.dll"/>
...
</Deployment.Parts>
...
</Deployment>

Also we need to copy of the GalaSoft.MvvmLight.SL4.dll file to the chiron.exe folder (ex. IronPython\Silvelright\bin).


Using it in Python


Once we referenced this file using the manifest we need to reference it from code.
import clr
clr.AddReferenceToFile('GalaSoft.MvvmLight.SL4.dll')


Example


The following example shows the use of RelayCommand and ViewModelBase from IronPython.

app.xaml:

<UserControl x:Class="System.Windows.Controls.UserControl"
xmlns="http://schemas.microsoft.com/client/2007"
xmlns:x="http://schemas.microsoft.com/winfx/2006/xaml"
xmlns:wbc="clr-namespace:System.Windows.Controls">
<StackPanel Width="300" x:Name="layout_root" Background="White">
<TextBox x:Name="my_text_box"
Text="{Binding text_to_display, Mode=TwoWay}" />

<TextBlock Text="{Binding text_to_display}" />
<Button Content="Reset" Command="{Binding reset_command}"/>
</StackPanel>
</UserControl>


app.py:

import clr
clr.AddReferenceToFile('GalaSoft.MvvmLight.SL4.dll')
from System.Windows import Application
from System.Windows.Controls import UserControl
import System
import clrtype
from System.Windows import MessageBox
from GalaSoft.MvvmLight.Command import RelayCommand
from GalaSoft.MvvmLight import ViewModelBase

class MyBasicModel(ViewModelBase):
__metaclass__ = clrtype.ClrClass

def __init__(self):
self.text = 'Initial text'

@property
@clrtype.accepts()
@clrtype.returns(System.String)
def text_to_display(self): return self.text


@text_to_display.setter
@clrtype.accepts(System.String)
@clrtype.returns()
def text_to_display(self, value):
self.text = value
self.RaisePropertyChanged('text_to_display')

@property
@clrtype.accepts()
@clrtype.returns(System.Object)
def reset_command(self):
return RelayCommand(lambda: self.perform_reset_text() )

def perform_reset_text(self):
self.text_to_display = ''


class App:

def __init__(self):

self.model = MyBasicModel()
self.root = Application.Current.LoadRootVisual(UserControl(), "app.xaml")
self.root.DataContext = self.model


theApp = App()


Using this library from IronPython saves us from many thins such as having to declare events to comply with the INotifyPropertyChanged interface.

Tuesday, January 25, 2011

IronPython & Silverlight Part IV: Using Silverlight 4

The default Silverlight runtime version of programs created with IronPython 2.7 Beta 1 is "2.0.31005.0". If you want to take advantage of Silverlight 4 features you have to make a small change to AppManifest.xaml.


For example, say that you want to add a RichTextBox control(available on Silverlight 4).

<UserControl x:Class="System.Windows.Controls.UserControl"
xmlns="http://schemas.microsoft.com/client/2007"
xmlns:x="http://schemas.microsoft.com/winfx/2006/xaml"
xmlns:wbc="clr-namespace:System.Windows.Controls">
<StackPanel Width="300" x:Name="layout_root" Background="White">
<wbc:RichTextBox x:Name="rtb" />
<Button x:Name="my_button" Content="Ok"/>
</StackPanel>
</UserControl>


And

from System.Windows import Application
from System.Windows.Controls import UserControl
import System


class App:

def __init__(self):
self.theText = """
this
is
some
text"""


self.root = Application.Current.LoadRootVisual(UserControl(), "app.xaml")
self.root.rtb.Selection.Select(self.root.rtb.ContentStart, self.root.rtb.ContentEnd)
self.root.rtb.Selection.Text = self.theText

theApp = App()


In order to make this program work you have to add the AppManifest.xaml to the app/ folder of your application. You can get a copy of this file using chiron.exe /m :

By default this file looks like this:

<Deployment xmlns="http://schemas.microsoft.com/client/2007/deployment" 
xmlns:x="http://schemas.microsoft.com/winfx/2006/xaml"
RuntimeVersion="2.0.31005.0"
EntryPointAssembly="Microsoft.Scripting.Silverlight"
EntryPointType="Microsoft.Scripting.Silverlight.DynamicApplication"
ExternalCallersFromCrossDomain="ScriptableOnly">
<!-- Add assembly references here -->
<Deployment.Parts>
<!-- In the XAP -->
<!-- <AssemblyPart Source="Foo.dll" /> -->
<!-- Outside the XAP, same domain -->
<!-- <AssemblyPart Source="/Foo.dll" /> -->
<!-- Outside the XAP, different domain -->
<!-- <AssemblyPart Source="http://bar.com/Foo.dll" /> -->
<AssemblyPart Source="Microsoft.Scripting.Silverlight.dll" />
<AssemblyPart Source="System.Numerics.dll" />
<AssemblyPart Source="Microsoft.Scripting.dll" />
<AssemblyPart Source="Microsoft.Dynamic.dll" />
<AssemblyPart Source="IronPython.dll" />
<AssemblyPart Source="IronPython.Modules.dll" />
</Deployment.Parts>
<!-- Add transparent platform extensions (.slvx) references here -->
<Deployment.ExternalParts>
<!-- Example -->
<!-- <ExtensionPart Source="http://bar.com/v1/Foo.slvx" /> -->
</Deployment.ExternalParts>
...
</Deployment>


After copying this file to the app/ folder you have to change the RuntimeVersion attribute value to "4.0.50401.0".

Now to can run the application and have access to Silverlight 4 features.