Thursday, October 30, 2008

Using F# Active Patterns to encapsulate complex conditions

In this post I'm going to show a little of example of using F# Active Patterns to encapsulate complex conditions.


While working on AbcExplorationLib I needed way to generate "friendly" labels for branch instruction destinations. According to the ActionScript Virtual Machine 2 Overview document, the branch instructions (jump,ifgt,ifeq,etc.) have a S24(signed 24 bit value) offset that specifies the destination. What I wanted to do was to modify the original instruction list to add a special(non existent ) instruction called ArtificalCodeBranchLabel which has a name which is referenced in the in the branch instruction.

Every branch instruction in the library representation has an object of type:


type JumpLabelReference =
| UnSolvedReference of int
| SolvedReference of string


Every instruction in the library is described in a big discriminated union like this:


type AbcFileInstruction =
| ArtificalCodeBranchLabel of string
| Add
| AsType of int
| BitAnd
| BitNot
| BitOr
| BitXor
...
| IfEq of JumpLabelReference
| IfFalse of JumpLabelReference
| IfGe of JumpLabelReference
| IfGt of JumpLabelReference
| IfLe of JumpLabelReference
...


Notice that essentially, every branch instruction(except for lookupswitch) have a single JumpLabelReference instance as its argument, and in order to write the process of solving the branch destination we can have to write code for each instruction.

So in order to assist the process of solving the reference the following active pattern was created:


let (|UnsolvedSingleBranchInstruction|_|)(pair:int64*AbcFileInstruction) =
let (instructionOffset,instruction) = pair in
let absoluteOffset(relativeOffset:int) = int64(3 + 1 + relativeOffset) + instructionOffset in
let result(offset,createFunction) = Some(absoluteOffset <| offset,createFunction)
in
match instruction with
| IfEq(UnSolvedReference offset) -> result(offset,fun o -> IfEq(o))
| IfFalse(UnSolvedReference offset) -> result(offset,fun o -> IfFalse(o))
| IfGe(UnSolvedReference offset) -> result(offset,fun o -> IfGe(o))
| IfGt(UnSolvedReference offset) -> result(offset,fun o -> IfGt(o))
| IfLe(UnSolvedReference offset) -> result(offset,fun o -> IfLe(o))
| IfLt(UnSolvedReference offset) -> result(offset,fun o -> IfLt(o))
| IfNGe(UnSolvedReference offset) -> result(offset,fun o -> IfNGe(o))
| IfNGt(UnSolvedReference offset) -> result(offset,fun o -> IfNGt(o))
| IfNLe(UnSolvedReference offset) -> result(offset,fun o -> IfNLe(o))
| IfNLt(UnSolvedReference offset) -> result(offset,fun o -> IfNLt(o))
| IfNE(UnSolvedReference offset) -> result(offset,fun o -> IfNE(o))
| IfStrictEq(UnSolvedReference offset) -> result(offset,fun o -> IfStrictEq(o))
| IfStrictNEq(UnSolvedReference offset) -> result(offset,fun o -> IfStrictNEq(o))
| IfTrue(UnSolvedReference offset) -> result(offset,fun o -> IfTrue(o))
| Jump(UnSolvedReference offset) -> result(offset,fun o -> Jump(o))
| _ -> None


This active pattern is used for a couple of things. First, it matches every branch instruction and provides a function to rebuild the instruction with a new destination. Also it calculates the absolute offset of the branch instruction.

Now we can use it in the process of solving the references:


member this.UpdateCodeWithDestinations(destinations:Map<int64,string>,
instructions,
resultingInstructions) =
let processedInstructions =
match instructions with
| (((offset,_) & UnsolvedSingleBranchInstruction( jumpOffset,f))::rest)
when (destinations.ContainsKey(jumpOffset)) ->
(offset,f(SolvedReference(destinations.[jumpOffset])))::rest
| _ -> instructions
in
match processedInstructions with
| ((offset,instruction)::rest) when (destinations.ContainsKey(int64(offset))) ->
this.UpdateCodeWithDestinations(destinations,
rest,
instruction::ArtificalCodeBranchLabel(destinations.[int64(offset)])::resultingInstructions)
| ((_,instruction)::rest) ->
this.UpdateCodeWithDestinations(destinations,
rest,
instruction::resultingInstructions)
| [] -> List.rev(resultingInstructions)


Although this problem could be expressed using other strategies (for example a separate class for each instruction and branch instructions inheriting from the same base class) the use of Active Patterns was very useful to write a simpler implementation of the UpdateCodeWithDestinations method.

Monday, October 20, 2008

Using F# computation expressions to read binary files

In this post I'm going to show a little experiment of using F# computation expression syntax to build a binary file reader.

Computation expressions


F# Computation expressions provides a way to override the interpretation of a subset of language constructs(for example let,for,while) in a given context. This feature provides similar functionality to Haskell's do-notation or LINQ's query syntax.

Two excellent resources to learn about this feature are: Don Syme's "Some Details on F# Computation Expressions" and Robert Pickering's "Beyond Foundations of F# - Workflows".

As described by Don Syme, this feature is related to Monads:


... Likewise the kinds of operations used under the hood are much like the operations used in both LINQ and Haskell monads. Indeed, computation expressions can be seen as a general monadic syntax for F#.


There's a lot of nice documentation available on the net about this topic.

Monads and Parsers


While learning this feature I decided to create a little example based on the monadic parser combinators technique. The "Monadic Parsing in Haskell" paper by Graham Hutton and Erik Meijer provides a nice introduction to this topic.

There are some blog posts that talk about parser combinators in F#, for example the Inside F# blog has a nice post called Monadic parser combinators... in F#. Also Harry Pierson wrote a nice post called Monadic Philosophy Part 4 - The Parser Monad in F# treating this topic. Finally there's an adaptation of the Parsec library to F# called FParsec.

This time I wanted to create something that helps reading the content of a binary file.


Binary parser


The binary parser definition:


type ParseResult<'a> =
| Success of 'a * BinaryReader
| Failure of int64 * string

type BinParser<'a> =
| BinParser of (BinaryReader -> ParseResult<'a>)
with
member this.Function =
match this with
BinParser pFunc -> pFunc

end


Notice that I'm using a BinaryReader as the input instead of a byte list or array. By doing this I'm sacrificing flexibility (for example when creating a choice) for some useful methods included in BinaryReader.


The following code shows some basic binary parsers for bytes,int16 and int32 values.


let IOExceptionHandlingWrapper(f:BinaryReader -> ParseResult<'a>) =
fun i -> try
f(i)
with
(e & :? IOException ) -> Failure(i.BaseStream.Position,e.Message)


let RByte =
BinParser(IOExceptionHandlingWrapper(
fun (i:BinaryReader) -> Success(i.ReadByte(),i)))

let RShort =
BinParser(IOExceptionHandlingWrapper(
fun (i:BinaryReader) -> Success(i.ReadInt16(),i)))

let RInt =
BinParser(IOExceptionHandlingWrapper(
fun (i:BinaryReader) -> Success(i.ReadInt32(),i)))


Notice that the IOExceptionHandlingWrapper handles the case of a IOException and makes the parser fail.

An additional parser for reading an expected byte is the following:


let AByte(b:byte) =
BinParser(IOExceptionHandlingWrapper(
fun (i:BinaryReader) ->
let rB = i.ReadByte() in
if (rB = b) then
Success(byte(rB),i)
else
Failure(i.BaseStream.Position,
System.String.Format("Expecting {0}, got {1}",b,rB))))


Another useful parser let's you read a fixed sequence of elements recognized by another parser.


let ParsingStep (func:'a -> BinParser<'b>) (accumulatedResult:ParseResult<'b list>) currentSeqItem =
match accumulatedResult with
| Success(result,inp) ->
match ((func currentSeqItem).Function inp) with
| Success(result2,inp2) -> Success(result2::result,inp2)
| Failure(offset,description) -> Failure(offset,description)
| Failure(offset,description) -> Failure(offset,description)


let FixedSequence (s:seq<'b>,parser:BinParser<'a>) =
BinParser(fun i ->
match (Seq.fold (ParsingStep (fun _ -> parser)) (Success([],i)) s) with
| Success(result,input) -> Success(List.rev(result),input)
| Failure(offset,description) -> Failure(offset,description))


A fixed sequence of elements is recognized. The number of elements is given by the seq instance.

Finally the definitions required to use the computation expression are the following:


type BinParserBuilder() =
member this.Bind(p:BinParser<'a>,rest:'a -> BinParser<'b>) : BinParser<'b> =
BinParser(fun i -> match p.Function(i) with
| Success(r:'a,i2) -> ((rest r).Function i2)
| Failure(offset,description) -> Failure(offset,description)
)

member this.Return(x) = BinParser(fun i -> Success(x,i))


Notice that we're only defining the behavior for the let! and return elements.

Sample use


The following code shows a parser for uncompressed BMP file using the computational expression syntax.


let theBmpBinParser = pBuilder {
let! _ = AByte(byte(0x42))
let! _ = AByte(byte(0x4D))
let! size = RInt
let! reserved1 = RShort
let! reserved2 = RShort
let! dataOffset = RInt
let! headerSize = RInt
let! width = RInt
let! height = RInt
let! colorPlanes = RShort
let! bpp = RShort
let! compression = RInt
let! imageSize = RInt
let! hResolution = RInt
let! vResolution = RInt
let! paletteColors = RInt
let! importantColors = RInt
let numberOfColorsInPalette =
if int(bpp) < 16 && paletteColors = 0
then (pown 2 (int(bpp)))
else paletteColors
let! palette = FixedSequence({1..numberOfColorsInPalette },RInt)
let! content = FixedSequence({1..height},
FixedSequence({1..adjust_to_32_boundary(width,bpp)},RByte))
return (headerSize,bpp,width,height,compression,paletteColors,content)
}


The following example shows how to use this binary parser to print the contents of a monochrome BMP file:


let PrintMonoBmpData(data: byte list) =
Seq.iter(fun (x:byte) ->
Seq.iter (fun w -> match int(x &&& byte(128 >>> w)) with
| 0 -> (System.Console.Write(0))
| _ -> System.Console.Write(1)) { 0..7}
) data


let prsed = (theBmpBinParser.Function br)

match prsed with
| Success((_,bpp,_,_,_,pc,ctnt),_) when bpp = int16(1) ->
Seq.iter(fun r ->PrintMonoBmpData(r)
System.Console.WriteLine()) ctnt
| Failure(x,y) -> System.Console.WriteLine("Error: {0},in {1}",y,x)
| _ -> System.Console.WriteLine("Done");


Running this program with a monochrome BMP with a single square shows:


11111111111111111111111111111111
11111111111111111111111111111111
11111111111111111111111111111111
11111111111111111111111111111111
11111111111111111111111111111111
11111111111111111111111111111111
11111111111111111111111111111111
11111111111111111111111111111111
11111111111111111111111111111111
11111111111111111111111111111111
11111110000000000000000001111111
11111110111111111111111101111111
11111110111111111111111101111111
11111110111111111111111101111111
11111110111111111111111101111111
11111110111111111111111101111111
11111110111111111111111101111111
11111110111111111111111101111111
11111110111111111111111101111111
11111110111111111111111101111111
11111110111111111111111101111111
11111110111111111111111101111111
11111110111111111111111101111111
11111110111111111111111101111111
11111110111111111111111101111111
11111110000000000000000001111111
11111111111111111111111111111111
11111111111111111111111111111111
11111111111111111111111111111111
11111111111111111111111111111111
11111111111111111111111111111111
11111111111111111111111111111111


Code for this post can be found here.

Tuesday, October 7, 2008

A quick look at Flex

This post presents a little Flex program exercises features such as graphics, language interaction and style separation.

This is the third of series of posts that explore features across different platforms such as JavaFX Script or Silverlight with IronRuby.

Code is this post was created using Flex SDK 3.1.

The example


As described in the first post the example is a:

A little program that calculates and plots a polynomial that touches four points selected by the user. The user can move any of the given points in the screen and the polynomial will be recalculated and replotted while moving it.


The Neville's algorithm is used in order to find the polynomial that touches all the given points.

Developing Flex programs


Working with Flex was a nice experience. Adobe provides a lot of documentation along with lots blogs and articles from developers using it.

As with JavaFX Script and Silverlight Dynamic Languages SDK the Flex SDK provides command line tools to develop programs. Only a text editor is required to start programming! . For creating this example I used Emacs with an actionscript-mode and for MXML the nxml-mode.


The program


The final program looks like this:

Neville Flex program

A running version of this program can be found here.

In the following sections some parts of the program will be presented.

Utility classes


The following utility function was very handy when creating new arrays.


public class Utils
{
public static function createArray(numberOfElements:int,aFunction:Function):Array
{
var result:Array = new Array(numberOfElements);
for(var i:int = 0;i < numberOfElements;i++)
{
result[i] = aFunction(i);
}
return result;
}
}


It creates an array of numberOfElements elements and initializes each entry with the result of calling a function for each index.

The Polynomial class


This class provides basic functionality for manipulating polynomials.


public class Polynomial
{
private var coefficients:Array;
public function get coefficientValues():Array
{
return coefficients;
}

public function Polynomial(coefficients:Array)
{
this.coefficients = coefficients;
}

public function evaluate(x:Number):Number
{
var result:Number = 0.0;
for ( var i:int = 0; i < coefficients.length; i++ )
{
result += coefficients[i]*Math.pow(x,i);
}
return result;
}

public function multiplyByTerm(coefficient:Number,exponent:int):Polynomial
{
var originalExponent:int = coefficients.length;
if (coefficient == 0.0)
return new Polynomial(new Array(0));
else
return new Polynomial(
Utils.createArray(originalExponent+exponent ,
function(i:int):Number {
return (i < exponent) ? 0 : coefficients[i-exponent]*coefficient;
}));
}

public function multiply(p:Polynomial):Polynomial
{
var parts:Array = Utils.createArray(coefficients.length,
function(i:int):Polynomial {
return p.multiplyByTerm(coefficients[i],i);
});
var result:Polynomial = new Polynomial(new Array());
for each (var aPart:Polynomial in parts)
{
result = result.add(aPart);
}
return result;
}

public function add(p:Polynomial) : Polynomial
{
var length1:int= coefficients.length;
var length2:int = p.coefficients.length;
var resultArray:Array = null;

if (length1 == length2)
{
resultArray = Utils.createArray(length1,
function(i:int):Number {
return coefficients[i]+p.coefficients[i];
});

}
else
{
if (length1 > length2)
{
resultArray = Utils.createArray(length2,
function(i:int):Number {
return coefficients[i]+p.coefficients[i];
});
for(var i:int = length2;i <= length1 - 1;i++)
{
resultArray.push(coefficients[i]);
}
}
else
{
resultArray = Utils.createArray(length1,
function(i:int):Number {
return coefficients[i]+p.coefficients[i];
});
for(var j:int = length1;j <= length2 - 1;j++)
{
resultArray.push(p.coefficients[j]);
}
}
}

return new Polynomial(resultArray);
}
}


The Algorithm


The implementation of Neville's algorithm is the following:


public class NevilleCalculator
{
private var theConverter : PlaneToScreenConverter;

...

public function createPolynomial(screenPoints:Array):Polynomial
{
var numberOfPoints:int = screenPoints.length;
var matrix:Array = Utils.createArray(numberOfPoints,
function(i:int):Array {
return Utils.createArray(i+1,
function(i:int):Polynomial
{
return new Polynomial([]);
}
);
});

for(var pindex:int = 0;pindex < numberOfPoints;pindex++)
{
var coefficients:Array = [converter.convertToPlaneY(screenPoints[pindex].y)];
matrix[pindex][0] = new Polynomial(coefficients);
}

var xs:Array = Utils.createArray(numberOfPoints,function(i:int):Number { return converter.convertToPlaneX(screenPoints[i].x); } );
var ys:Array = Utils.createArray(numberOfPoints,function(i:int):Number { return converter.convertToPlaneY(screenPoints[i].y); } );
for(var i:int = 1; i < numberOfPoints;i++) {
for(var j:int = 1;j <= i;j++) {
var q:Number = xs[i] - xs[i-j];
var p1:Polynomial = new Polynomial([ -1.0*xs[i-j]/q, 1.0/q]);
var p2:Polynomial = new Polynomial([ xs[i]/q, -1.0/q ]);

matrix[i][j] = p1.multiply(matrix[i][j-1]).add(p2.multiply(matrix[i-1][j-1]));
}
}


return matrix[numberOfPoints-1][numberOfPoints-1];
}
}


Plane to screen conversion


As with the other examples, a class was used to convert between screen and Cartesian plane coordinates.


public class PlaneToScreenConverter
{

public var screenMaxX : Number;
public var screenMaxY : Number;
public var screenMinX : Number;
public var screenMinY : Number;
public var planeMinX : Number;
public var planeMinY : Number;
public var planeMaxX : Number;
public var planeMaxY : Number;

...

public function convertToScreenX(x:Number):int {
var m:Number = ((screenMaxX - screenMinX)/(planeMaxX - planeMinX));
var b:Number = screenMinX - planeMinX*m ;
return (m*x + b);
}
public function convertToScreenY(y:Number):int {
var m:Number = ((screenMaxY - screenMinY)/(planeMaxY - planeMinY));
var b:Number = screenMinY - planeMinY*m ;
return (m*y + b);
}
public function convertToPlaneX(x:int):Number{
var m:Number = ((planeMaxX - planeMinX)/(screenMaxX - screenMinX));
var b:Number = planeMinX- screenMinX*m ;
return (m*x + b);
}
public function convertToPlaneY(y:int):Number {
var m:Number = ((planeMaxY - planeMinY)/(screenMaxY - screenMinY));
var b:Number = planeMinY - screenMinY *m ;
return (m*y + b);
}
}


Plotting the polynomial


In order to plot the polynomial two classes were created. One that used to create all the points to be plotted(FunctionPlotter) and the other to represent the graphic elements in the screen(PlottedFunction).

The FunctionPlotter class looks like this:


public class FunctionPlotter
{
private var converter : PlaneToScreenConverter;
private var steps:int = 250;
private var initialX:Number = -1.0;
private var finalX:Number = 1.0;
private var poly:Polynomial;

public function FunctionPlotter(aConverter : PlaneToScreenConverter,poly:Polynomial)
{
converter = aConverter;
this.poly = poly;
}

public function createPolyPoints():Array
{
var m:Number = (finalX - initialX)/(steps - 0);
var b:Number = finalX - m*steps;
var increment:Number = Math.abs(converter.planeMaxX - converter.planeMinX) / steps;
var currentX:Number = Math.min(converter.planeMaxX, converter.planeMinX);

var result:Array = new Array(steps);
for (var i:int = 0; i < steps;i++)
{
var currentY:Number = poly.evaluate(currentX);
result[i] = new Point(converter.convertToScreenX(currentX)*1.0,
converter.convertToScreenY(currentY)*1.0);
currentX = currentX + increment;
}
return result;


}
}


The PlottedFunction class looks like this:


public class PlottedFunction extends UIComponent
{
private var points:Array;

public function PlottedFunction()
{
this.points = new Array();
}

public function get pointsToPlot():Array
{
return points;
}
public function set pointsToPlot(newPoints:Array):void
{
points = newPoints;
invalidateDisplayList();
}

protected override function updateDisplayList(w:Number,h:Number):void
{
graphics.clear();

graphics.lineStyle(1, 1, 1);
if (points.length > 0)
{
graphics.moveTo(points[0].x,points[0].y);
}

for (var i:int = 1; i < points.length;i++) {
graphics.lineTo(points[i].x,points[i].y);
}
}
}


Dragging elements


In order to allow the user to modify the control points a ControlPoint class was created.


[Style(name="pointColor",type="uint",format="Color",inherit="no")]
[Event(name="change", type="flash.events.Event")]
public class ControlPoint extends UIComponent
{

private var theSize:Number = 10;
private var theColor:int = 0x000000;
private var pointLabel:Label;
private var pconverter:PlaneToScreenConverter;
private var numberFormatter:NumberFormatter;

public function ControlPoint()
{
addEventListener(MouseEvent.MOUSE_DOWN,onMouseDown);
addEventListener(MouseEvent.MOUSE_UP,onMouseUp);
pointLabel = new Label();
setPointText();
}

public function get converter() : PlaneToScreenConverter
{
return pconverter;
}

public function set converter(theConverter:PlaneToScreenConverter) : void
{
pconverter = theConverter;
setPointText();
}

public function get formatter() : NumberFormatter
{
return numberFormatter;
}
public function set formatter(numberFormatter:NumberFormatter):void
{
this.numberFormatter = numberFormatter;
setPointText();
}

private function onMouseDown(e:MouseEvent):void
{
startDrag();
addEventListener(MouseEvent.MOUSE_MOVE,onMouseMovingWhileDragging);
}
private function onMouseUp(e:MouseEvent):void
{
removeEventListener(MouseEvent.MOUSE_MOVE,onMouseMovingWhileDragging);
stopDrag();
setPointText();
}

private function onMouseMovingWhileDragging(e:MouseEvent):void
{
dispatchEvent(new Event(Event.CHANGE));
setPointText();
}

public function get size() : Number
{
return theSize;
}

public function set size(value:Number):void
{
theSize = value;
}

override protected function createChildren():void {
super.createChildren();
addChild(pointLabel);

setPointText();

}

private function setPointText() : void
{
this.pointLabel.move(0,0);
if (converter != null && numberFormatter != null) {
var xText:String = numberFormatter.format(converter.convertToPlaneX(x));
var yText:String = numberFormatter.format(converter.convertToPlaneY(y));
pointLabel.text = "("+xText+","+yText+")";
}
}


protected override function updateDisplayList(w:Number,h:Number):void
{
super.updateDisplayList(w,h);
this.pointLabel.move(0,0);
var metrics:TextLineMetrics = pointLabel.getLineMetrics(0);
pointLabel.setActualSize(metrics.width+5,metrics.height+3);
graphics.beginFill(getStyle("pointColor"));
graphics.drawCircle(0,0,size);
graphics.endFill();
}
}


The Capturing mouse input section of the documentation shows a nice way to allow drag and drop operations on a given object. The only thing that is required is to call the startDrag method when the mouse button is pressed and call stopDrag when it is released.

A handler to the MOUSE_MOVE event is added so the coordinates are updated while moving while also raising a CHANGE event which will be useful when trying to update line graph.

One important lesson learned while creating this custom control is that, when having nested controls, the setActualSize method must be call in the updateDisplayList method. If not, the nested control will not be presented.

Presenting the polynomial's formula


As with the Silverlight example, I wasn't able to present superscript characters in in one label control. The Flex label control supports HTML for formatting, however the <sub> and <sup> tag aren't supported.

The solution was to create an horizontal box that holds a sequence of labels with vertical alignment set to top.


public function createFormulaTextComponents(p:Polynomial,b:Box):void
{
var firstTime:Boolean = true;
b.removeAllChildren();

for(var i:int = 0;i < p.coefficientValues.length;i++)
{
var result:String = "";
var theIndex:Number = p.coefficientValues.length - 1 - i;
if (Math.abs(p.coefficientValues[i]) > 0.001)
{
if (!firstTime)
{
result = result + " + ";
}
if(theIndex != 0)
{
result = result + formatter.format(p.coefficientValues[theIndex]) + "x";
var l:Label = new Label();
l.text = result;
l.styleName = "formula";
b.addChild(l);
if(theIndex != 1)
{
var le:Label = new Label();
le.htmlText = theIndex.toString();
le.styleName = "formulaExponent";
b.addChild(le);
}
}
else
{
result = result + formatter.format(p.coefficientValues[theIndex]);
var cl:Label = new Label();
cl.styleName = "formula";
cl.text = result;
b.addChild(cl);
}
firstTime = false;
}
}


Styling custom controls


Flex supports CSS styling for controls. Some considerations must be taken when creating properties in custom controls that will be configured using this mechanism.

The Creating Style Properties article gives a complete explanation on how to create this kind of properties.

Mainly what it requires it's to add an Style annotation to the control's type annotation. For example in the ControlPoint class
the color of the point can be configured using the pointColor style property.


[Style(name="pointColor",type="uint",format="Color",inherit="no")]
[Event(name="change", type="flash.events.Event")]
public class ControlPoint extends UIComponent
{
....
}


Changing this property using a mx:Style block looks like this:


<mx:Style>
.pointStyle {
pointColor: #0000F5;
}
</mx:Style>

The main program


The main MXML file is presented below. It shows the basic scene with a vertical box that has an horizontal box for the formula's text and a canvas for the function's graph.

The init is responsible for synchronizing the function's graph with the given control points.


<mx:Application xmlns:langexplr="langexplr.*"
xmlns:mx="http://www.adobe.com/2006/mxml"
initialize="init();"
backgroundColor="0xFFFFFF"
paddingLeft="0" paddingRight="0" paddingTop="0" paddingBottom="0">
<mx:Style>
.alines {
gridLineColor: #00FFFF;
axisLineWidth: 3;
}
.pointStyle {
pointColor: #0000F5;
}
.formula {
paddingLeft: 0;
paddingRight: 0;
textIndent: 0;
fontSize:12;
}
.formulaExponent {
paddingLeft: 0;
paddingRight: 0;
textIndent: 0;
fontSize: 10;
}
</mx:Style>

<mx:Script>
<![CDATA[
import langexplr.*;
import mx.controls.Label;

private var p:Polynomial = null;

private var plotter:FunctionPlotter;

private function init():void
{
var somePoints:Array = [new Point(p1.x,p1.y),
new Point(p2.x,p2.y),
new Point(p3.x,p3.y),
new Point(p4.x,p4.y)];

var poly:Polynomial = nevilleCalculator.createPolynomial(somePoints);
plotter = new FunctionPlotter(converter,poly);
var pointsToPlot:Array = plotter.createPolyPoints();
plotted.pointsToPlot = pointsToPlot;
createFormulaTextComponents(poly,formulaBox);
}

...
}
]]>
</mx:Script>
<mx:NumberFormatter id="formatter" precision="3"/>
<langexplr:PlaneToScreenConverter id="converter"
screenMaxX="400" screenMaxY="0"
screenMinX="0" screenMinY="400"
planeMinX="-20" planeMinY="-20"
planeMaxX="20" planeMaxY="20"/>
<langexplr:NevilleCalculator id="nevilleCalculator" converter="{converter}" />
<mx:Box direction="vertical" width="100%" height="100%">
<mx:Box id="formulaBox" direction="horizontal" verticalAlign="top" horizontalGap="-4" verticalGap="0" paddingLeft="0" paddingRight="0">
</mx:Box>
<mx:Canvas id="c" width="400" height="400" clipContent="true" backgroundColor="0xFFFFFF">
<langexplr:AxisLines converter="{converter}" numberOfSteps="14" styleName="alines"/>
<langexplr:ControlPoint id="p1" x="30" y="120" change="init();" converter="{converter}" formatter="{formatter}" styleName="pointStyle" />
<langexplr:ControlPoint id="p2" x="80" y="100" change="init();" converter="{converter}" formatter="{formatter}" styleName="pointStyle"/>
<langexplr:ControlPoint id="p3" x="190" y="30" change="init();" converter="{converter}" formatter="{formatter}" styleName="pointStyle"/>
<langexplr:ControlPoint id="p4" x="250" y="185" change="init();" converter="{converter}" formatter="{formatter}" styleName="pointStyle"/>
<langexplr:PlottedFunction id="plotted" x="0" y="0" />

</mx:Canvas>
</mx:Box>
</mx:Application>


Deploying the application


Compiling and the application and making it available in a web page is pretty straightforward.

By calling the compiler using the following command:

mxmlc Neville.mxml

A Neville.swf file is created. This file could be embedded like any other Flash program.

Final words


The experience of developing this little example using Flex was great. The documentation provided by Adobe was very useful.

As with JavaFX script and Silverlight Dynamic Languages SDK it was very nice to be able to create this example using only command line tools and a text editor.

It was interesting to learn a little bit about ActionScript 3. The language has some interesting things. I hope I could learn more about it in the future.

One feature that may be nice to have in AS3 is type inference for local variables. It could be useful to avoid scenarios such as typing var v:MyClass = new MyClass();
to avoid the "variable 'v' has no type declaration" warning.

Then creation of basic graphic shapes such as circles or lines was a little more difficult compared to JavaFX or Silverlight, since it cannot be specified directly in the MXML. That is something that seems to be different in
Flex 4 with FXG.

Code for this post can be found here.

A running version of this program can be found here.

Wednesday, October 1, 2008

Creating Flex unit tests with FlexUnit

While working on a little Flex example for an upcoming post, I needed a way to validate the parts of the code before finishing the complete example. By doing a search for unit testing frameworks for Flex I found FlexUnit.

In this post I'll show my experiences on writing my first unit tests for Flex code using FlexUnit.

There's already several excellent articles explaining how to start with FlexUnit. For example "Unit Testing with FlexUnit" and "How to use FlexUnit in Flex" provide a very nice introduction.

Creating a test cases


As in testing frameworks for other languages, test cases are defined as classes that inherit from a TestCase class. Individual tests are represented by methods.

The following example shows a method that tests a Polynomial class.


package tests
{
import flexunit.framework.TestCase;
import flexunit.framework.TestSuite;
import langexplr.Polynomial;

public class PolynomialTests extends TestCase
{
/***** Utility methods ********/
public static function suite():TestSuite
{
var theSuite:TestSuite = new TestSuite();
theSuite.addTestSuite( PolynomialTests );
return theSuite;
}

/***** Tests ********/
public function testAdditionDiffExponents():void
{
var p2:Polynomial = new Polynomial([4,3,9]);
var p1:Polynomial = new Polynomial([3.0]);


var p3:Polynomial = p1.add(p2);

assertEquals("Exponent",3,p3.coefficientValues.length);
assertEquals("x^0",7.0,p3.coefficientValues[0]);
assertEquals("x^1",3.0,p3.coefficientValues[1] );
assertEquals("x^2",9.0,p3.coefficientValues[2] );
}
...
}


The suite method is just an utility method that creates a TestSuite for all the tests in current test case. By calling theSuite.addTestSuite( PolynomialTests ); all the methods in the PolynomialTests class containing the word "test" will be included in the test suite.

The testAdditionDiffExponents method shows a simple test for the add method of the Polynomial class. As with other unit test frameworks, assertions are made inside the test method to verify the behavior of the code.

Creating a test runner


The test runner provides a nice UI for displaying test results. The following code shows the creation of the runner.


<mx:Application xmlns:mx="http://www.adobe.com/2006/mxml" xmlns="*"
xmlns:flexunit="flexunit.flexui.*"
creationComplete="onCreationComplete()">

<mx:Script>
<![CDATA[
import flexunit.framework.TestSuite;
import tests.PolynomialTests;
import tests.ConverterTests;
import tests.NevilleCalculatorTests;

private function onCreationComplete():void
{
testRunner.test = createSuite();
testRunner.startTest();
}

private function createSuite():TestSuite {
var ts:TestSuite = new TestSuite();

ts.addTest( PolynomialTests.suite() );
ts.addTest( ConverterTests.suite() );
ts.addTest( NevilleCalculatorTests.suite() );

return ts;
}

]]>
</mx:Script>

<flexunit:TestRunnerBase id="testRunner" width="100%" height="100%" />
</mx:Application>


The createSuite method creates all the test suites that will be executed.

Running a tests


By loading a page that references the generated SWF file we can execute the tests and browse the results.

The following screenshot shows a successful execution of the tests:

Successful FlexUnit tests execution

If a test fails message of the failed assertion is presented.

Failed FlexUnit execution

Creating a new kind of assertion


An assertion that compares two floating point numbers given a minimum difference is very useful while creating tests for the Polynomial operations. The following class was created to be the base class for test cases that require this kind of assertions.


package tests
{
import flexunit.framework.TestCase;
import flexunit.framework.TestSuite;
import flexunit.framework.AssertionFailedError;

public class NumericTestCase extends TestCase
{
public static function assertNumberEquals(message:String,num1:Number,num2:Number,d:Number=0.00001):void
{
oneAssertionHasBeenMade();
if (Math.abs(num1 - num2) > d) {
throw new AssertionFailedError(message+" "+ "expected:<" + num1 + "> but was:<" + num2 + ">");
}
}
}
}


An example of a use of this assertion is the following:

assertNumberEquals("First evaluation",c.convertToPlaneY(40.0),p.evaluate(c.convertToPlaneX(30.0)));


By using the default value of the d we're not required to always specify the tolerance value.

Thursday, August 21, 2008

Using Emacs and nXML to edit XAML files

In this post I'll show how to use Emacs and nXML to edit XAML files.

The powerful nXML mode allows the use a RELAX NG schema to validate and to assist the edition of XML documents.

The RELAX NG schema generated in the previous post is used to provide XAML code completion.

As described in the previous post, not all elements of XAML could be mapped to RELAX NG, so validation errors will be displayed on valid documents.

Once you have Emacs and nXML installed the following line could be added to the .emacs file to activate nXML when a XAML file is opened.


(setq auto-mode-alist (cons '("\.xaml$" . nxml-mode) auto-mode-alist))


Also the mode could be activated by typing M-x nxml-mode.

Once a file is opened with the nXML mode, the schema must be specified for that file. The XML -> Set Schema -> File... option is used to specify the silverlight.rnc file created for the previous post.

Setting the XAML schema

Once the schema is load we can start modifying the file. For example the following screenshot shows the result of pressing Control+Enter (C-Return) inside a DoubleAnimation tag.

Presenting available attributes

All the available attributes are presented as possible options.

In several scenarios the schema presents only the valid options for a given context. For example the following screenshot shows the result of pressing Control+Enter after an opening angle bracket inside a StackPanel tag:

Emacs displaying possible options for a StackPanel child

Properties elements are also available, for example the following screenshot shows, available options by pressing Control+Enter after the "<Line." text:

Property Element completion


Code for this post can be found here.

Wednesday, August 20, 2008

Creating a RELAX NG schema from classes using XAML rules with IronRuby

In this post I'm going to show a little IronRuby program that generates a RELAX NG Schema Definition for XAML documents using some of the rules to map XML to classes.

This program is was created by modifiying the code of the
previous post to also generate RELAX NG Compact Syntax.

My goal with this post is to use the generated schema with a tool that supports RELAX NG to assist the creation of XAML document.

As with the previous post mentions, not all XAML rules can be expressed in XSD or in this case in RELAX NG. However I hope that the generated schema at least provides some help for editing XAML files.

Changes to RootClassNode and ClassNode classes

The RootClassNode and ClassNode contains information for classes that need an schema definition.

Here's the method to create the definition for one element:


def write_schema_definition_rlx(file)
ctype_name = @the_type.Name.to_s+"Atts"
file.print("#{ctype_name} = ")

write_properties_definition_rlx(file)

file.puts("")

if (!is_abstract)
file.print("#{@the_type.Name} = element #{@the_type.Name} { #{ctype_name} ,")
write_inner_elements_definition_rlx(file) unless is_abstract
file.puts("}")
end


@children.values.each {|c| c.write_schema_definition_rlx(file)}
end


What this code dos is to create a grammar definition for the attributes of the current class. This definition will be used in the definition of the current element (if not abstract) and in the definition of the descendants of the current element.

The write_properties_definition_rlx method writes the definition of the attributes using the defined properties.


def write_properties_definition_rlx(file)
atts = get_type_properties

file.print "("
file.print atts.map {|p| "attribute #{p.Name} { text } ?"}.join(" , ")
file.print ")*"
end


The write_inner_elements_definition_rlx method adds the definition of the content property if it exists. The add_group_base_type creates a group with all the descendants of the of the type of the content property.


def write_inner_elements_definition_rlx(file)
write_element_properties_definition_rlx(file)
if is_container
file.puts(",")
property_type = get_content_property_type
element_type = get_collection_element_type

if (element_type != nil)

group = @registry.add_group_base_type(element_type.FullName)
file.puts "(#{group} *)"
elsif (@registry.descends_from_base_type(property_type))

group = @registry.add_group_base_type(property_type.FullName)
file.puts(group)
else

file.puts(" text ")
end

end
end


The write_schema_definition_rlx creates the definition of a ClassNode which represents a class that inherits from another class.


def write_schema_definition_rlx(file)
if @the_type.contains_generic_parameters
ctype_name = @the_type.Name.to_s.gsub(/`/,'')+"Atts"
else
ctype_name = @the_type.Name.to_s + "Atts"
end

file.print("#{ctype_name} = #{@the_type.BaseType.Name}Atts")
if get_type_properties.length > 0
file.print(" , ")
write_properties_definition_rlx(file)
end

file.puts("")

if (!is_abstract)
file.puts(" #{@the_type.Name} = element #{@the_type.Name} {")
file.print("#{ctype_name},")
write_inner_elements_definition_rlx(file)
file.puts("}")

end

@children.values.each {|c| c.write_schema_definition_rlx(file)}
end


The generated schema

An example of the generated schema is the following:


TextBlockAtts = FrameworkElementAtts | (attribute FontSize { text } ? , attribute FontFamily { text } ? , attribute FontWeight { text } ? , attribute FontStyle { text } ? , attribute TextAlignment { text } ? , attribute Text { text } ?
... )*
TextBlock = element TextBlock {
TextBlockAtts,(element TextBlock.FontSize {AnyGenElement} | element TextBlock.FontFamily {AnyGenElement} | element TextBlock.FontWeight {AnyGenElement} | element TextBlock.FontStyle {AnyGenElement} | element TextBlock.TextAlignment {AnyGenElement} | element TextBlock.Text {AnyGenElement}
...)*,
(InlineElementGroup *)
}
...
InlineElementGroup = Run | LineBreak


Code for this post and the generated schema can be found here.

Monday, August 11, 2008

Creating an XSD schema from classes using XAML rules with IronRuby

This post presents a little unfinished experiment for creating an XSD Xml Schema definition from classes based on some of the rules to map XAML documents to objects. The program is written in IronRuby and it uses reflection to inspect classes and generate the schema definition.

The goal is to have an XML Schema that could be used in conjunction with an XML editor to create XAML documents (which is useful for those of us who don't have a full Visual Studio version). Although as the XAML Overview document says, there are elements that could not be completely mapped to an schema definition, some of them are mentioned below.

The Silverlight Visual Studio integration already includes a very nice XAML editing capabilities.

I think this experiment is a great way to learn more about IronRuby and how to use it to call .NET Libraries.

The strategy

What the program will do is to navigate all the classes inheriting from System.Windows.DependencyObject and generate and XML element and a complex type definition with all the properties included in the definition. For this experiment only two mappings are implemented: properties and content properties.

Properties

As the XAML Overview document describes two ways for specifying properties:


  1. By using XML attributes

  2. By using a class.property-name element


This means that:

This


<Button Background="Blue" >
...
</Button>


and


<Button>
<Button.Background>
<SolidColorBrush Color="Blue">
</Button.Background>
...
</Button>


are equivalent.

So the alternative is to create both the attribute and the property element definitions in the schema.

Content properties

For elements that contain the ContentPropertyAttribute a special child element will be created with a reference to a sequence of all identified concrete elements that in inherit from the property type. As discussed below, this definition is not complete for content properties that accept basic types such as a string.


The program

Some constant and variable definitions


require 'mscorlib'
require 'System.Xml, Version=2.0.0.0, Culture=neutral, PublicKeyToken=b77a5c561934e089, processorArchitecture=MSIL'
include System::Xml
include System::Reflection

SILVERLIGHT_FOLDER = "c:\\Program files\\Microsoft Silverlight\\2.0.30523.8\\"
BASE_TYPE_NAME = "System.Windows.DependencyObject"
CONTENT_PROPERTY_ATTRIBUTE = "System.Windows.Markup.ContentPropertyAttribute"

SILVERLIGHT_NAMESPACE = "http://schemas.microsoft.com/client/2007"
EXTRA_ATTRIBUTES_NAMESPACE = "http://schemas.microsoft.com/winfx/2006/xaml"
XSD_NAMESPACE = "http://www.w3.org/2001/XMLSchema"
CONCRETE_ELEMENTS_GROUP_NAME = "UIElementsGroup"

PRESENTATION_FRAMEWORK_COLLECTION_BASE_TYPE = "PresentationFrameworkCollection`1"


The main program

The main program looks like this:


begin

silveright_system_assembly = Assembly.reflection_only_load_from(SILVERLIGHT_FOLDER + "system.dll")
silveright_windows_assembly = Assembly.reflection_only_load_from(SILVERLIGHT_FOLDER + "System.Windows.dll")
silveright_core_assembly = Assembly.reflection_only_load_from(SILVERLIGHT_FOLDER + "System.Core.dll")
silveright_net_assembly = Assembly.reflection_only_load_from(SILVERLIGHT_FOLDER + "System.Net.dll")
silveright_xml_assembly = Assembly.reflection_only_load_from(SILVERLIGHT_FOLDER + "System.Xml.dll")


registry = Registry.new(silveright_windows_assembly)

registry.collect_data

registry.generate_xsd_schema
puts 'Done!'

rescue System::Reflection::ReflectionTypeLoadException => tl
puts tl
puts tl.LoaderExceptions
rescue System::IO::FileLoadException => e
puts e
puts "-----"
puts e.FusionLog
end


As presented here, the program first collects data about the classes stored in the System.Windows.dll Silverlight library and then generate the XSD schema definition.

The Registry class

The Registry class stores information on the identified classes and keeps track of element groups to be generated.

The collect_data method of the Registry class looks like this:


class Registry

def initialize(types_assembly)
@groups = {}
@types_assembly = types_assembly
@additional_types = {}
@classes = {}
end

...

def get_or_create(name,registry)
if @classes.has_key? name
return @classes[name]
else
return (@classes[name] = ClassNode.new(name,nil,registry))
end
end


...

def collect_data
base_type = @types_assembly.GetType(BASE_TYPE_NAME)
@classes[base_type.FullName] = RootClassNode.new(BASE_TYPE_NAME,base_type,self)

@types_assembly.get_types.each do |a_type|
if (base_type.is_assignable_from a_type and base_type.FullName != a_type.FullName )
node = get_or_create(a_type.full_name,self)
node.the_type = a_type
parent = get_or_create(a_type.BaseType.full_name,self)
parent.add_child(node)

puts "Adding #{a_type.FullName}"
end
end
end

end


As shown here the collect_data method iterates all the classes in the assembly, asking for elements that descend from System.Windows.DependencyObject. For each of these classes an instance of the ClassNode class is created.
If you are familiar with the .NET Reflection API you will recognize some of the names presented here such as is_assignable_from which is a call to the IsAssignableFrom method. As described here, IronRuby allows you to call existing .NET method names using Ruby naming convention .

Generating the Schema

The XSD schema is generated in the generate_xsd_schema Registry method which looks like this:


def generate_xsd_schema
base_type = @types_assembly.GetType(BASE_TYPE_NAME)
swriter = System::IO::StreamWriter.new("silveright.xsd")
writer_settings = XmlWriterSettings.new()
writer_settings.Indent = true
w = XmlWriter.Create(swriter,writer_settings)
w.write_start_document
w.write_start_element("schema",XSD_NAMESPACE)
w.write_attribute_string("targetNamespace",SILVERLIGHT_NAMESPACE)
w.write_attribute_string("elementFormDefault","qualified")
w.write_attribute_string("xmlns","sl",nil,SILVERLIGHT_NAMESPACE)
w.write_attribute_string("xmlns","x",nil,EXTRA_ATTRIBUTES_NAMESPACE)

w.write_start_element("import",XSD_NAMESPACE)
w.write_attribute_string("namespace",EXTRA_ATTRIBUTES_NAMESPACE)
w.write_attribute_string("schemaLocation","extraxamldefs.xsd")
w.write_end_element()

@classes[base_type.FullName].write_schema_definition(w)


create_additional_type_definitions(w)
create_concrete_elements_group(w)

w.write_end_element
w.write_end_document

w.Close
swriter.Close
end


As shown here a .NET XmlWriter class is used to generate the schema.

The write_schema_definition of the RootClassNode and ClassNode classes generates all the appropriate definitions for each class.


For the RootClassNode which represents classes that don't inherit from the DependencyObject the code looks like this:


class RootClassNode
attr_accessor :name,:the_type,:children

def initialize(name,the_type,registry)
@the_type = the_type
@name = name
@children = {}
@registry = registry
end

...

def write_schema_definition(writer)
ctype_name = @the_type.Name.to_s+"Type"
writer.write_start_element("complexType",XSD_NAMESPACE)
writer.write_attribute_string("name",ctype_name )

write_inner_elements_definition(writer) unless is_abstract

write_properties_definition(writer)
if (@the_type.FullName.to_s == BASE_TYPE_NAME)
writer.write_start_element("attributeGroup",XSD_NAMESPACE)
writer.write_attribute_string("ref","x:extraAttributes")
writer.write_end_element
end

writer.write_end_element

write_element_definition(writer,ctype_name) unless is_abstract

@children.values.each {|c| c.write_schema_definition(writer)}
end

end


A complex type is generated with the content of the current class. The write_inner_elements_definition method writes all the description of the child nodes for this complexType, for example it writes the property/element definitions and child node references. The write_properties_definition
method writes the attribute definitions for all the properties.

Also for all base types, a reference to an attribute group of "extraAttributes" is generated. This attribute group contains reference to definitions for some of the XAML attributes such as x:Name. More information about these attributes can be found in XAML Namespace (x:) Language Features.

Finally an element definition is created if the class is not abstract.

For classes inheriting from DependencyObject, a ClassNode instance is created.


class ClassNode < RootClassNode

def write_schema_definition(writer)

if @the_type.contains_generic_parameters
ctype_name = @the_type.Name.to_s.gsub(/`/,'')+"Type"
else
ctype_name = @the_type.Name.to_s + "Type"
end

writer.write_start_element("complexType",XSD_NAMESPACE)
writer.write_attribute_string("name",ctype_name )

writer.write_start_element("complexContent",XSD_NAMESPACE)
writer.write_start_element("extension",XSD_NAMESPACE)
writer.write_attribute_string("base","sl:#{@the_type.BaseType.Name}Type")
write_inner_elements_definition(writer) unless is_abstract
write_properties_definition(writer)
writer.write_end_element


write_element_definition(writer,ctype_name) unless is_abstract

@children.values.each {|c| c.write_schema_definition(writer)}
end
end


The main difference with BaseClassNode is that a complex type extension to the base type is generated. This will reduce the number of attribute definitions of each complex type.

Writing child node references

In order to allow sequences of heterogeneous elements as child nodes of XAML elements, a group definition is created with a choice that references every concrete type.

For example for elements that have a content property of type UIElement the following group is generated:


<group name="UIElementGroup">
<choice>
<element ref="sl:Path" />
<element ref="sl:Ellipse" />
<element ref="sl:Line" />
<element ref="sl:Polygon" />
<element ref="sl:Polyline" />
<element ref="sl:Rectangle" />
...
</choice>
</group>


Combining Enum values

The only way, that I could find, for combining .NET Enum values was to use a combination of Convert.ToInt32 and Enum.ToObject. The following function was used to do that.


def combine(enum_type,enum_values)
System::Enum.ToObject(
enum_type.to_clr_type,
((enum_values.map {|e_value|
System::Convert.ToInt32(e_value)}).inject {|i,j| (j | i)}))
end


A use of this function for combining BindingFlags looks like this:


p = @the_type.get_property(
c.to_string,
combine(BindingFlags,
[BindingFlags.Instance,
BindingFlags.Public,
BindingFlags.NonPublic]))

result_type = p.PropertyType


Elements not mapped

As mentioned at the beginning of the document, not all XAML document features can be accurately represented using XSD. Some of the things that I noticed:


  • Couldn't find a way to define attached properties. A possible workaround is to generate all possible attached property definitions

  • Content properties that allow strings are not represented. This is difficult since it has conflicts with the property/element definitions. Mixed content could be a possible workaround.

  • Extensibility: no easy way to represent things outside of System.Windows. This is a very difficult problem, maybe things like substitution groups could help to represent future child nodes.
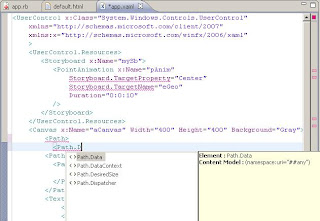


Using the generated schema

With the schema generated, an XML editor with XSD Schema aware completion can be used. For example here it is used in Eclipse with XML editor tools included in WTP.


I tried to use the schema with the Netbeans 6.1 IDE (which was used as the Ruby editor for this code) however for schema completion it requires you to specify the schemaLocation attribute. Using this attribute or declaring the xsi namespace generates an error when the XAML is loaded at runtime!.


Code and generated schema for this post can be found here.